Flourish-Everyday
Search Results
309 results found with an empty search
- The Ultimate Running Shoe Guide For Your Best Run
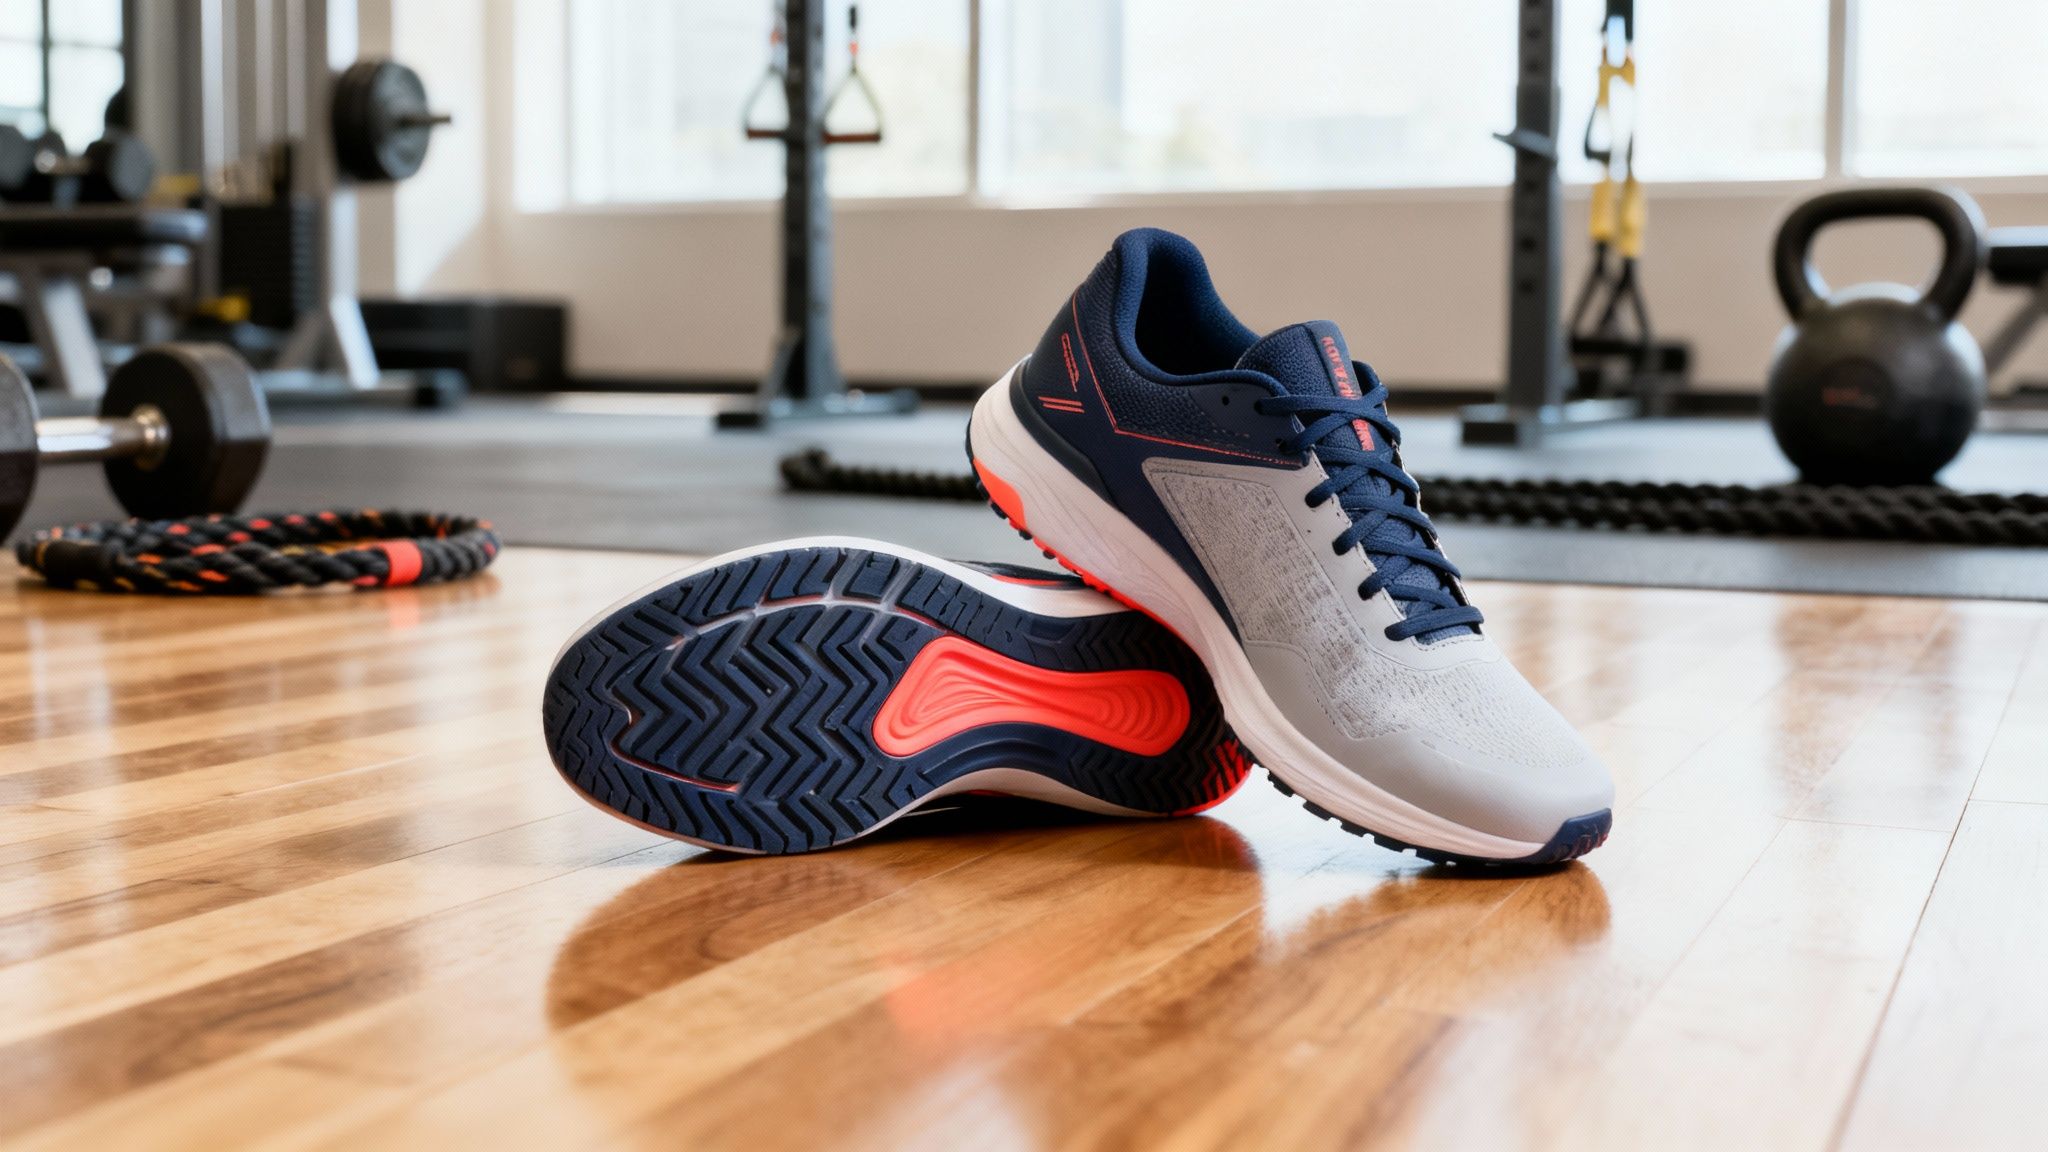
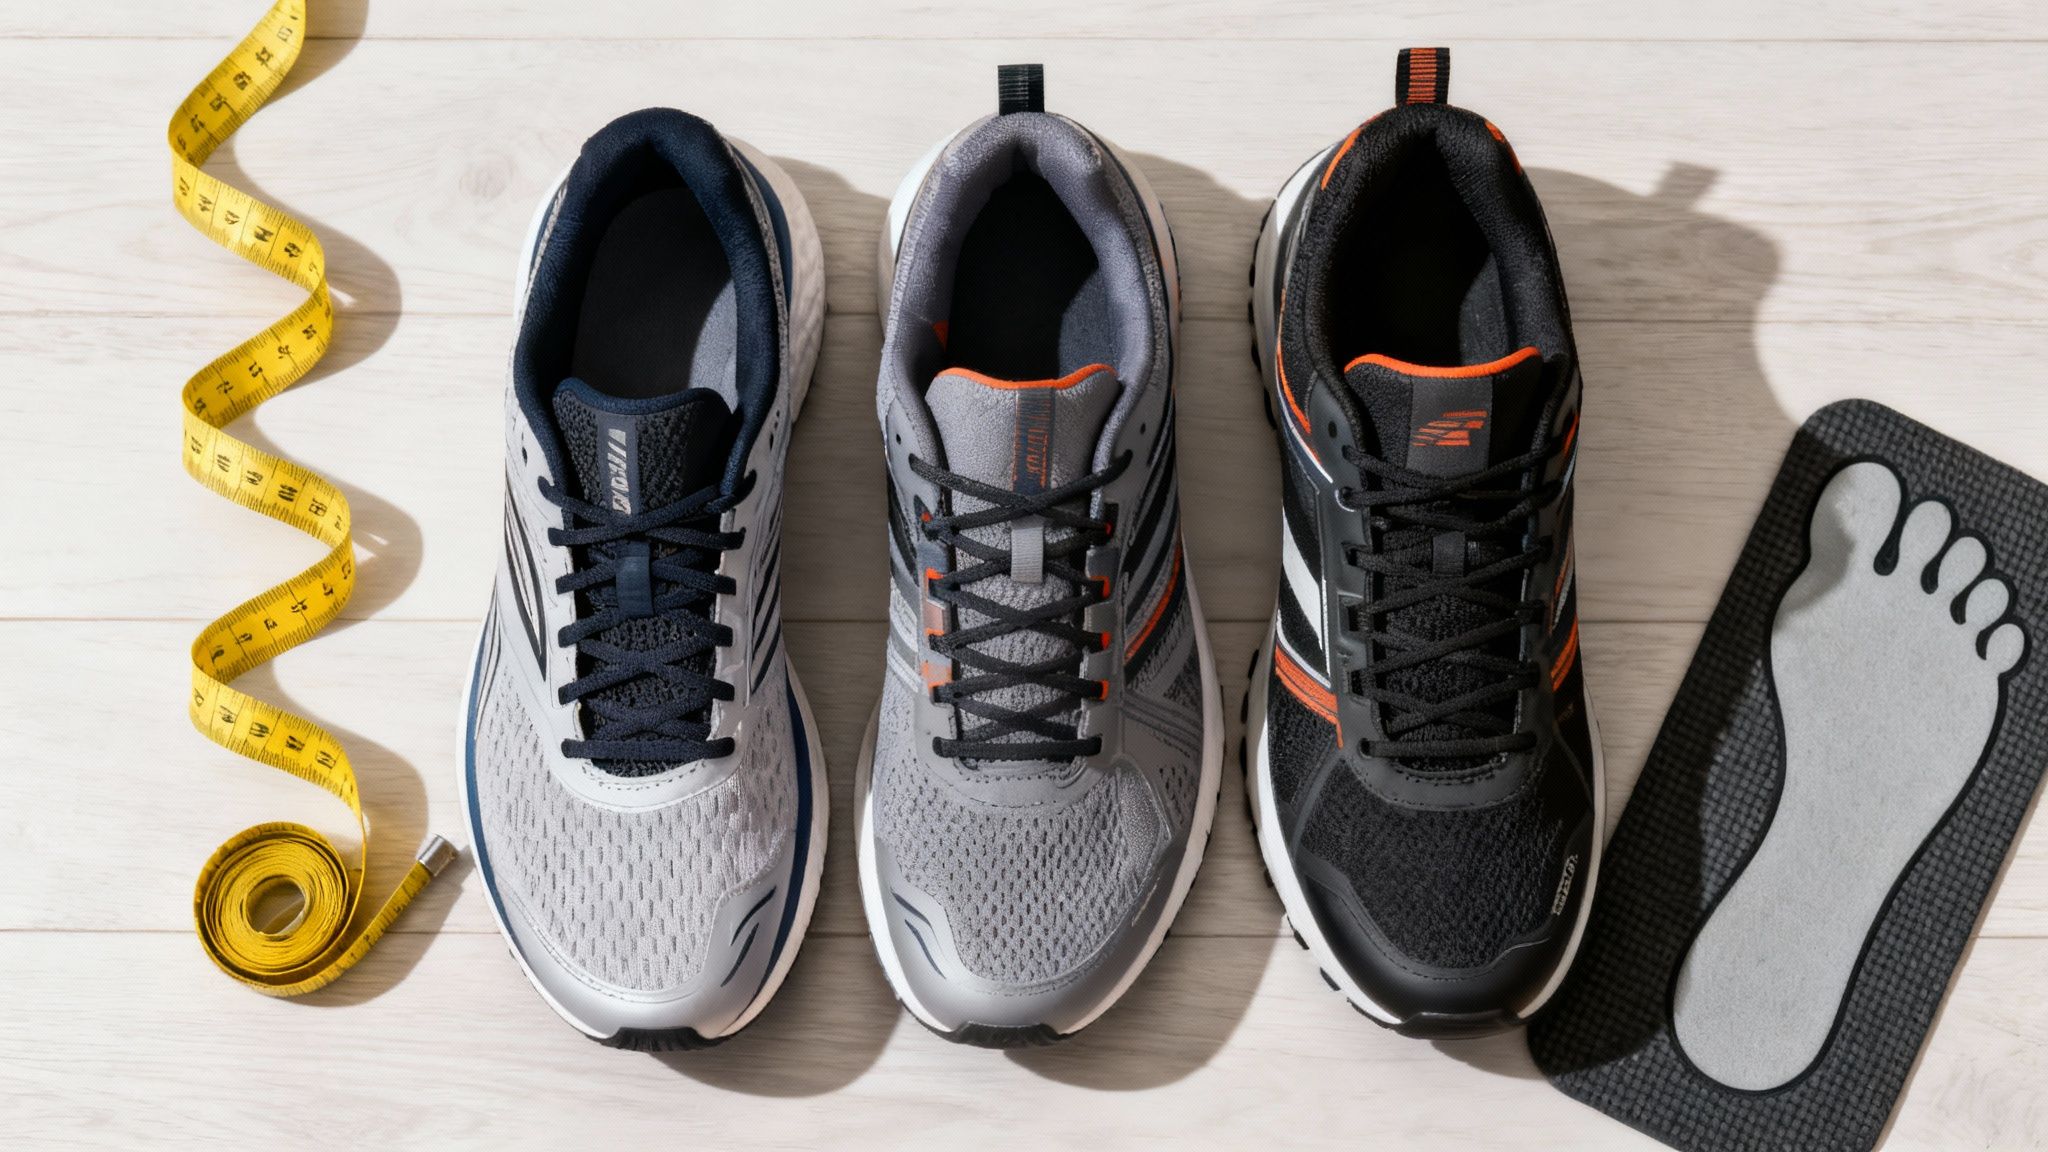
Workout enthusiasts know that choosing the right running shoe is the single most important gear decision a runner can make. It's the foundation for every stride, directly impacting comfort, performance, and injury prevention. With countless models and technologies on the market, finding the perfect pair can feel overwhelming. The Running Shoe Guide For Your Best Run simplifies the process, breaking down complex topics into practical, actionable advice. We will cover everything from understanding your personal foot mechanics to decoding shoe anatomy, ensuring you can make an informed choice that works with your body, not against it. Index of this Guide Your Foundation For Every Stride Understanding Your Foot Type and Gait Decoding The Anatomy Of A Running Shoe Matching Your Shoe To Your Workout Top Running Shoe Reviews Comparison of Well-Being Trends: Barefoot vs. Cushioned Running How To Find The Perfect Fit When To Replace Your Running Shoes Common Questions About Running Shoes References Your Foundation For Every Stride The perfect running shoe enhances your natural stride and provides a solid base for movement. Selecting the right shoe is a critical step in how to prevent running injuries and ensuring long term enjoyment of the sport. The goal is to find footwear that complements your biomechanics for maximum efficiency and comfort. Determining your primary terrain is the first and most crucial filter. The global running shoe market, valued at USD 48,419.3 million in 2025 and projected to reach USD 75,916.4 million by 2035, reflects the growing global emphasis on active lifestyles. This trend is supported by evidence that regular running can reduce the risk of chronic diseases by up to 30% (Pedisic, Shrestha, et al., 2019). Your shoes are arguably the most essential piece of gear you'll own. The right pair works with your body's natural mechanics, reducing stress on your joints and allowing you to run efficiently and pain free. Understanding Your Foot Type And Gait Before considering brands or styles, start with your own body. Understanding your foot's unique mechanics is key to finding a shoe that helps, not hinders. A simple at home diagnostic can provide valuable insight. The "wet test" is a reliable method for determining your arch type. Wet the bottom of your foot and step firmly onto a piece of cardboard. The imprint reveals how your foot is built to handle impact. Identifying Your Arch Type The shape of your footprint provides a snapshot of your foot's structure, which dictates your support needs. Flat Arch (Low Arch): A solid, complete footprint suggests your foot tends to roll inward excessively (overpronation). Neutral Arch (Medium Arch): A C-shaped curve along the inside indicates a biomechanically efficient arch. High Arch: The imprint shows only the heel and ball of the foot, suggesting the foot is rigid and may not absorb shock effectively. Knowing your arch type is crucial, especially for those with specific needs like flat feet. Proper support is essential, and you can learn more about finding the best running shoes for flat feet . Understanding Pronation: Your Body's Suspension Pronation is the natural lateral rolling motion of the foot during movement, acting as the body's built-in shock absorption system. The degree of this roll is critical. Overpronation: Common with low arches, the foot rolls excessively inward. This requires a stability shoe to guide the foot to a more neutral path. Neutral Pronation: The foot rolls inward just enough to absorb impact efficiently. Neutral shoes are ideal. Supination (Underpronation): Common with high arches, the foot doesn't roll inward enough, placing stress on the outer edge. Supinators need well-cushioned shoes to compensate for poor natural shock absorption. Matching Shoe Support To Your Arch Type Arch Type Wet Test Footprint Common Pronation Recommended Shoe Category Flat / Low Arch A full, solid footprint with little to no visible arch. Overpronation Stability Shoes or Motion Control Shoes Neutral / Medium Arch A footprint with a noticeable curve on the inside. Neutral Pronation Neutral Shoes High Arch A footprint showing only the heel and ball of the foot. Supination (Underpronation) Neutral Shoes with plenty of Cushioning Decoding The Anatomy Of A Running Shoe Understanding a shoe's components helps you look past marketing and see its true purpose. Each part is engineered to work together to deliver a specific type of ride. Cushioning, Stability, and Heel-to-Toe Drop The midsole is the heart of the shoe, providing cushioning and determining the softness of the ride. Levels range from minimal (natural feel) to maximal (ultimate comfort). Support is built into the midsole to accommodate different pronation patterns. A neutral shoe has uniform foam density for efficient runners. A stability shoe features firmer foam or "guide rails" on the inner side to correct overpronation. Heel-to-toe drop is the height difference between the heel and forefoot. A higher drop (8-12mm) encourages a heel strike, while a lower drop (0-6mm) promotes a midfoot or forefoot strike. A sudden change can stress the body, so it's important to understand this metric. For a deeper dive, learn more about heel-to-toe drop in our article . Women specific designs are also becoming more common, with features like wider toe boxes and softer cushioning reducing injury rates. For more market data, see the running shoes market on maximizemarketresearch.com . Matching Your Shoe To Your Workout Using the right shoe for the activity is crucial for performance and injury prevention. Road, trail, and cross-training shoes are engineered for different demands. Shoes For The Road Road shoes are designed for hard, consistent surfaces like pavement. They prioritize cushioning to absorb repetitive impact and reduce stress on joints. Their outsoles are typically flatter for a smooth, stable ride. Taking On The Trails Trail shoes are the rugged 4x4s of footwear, built for unpredictable terrain. Key features include aggressive lugs for traction, rock plates for protection, and durable uppers to resist abrasions. The trail running market has seen significant growth, reflecting a post pandemic surge in outdoor fitness. You can find more insights on the trail running shoes market at Grand View Research . Versatility For The Gym Running shoes, with their high, soft heels, are unsuitable for gym workouts. The plush cushioning creates an unstable base for lifting and lateral movements. Cross-training shoes are the correct choice, offering a lower heel drop for stability, a durable outsole for grip, and a firmer midsole that provides a solid connection to the floor. Using a running shoe for weightlifting is like trying to build a house on a mattress. The foundation is too soft and wobbly, increasing your risk of an ankle roll or worse. Top Running Shoe Reviews Here are some of the top rated running shoes for men and women, recognized for their performance, comfort, and technology across different categories. Top Picks for Men Best Daily Trainer: Brooks Ghost 15 - Known as a reliable workhorse, the Ghost 15 offers a perfect balance of soft cushioning and responsiveness. Its DNA LOFT v2 midsole provides a smooth ride suitable for all types of runs, making it a favorite for neutral runners. Best for Stability: Hoka Arahi 7 - For overpronators, the Arahi 7 delivers exceptional stability without the bulk. Hoka's J-Frame™ technology guides the foot naturally, providing support in a surprisingly lightweight package. Best for Race Day: Nike Vaporfly 3 - Engineered for speed, the Vaporfly 3 combines a carbon fiber plate with responsive ZoomX foam. This combination provides a propulsive feeling that helps runners achieve personal bests over long distances. Top Picks for Women Best Daily Trainer: New Balance Fresh Foam X 880v13 - This shoe is a dependable choice for everyday miles. The dual layer Fresh Foam X midsole offers a soft landing and an energetic toe-off, while the engineered mesh upper provides a secure and breathable fit tailored to the female foot. Best for Stability: Asics Gel-Kayano 30 - A long standing leader in stability, the Gel-Kayano 30 features 4D GUIDANCE SYSTEM™ technology for adaptive support. It's an excellent choice for female runners who overpronate and need reliable cushioning for long runs. Best for Trails: Salomon Speedcross 6 - Designed for technical trails, the Speedcross 6 offers unparalleled grip with its deep, aggressive lugs. The SensiFit™ construction cradles the foot, providing a secure and comfortable fit on uneven terrain. Top Rated Steel Water Bottles Comparison of Well Being Trends: Barefoot vs. Cushioned Running The running world has seen two opposing trends dominate discussions on foot health and performance: minimalist "barefoot" running and maximalist cushioned shoes. The Barefoot/Minimalist Movement Popularized by the book Born to Run , this philosophy argues that modern running shoes weaken feet and encourage an unnatural, heel striking gait. Proponents believe that running with minimal or no footwear promotes a more natural midfoot or forefoot strike, which may reduce impact forces on the joints. Research suggests that while it can strengthen foot muscles, a sudden transition to minimalist running without proper adaptation can lead to injuries like stress fractures and Achilles tendonitis (Lieberman, 2012). The Maximalist Cushioning Trend In direct contrast, brands like Hoka pioneered maximalist shoes with oversized, plush midsoles. This approach aims to provide superior shock absorption, reducing the load on the runner's body. These shoes are particularly popular for long distance and recovery runs, as the extreme cushioning can alleviate joint stress. However, critics argue that the thick foam can diminish ground feel and stability, potentially altering natural running mechanics. The choice between these two styles is highly personal and depends on a runner's biomechanics, injury history, and comfort preference. How To Find The Perfect Fit Getting the fit right is the most critical step. A shoe that feels great in the store can cause problems miles down the road. A common mistake is buying shoes that are too small, as feet swell during a run. Pro Tip: Always shop for running shoes in the late afternoon or evening. Your feet will be at their largest, giving you a more realistic idea of the fit you'll need during a run. Your In-Store Fitting Checklist When trying on shoes, wear your usual running socks and use this checklist. Check the Length: Ensure about a thumb's width of space between your longest toe and the shoe's tip to prevent black toenails. Assess the Width: The shoe should feel snug but not tight. You should be able to splay your toes easily. Test the Heel: Your heel should feel locked in with minimal or no slipping when you walk or jog. When To Replace Your Running Shoes Running shoes have a limited lifespan. Pushing them past their prime is a common cause of injury. The midsole foam compresses over time and loses its ability to absorb impact, leaving your joints to take the punishment. Tracking Mileage and Recognizing Warning Signs Most running shoes last between 300 and 500 miles . Tracking your mileage with an app or a simple log is the best way to know when it's time for a new pair. A classic mistake is waiting until the shoe looks completely thrashed. The midsole foam that gives you support and cushioning breaks down long before the rubber on the bottom wears through. Pay attention to subtle warning signs from your body and the shoes themselves: Loss of Bounce: The shoe feels flat and unresponsive. New Aches and Pains: Unexplained soreness in your feet, shins, or knees after runs. Uneven Wear Patterns: The outsole tread is worn smooth, especially in a lopsided pattern. Wrinkled Midsole: Deep compression wrinkles appear in the foam. For more details, check our guide on how often to replace running shoes . Top Rated Socks Common Questions About Running Shoes Do I Really Need Different Shoes For Running And Gym Workouts? Absolutely. Running shoes are built for forward motion and have soft cushioning that makes them unstable for gym activities like lifting or agility drills. A cross-trainer with a flatter, more stable base is essential for a safe and effective gym workout. How Much Should I Spend On Good Running Shoes? A quality pair of running shoes typically costs between $120 and $160 . This price reflects better materials and cushioning technology that protect your joints and last longer. Avoid the cheapest options, as their foam breaks down quickly, and don't assume the most expensive shoe is the best for you. Can I Just Buy The Newest Version Of My Favorite Shoe? Be cautious. Brands update models annually, and "upgrades" can alter the fit and feel. Changes to foam, upper material, or shape can make the new version feel completely different. Always read reviews and, if possible, try them on before buying. How Do I Break In New Running Shoes? Modern running shoes require minimal to no break-in period. They should feel comfortable out of the box. However, it's wise to ease into them. Wear them around the house first, then use them for a few shorter runs before tackling a long run or intense workout. References Lieberman, D. E. (2012). What we can learn about running from barefoot running: an evolutionary medical perspective. Exercise and Sport Sciences Reviews, 40 (2), 63-72. Pedisic, Z., Shrestha, N., Kovalchik, S., Stamatakis, E., Liangruenrom, N., Grgic, J., ... & Oja, P. (2019). Is running associated with a lower risk of all-cause, cardiovascular and cancer mortality, and is the more the better? A systematic review and meta-analysis. British Journal of Sports Medicine, 54 (15), 898-905. At Flourish-Everyday , we're dedicated to helping you find the perfect shoes for running, cross-training, and living a healthy life. Explore our reviews and resources to support your journey. Find your next favorite pair at https://www.flourish-everyday.com .
- The Updated Guide for Cross-Training Shoes
If you're into cross-training, you know it’s a mix of lifting, cardio, and agility. Using the wrong shoes is like building on a shaky foundation, it’s unsafe and ineffective. The Guide for Cross-Training Shoes is your blueprint for finding the perfect pair of shoes for cross-training, ensuring every jump, lift, and sprint is both effective and safe. Ok, let's get you set up. In This Guide Understanding Cross-Training Shoe Anatomy Top Cross-Training Shoes: Men's Reviews Top Cross-Training Shoes: Women's Reviews Footwear, Health, and Performance Impact Wellbeing Trends: Matching Shoes to Workouts Common Questions Answered References Understanding Cross-Training Shoe Anatomy So, what separates a great cross-training shoe from an average sneaker? It’s all in the design. A true cross-trainer is a multi tool for your feet, built to handle almost any gym activity you throw at it. Unlike running shoes, engineered for forward motion, the best shoes for cross-training provide a stable, balanced platform. Let's break down the key parts. The Foundation: Firm Midsole and Outsole The midsole is the layer between your foot and the ground. In a cross-trainer, it's firmer than in a cushy running shoe. This is a crucial feature, preventing your foot from compressing too much under heavy loads, giving you a solid base for squats and deadlifts. The outsole, which contacts the floor, often has a multi directional tread pattern. This ensures solid grip during forward movement, lateral shuffles, and quick pivots. This versatility is why cross-training shoes are so popular. Their wider bases support lateral movements and can prevent up to 30% more ankle rolls during high impact sessions (1). Heel-To-Toe Drop: A Critical Measurement The heel-to-toe drop is the height difference between the heel and the forefoot. Running shoes often have a higher drop (8-12mm) to propel you forward. Cross-trainers usually have a much lower drop, around 4-8mm. A lower drop keeps you closer to the ground, boosting stability and balance. This is essential for lifting weights, as it places your foot in a more natural position to generate force. To learn more, see our guide on what heel-to-toe drop means for your workout . Upper Construction: Durability Meets Flexibility The "upper" is everything that covers your foot. In a good cross-training shoe, it must be both durable and flexible, tough enough for rope climbs but pliable enough for movement and breathability. Look for engineered mesh with reinforced overlays in high wear areas like the toe box. This combination provides a secure, locked in feel without sacrificing the flexibility needed for explosive movements like box jumps. The upper must handle stress from all angles, not just the front-to-back motion of running. Top Cross-Training Shoes: Men's Reviews Choosing the right shoes for cross training means matching your footwear to your gym goals. The men's training shoe market is huge, reflecting a high demand for versatile, high performance gear. Let's cut through the noise and highlight the top performers. This trend toward specialized gear is well documented. The men's training shoe market held a significant share in 2023 and is projected to grow. The entire market, valued at USD 58.40 billion in 2024, is expected to reach USD 88.80 billion by 2032 due to innovations in shoe technology (2). You can explore more about the growing training shoe market and its trends if you're interested. The Powerhouse Lifter : NOBULL Outwork For heavy lifting and functional fitness, the NOBULL Outwork is a top contender. Its simple design excels under pressure. The Outwork features a minimal 4mm heel-to-toe drop, providing a stable, grounded platform perfect for squats, deadlifts, and Olympic lifts where a connection to the floor is key. Its "practically bulletproof" upper is made from a tough, breathable material that resists abrasion. While stiff at first, it molds to your foot. However, its minimalist cushioning makes it less suitable for high impact cardio. The Versatile All-Rounder: Nike Metcon The Nike Metcon series is a gym favorite for its balance of stability for lifting and responsiveness for dynamic movements. A wide, flat heel provides a solid base, and some models include a removable Hyperlift insert to increase the drop for deeper squats. The forefoot is flexible and cushioned enough for box jumps and short runs without feeling clunky. The Metcon is a reliable choice for athletes who do a bit of everything. The Dynamic HIIT Specialist: Reebok Nano The Reebok Nano is built for the high energy demands of HIIT and CrossFit. It blends cushioning, flexibility, and support. The Nano features responsive cushioning in the forefoot to absorb impact during plyometric moves. Its durable outsole provides excellent traction for quick lateral movements, keeping you locked in during agility drills. While stable enough for moderate lifting, serious powerlifters might prefer a shoe with a firmer base. Top Rated Steel Workout Water Bottles Top Cross-Training Shoes: Women's Reviews Finding the right cross-training shoe is crucial, especially since women's feet have different anatomical needs, often requiring a narrower heel and higher arch support. The best athletic shoes for women are designed with these differences in mind. The Agile and Secure Performer For workouts with quick directional changes, like agility ladders, a secure fit is nonnegotiable. Look for shoes with a snug heel cup and a supportive upper that locks your foot down without being restrictive. A shoe engineered for lateral stability is ideal. It prevents lateral foot sliding during skaters or shuffles, which is crucial for performance and preventing ankle sprains. These shoes often combine a firm midsole with a supportive midfoot cage. The Versatile Hybrid for Class Lovers If your fitness routine includes everything from dumbbell circuits to box jumps, you need a true hybrid shoe. The goal is to find a balance between stability for lifting and flexible cushioning for high impact moves. Look for moderate cushioning, a flexible forefoot, and a durable, multi directional outsole. The New Balance Minimus TR is a great example. Its low profile design keeps you grounded while offering enough protection for various workouts. The Cushioned Choice for High-Impact HIIT High Intensity Interval Training (HIIT) involves jumping, sprinting, and explosive movements that stress your joints. For these workouts, shock absorption is a top priority. Shoes with responsive cushioning in the midsole are designed to soften this impact. The HOKA Kawana excels here, delivering superior cushioning without sacrificing stability. It's a fantastic choice for women who mix short runs or plyometrics into their training, protecting joints while providing an energetic bounce back. Footwear, Health, and Performance Impact The right shoes for cross-training are a critical investment in your long term health and training ability. Your feet are the foundation for every movement, and improper footwear can send stress throughout your body. Proper cross-training shoes act as a support system, creating a stable base that absorbs impact and distributes force evenly, protecting your ankles, knees, and lower back. The Biomechanical Connection Your body operates as a connected chain. When your feet are properly aligned, your joints and muscles function correctly. An unstable shoe forces your body to compensate, leading to poor form and injury risk. Lifting in cushioned running shoes, for example, is like squatting on a mattress, the soft foam compresses unevenly, wrecking your stability and potentially causing issues like plantar fasciitis or shin splints. Understanding this connection is vital. Learning how to prevent running injuries is part of this, as proper footwear is a key component (3). Common Issues from Improper Footwear Wearing the wrong shoes can lead to painful conditions that hinder performance. Plantar Fasciitis: This sharp heel pain is often worsened by shoes lacking arch support. Shin Splints: This pain can flare up when shoes lack shock absorption or stability, overworking lower leg muscles. Ankle Instability: Quick lateral cuts in a high, soft heeled shoe increase the risk of a rolled ankle. Cross-trainers have a wider, firmer base to prevent this. For those with specific foot mechanics, our guide on finding the best shoes for supination offers more targeted advice (4). Viewing your shoe purchase as a health investment is the first step toward better performance and an injury free fitness journey. Wellbeing Trends: Matching Shoes to Workouts Connecting shoe anatomy to your actual workout is where the magic happens. Every workout style has unique demands, and your shoes need to match them. Even your choice of equipment, like a manual treadmill vs motorized treadmill , can change your footwear needs (5). The growing trend of versatile fitness routines is driving market growth. The global cross-training shoes market, valued around USD 9.5 billion in 2023, is expected to reach USD 17 billion by 2032. This reflects a fundamental shift in how people train, demanding footwear that can keep up. As the decision tree shows, the right shoes support long term health, while the wrong ones can lead to preventable injuries. For the CrossFit and Functional Fitness Athlete Workouts involving Olympic lifts, rope climbs, and metabolic conditioning require a shoe that masters stability and toughness. Your ideal shoe has a minimal heel-to-toe drop (around 4mm) to keep you planted during lifts. It also needs a durable upper and a firm, flat outsole for maximum power transfer. Avoid shoes with squishy, high cushioned heels that create instability under heavy loads. For the HIIT and Bootcamp Enthusiast HIIT and bootcamp workouts involve explosive, high impact moves like burpees and box jumps. These demand a shoe that balances responsive cushioning with flexible support. You need something that absorbs shock without feeling mushy. For a deeper dive, our breakdown of cross training vs running shoes explained provides more clarity (6). Look for moderate forefoot cushioning, a flexible design, and a grippy outsole. Avoid rigid, heavy lifting shoes that hinder agility. Most Popular Workout Socks Common Questions Answered Here are answers to common questions about buying and using cross-training shoes. How often should I replace my shoes? Knowing when to replace cross-trainers is key to staying injury-free. Unlike running shoes tracked by mileage (typically 300-500 miles), a cross-trainer's lifespan depends on usage. A good rule of thumb is every 6-12 months for consistent gym goers. However, visual inspection is your best guide. Look for worn-out treads, a compressed midsole with deep wrinkles, or a frayed upper that no longer secures your foot. Can I run long distances in cross-trainers? No. Cross-trainers are not designed for long distance running. Their firm, stable design is ideal for lifting and lateral movements but lacks the specialized cushioning and forward propulsion tech of dedicated running shoes. They are suitable for short sprints or treadmill warm-ups (under a mile), but for longer distances, switch to a proper running shoe to protect your joints. How do I find the right fit? A proper fit is nonnegotiable. Try on shoes in the afternoon or evening when your feet are slightly swollen. You should have about a thumb's width of space between your longest toe and the end of the shoe. Your heel should feel locked in without slipping, but you should still have room to wiggle your toes. A snug fit is good; a cramped fit is not. What is the best way to clean my shoes? To extend your shoes' life, avoid the washer and dryer, as heat can damage adhesives. Instead, remove the insoles and laces and wash them separately. Use a soft brush and a mild soap and water mix to scrub the shoe's exterior. Wipe them with a clean, damp cloth and let them air dry at room temperature, away from direct heat or sunlight. References Journal of Sports Science & Medicine , "Impact of Footwear on Ankle Stability During Multi-Directional Movements," 2021. Fortune Business Insights. (2024). Training Shoes Market Size, Share & COVID-19 Impact Analysis . Retrieved from https://www.fortunebusinessinsights.com/training-shoes-market-110682 Nutrition Geeks. "How to Prevent Running Injuries." Retrieved from https://nutritiongeeks.com/how-to-prevent-running-injuries/ Flourish-Everyday. "Finding the Best Shoes for Supination." Retrieved from https://www.flourish-everyday.com/post/finding-the-best-shoes-for-supination Medeq Fitness. "Manual Treadmill vs Motorized Treadmill." Retrieved from https://medeqfitness.com/blogs/medeq-wellness-journal/manual-treadmill-vs-motorized-treadmill Flourish-Everyday. "Cross Training vs Running Shoes Explained." Retrieved from https://www.flourish-everyday.com/post/cross-training-vs-running-shoes-explained At Flourish-Everyday , our goal is to give you the insights you need to support your wellness journey. Feel free to explore our site for detailed reviews and recommendations on the best athletic footwear out there. https://www.flourish-everyday.com
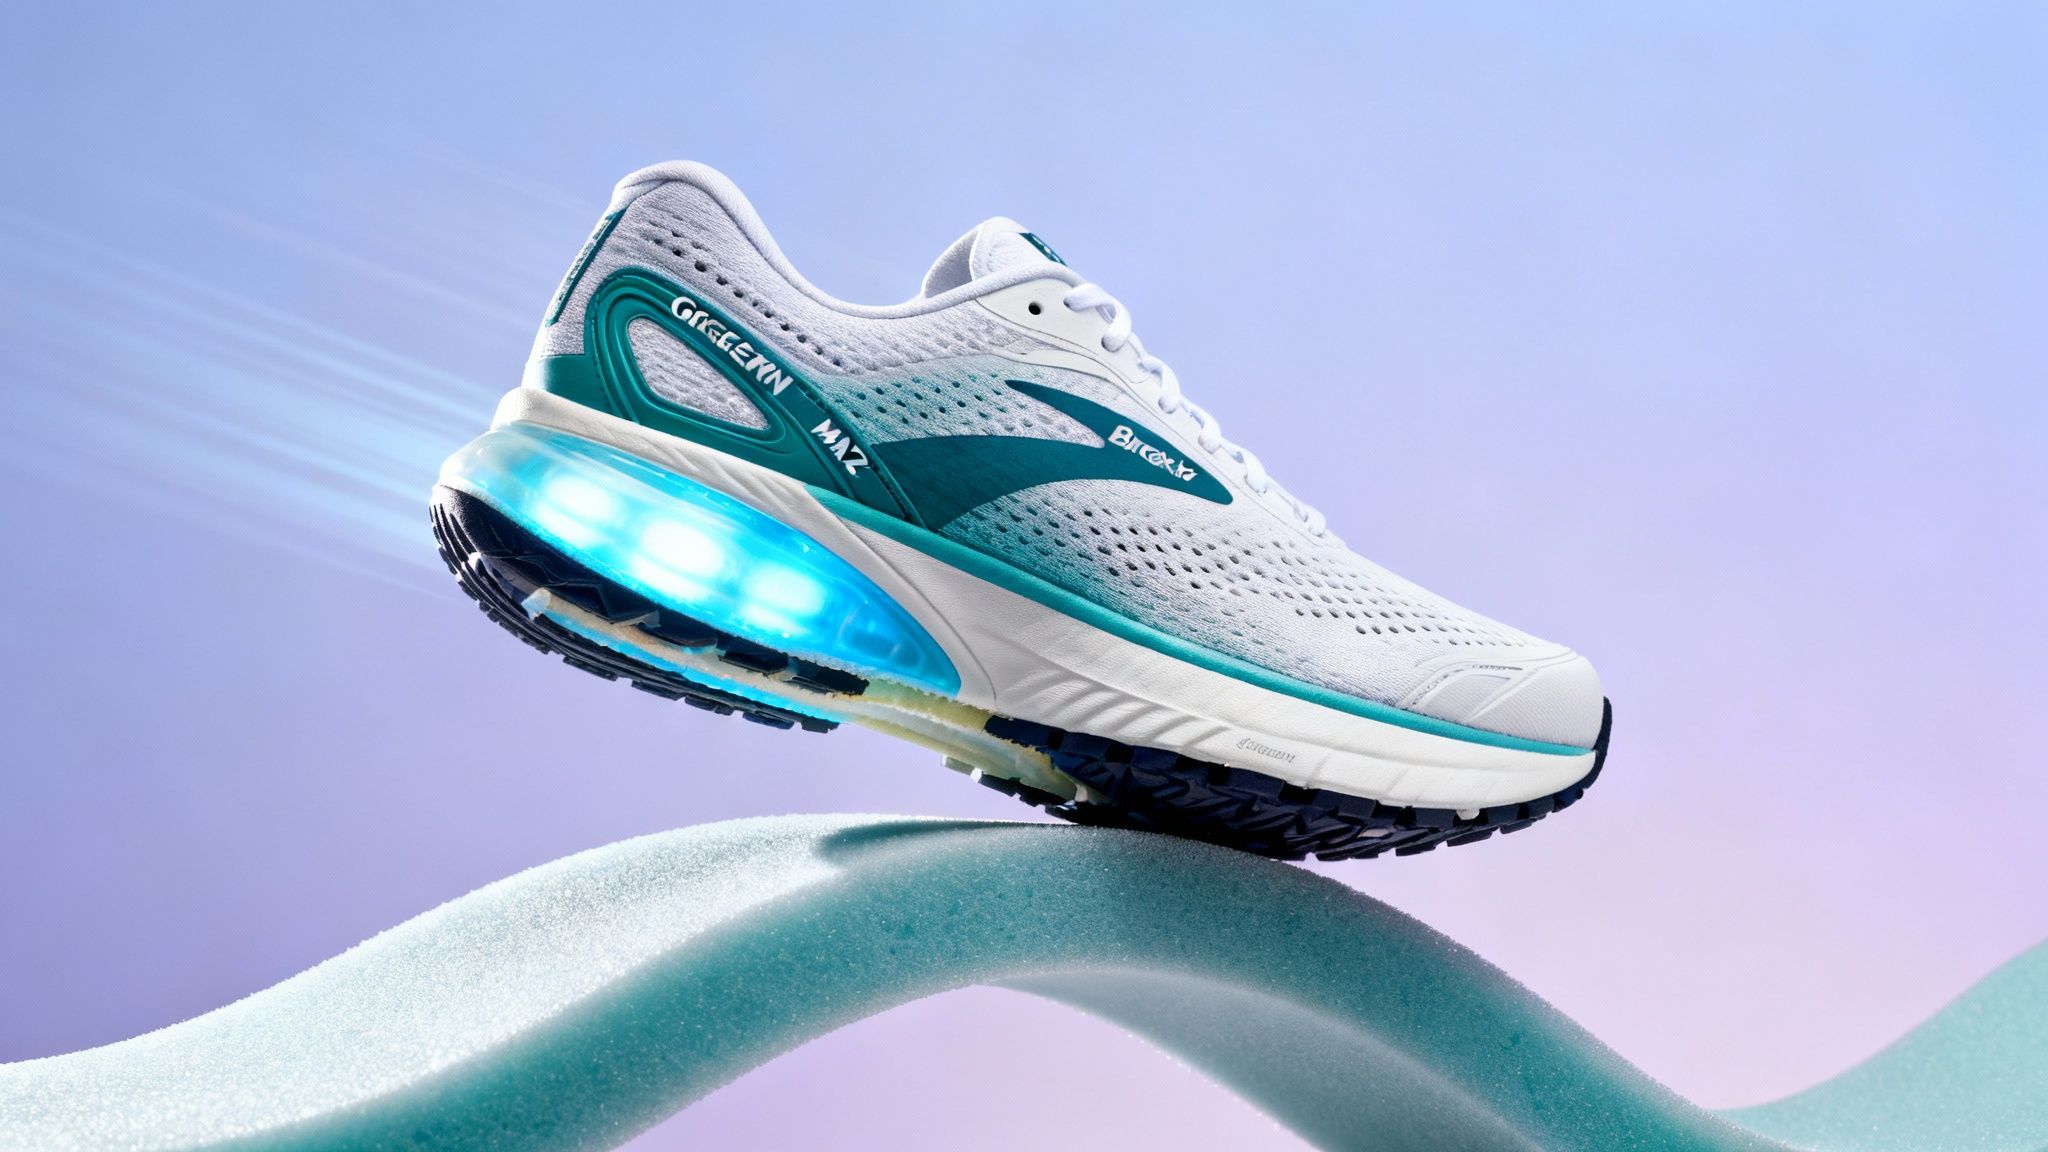
- Brooks Glycerin Max 2 Review: A Deep Dive Into Max Cushion
If you're a runner who daydreams about floating on clouds, the Brooks Glycerin Max 2 , for men and women, might be the answer to your prayers. Brooks built this shoe for one thing: delivering the absolute highest level of comfort and joint protection imaginable. It's a genuine maximalist shoe, featuring a massive stack of soft, nitrogen infused foam and a rockered sole to ensure every step feels exceptionally smooth. Brooks Glycerin Max 2 : Neutral Running Shoe Your Ultimate Guide to Peak Comfort Welcome to the complete breakdown of the Brooks Glycerin Max 2. This isn't just another cushioned trainer; it's Brooks' most ambitious leap into the world of maximalist running. This guide will dig deep into what makes this shoe a potential game changer. We'll explore its core technology, how it fits, its real world performance, and how it measures up against the competition. Index Innovative Midsole Technology : A deep dive into the DNA Tuned foam and GlideRoll rocker. Fit and Upper Construction : A close look at sizing, comfort, and breathability. On-Road Performance : How the shoe handles different types of runs and daily fitness. Comparative Analysis : A head-to-head comparison with the standard Glycerin 22 and other popular maximalist running shoes. FAQ's : References Who Is This Shoe For? The Brooks Glycerin Max 2 isn't for everyone, it's built for a specific type of runner. It’s ideal for those looking for maximum shock absorption to protect their joints over long distances. It also shines for those who prefer a smooth, rolling sensation over a springy, fast rebounding feel. It's also a fantastic option for anyone who needs a super comfortable shoe for walking or standing for long periods. If you want to explore this category further, you can check out our list of the best cushioned running shoes in our detailed article . This guide will help you decide if the Glycerin Max 2’s unique features are the right fit for your running goals. Decoding the DNA Tuned Midsole Technology At the heart of every great running shoe is the midsole, it’s the engine that powers your ride. For the Brooks Glycerin Max 2, that engine is an advanced piece of tech designed for supreme comfort. The magic starts with what Brooks calls DNA Tuned cushioning. This is a next generation, nitrogen infused material engineered to provide two different feelings in a single stride. The heel is built with a softer composition to absorb initial impact, giving you a plush, forgiving feel. As you roll forward, the forefoot is firmer, providing a stable platform for a powerful toe-off. The GlideRoll Rocker Working with the DNA Tuned foam is the GlideRoll rocker, the noticeable curve in the shoe's sole. Its job is to create a smooth, rolling motion from heel to toe. This rocker geometry guides your foot forward, taking strain off your muscles and joints and making each step feel more effortless. The combination of a soft landing and a smooth roll forward creates a ride that’s both protective and fluid. How Nitrogen Infusion Works So what's this "nitrogen infused" process about? During manufacturing, liquid nitrogen is injected into the foam compound under heat and pressure. As the nitrogen expands back into a gas, it creates tiny, consistent bubbles throughout the foam. This process gives Brooks incredible control to fine tune the foam's feel, resulting in a cushion that is not just soft, but also durable and resilient. It’s how the Glycerin Max 2 can pack such a massive stack of cushion while still feeling nimble. For the runner, this smart engineering delivers key benefits: Exceptional Impact Absorption: The soft heel foam soaks up shock, helping protect your joints. Stable and Smooth Transitions: The firmer forefoot and GlideRoll rocker team up for a secure and efficient push-off. Reduced Fatigue: By making each step feel easier, the shoe helps you feel fresher for longer. How the Glycerin Max 2 Fits and Feels A shoe's midsole can have all the fancy tech in the world, but if the fit is off, none of it matters. Thankfully, the Brooks Glycerin Max 2 pairs its incredible cushioning with an upper built for pure step-in comfort. For most runners, the Glycerin Max 2 fits true to size . Its design is accommodating, so you should be able to stick with your usual running shoe size. The feel is a secure wrap around the midfoot that opens into a comfortably spacious forefoot. Upper Construction and Sizing Brooks went with a triple layer engineered mesh upper designed to provide structure and flexibility where you need them. The result is a secure hold that adapts to your foot's shape. One thing to note is that this dense upper can run a bit warm, which might be a benefit in cooler climates but a consideration in serious heat. A plush tongue and padded heel collar lock your foot in place, preventing hot spots and heel slippage. The toe box offers a generous, accommodating fit, giving most foot shapes plenty of room to splay naturally. For a deeper dive into the importance of foot health, best/worst sneakers, and common foot issues , this is a fantastic resource. What truly defines the shoe's feel is its sheer height. The Brooks Glycerin Max 2 comes with a 47 mm heel stack height and a 41 mm forefoot stack . This towering platform gives the shoe a 6 mm drop . If you're not sure what that means for your stride, understanding what heel-to-toe drop is and why it matters for your run can help you decide if this moderate drop is a good fit. Performance for Running and Everyday Fitness How does the Brooks Glycerin Max 2 actually feel when the rubber meets the road? This shoe was built with a specific job in mind: plush comfort. That design translates into a ride that’s brilliant for some runs but not right for others. Excelling in Its Comfort Zone The Glycerin Max 2 truly hits its stride on long, slow runs and easy recovery days. On those runs, your goal isn’t to break records; it’s about logging miles consistently while protecting your joints. The massive stack of DNA Tuned cushioning and smooth GlideRoll rocker work together to make the miles melt away. The shoe's soft landing in the heel soaks up shock, which is a key factor in how to prevent running injuries . The transition from landing to toe-off is incredibly fluid, a seamless rolling motion that gently guides you into the next stride. However, this specialization means it isn't a do-it-all shoe. If you have speed work on the calendar, you'll likely find its weight and high cushion a bit cumbersome. Beyond Running: Versatility and Durability While a specialized tool for runners, the Brooks Glycerin Max 2 is a surprisingly great shoe for general fitness and daily life. Walking and All-Day Wear: For those who spend hours on their feet, this shoe is a lifesaver. Cross-Training: It's perfect for low impact cross-training like the elliptical or stationary bike. Travel: Its top tier comfort makes it an amazing travel companion for airports and city exploration. The outsole durability is another win. Brooks put tough RoadTack rubber in high wear areas, giving you a realistic lifespan of 300 to 500 miles for most runners, which is on par for a premium daily trainer. How The Glycerin Max 2 Compares To Other Shoes To get a feel for what the Brooks Glycerin Max 2 brings to the party, you have to see how it stacks up against its closest family members and biggest rivals. Glycerin Max 2 vs. Standard Glycerin 22 The Glycerin name is a cornerstone for Brooks. The standard Glycerin 22 is a classic, reliable daily trainer that weighs around 10.35 oz (293g) and costs $165 . It provides a traditional, plush ride without the aggressive rocker or sky high stack of the Max. The Max, however, is a true maximalist shoe. That towering stack and noticeable GlideRoll rocker create a unique rolling sensation focused on protecting your body. Top Rated Workout Socks Brooks Glycerin Max 2 vs The Competition The Glycerin Max 2 wades into a competitive pool filled with high cushion titans. The table below gives a bird's eye view of how it measures up. Shoe Model Mn&Wn Heel Stack (mm) Forefoot Stack (mm) Drop (mm) Weight (Men's US9) Price (USD) Best For Brooks Glycerin Max 2 47 41 6 ~10.5 oz (298g) $170 Ultimate protection and smooth, rockered rides Brooks Glycerin 22 38 28 10 ~10.3 oz (293g) $165 Traditional plush cushioning for daily training Hoka Bondi 8 33 29 4 ~10.8 oz (307g) $165 All-day comfort with a stable, well-cushioned feel New Balance Fresh Foam X More v4 34 30 4 ~10.4 oz (295g) $150 A soft, bouncy ride with a wide, stable platform ASICS Gel-Nimbus 26 41.5 33.5 8 ~10.7 oz (304g) $160 A balanced blend of soft cushioning and stability While competitors like the Hoka Bondi or New Balance More focus on soft, sink in comfort, the Glycerin Max 2 emphasizes a protective, rolling transition. If you value a shoe that helps guide your foot forward efficiently and reduces strain, the Glycerin Max 2 stands out. For even more help, check out our running shoe comparison guide to find your perfect fit . Who Should Buy the Glycerin Max 2 A High-Mileage Runner: If you’re deep into marathon training, this level of cushioning is a lifesaver for your legs. A Recovery Day Enthusiast: For easy days when your body is beat up, this shoe is like a spa day for your feet. Seeking All-Day Comfort: Anyone spending long hours walking or standing will appreciate the massive foam stack and stable platform. Who Might Want to Look Elsewhere Are Focused on Speed: Its weight and pillowy cushioning are not built for tempo runs or intervals. Prefer a Grounded Feel: If you like to feel the road, the towering stack height will feel disconnected. Need a Single Shoe for Everything: Runners looking for a "do-it-all" shoe will find the Glycerin Max 2 too specialized. At the end of the day, the Brooks Glycerin Max 2 is a fantastic choice for runners who put a premium on a protective, smooth, and highly cushioned experience for their easy paced miles. 24oz Steel Frequently Asked Questions Let's tackle some of the most common things people ask about the Brooks Glycerin Max 2. What is the main difference between the Glycerin Max 2 and the regular Glycerin 22? The Glycerin Max 2 has a much taller stack of cushioning and a more aggressive GlideRoll rocker shape. This combo gives you a smooth, rolling feeling forward with the most impact protection Brooks offers. The regular Glycerin is a classic, plush daily workhorse, while the Max is a true maximalist shoe built to save your joints. Is the Brooks Glycerin Max 2 good for walking or standing all day? Absolutely. It’s one of the best choices for anyone who spends long hours on their feet. The massive cushion stack, wide platform, and rocker help reduce leg fatigue. Can I use the Glycerin Max 2 for faster runs like tempo workouts? You could, but it’s not what this shoe is built for. Its weight and massive cushioning are designed for easy to moderate paces. For faster runs, you'd be better off with a lighter, more responsive shoe like the Brooks Hyperion. References Best Cushioned Running Shoes: Top Picks for Comfort & Support . (n.d.). Flourish-Everyday. Retrieved from https://www.flourish-everyday.com/post/best-cushioned-running-shoes-top-picks-for-comfort-support EPI 191: The Importance of Foot Health, Best/Worst Sneakers... . (n.d.). Buy Peak Performance. Retrieved from https://buypeakperformance.com/blogs/podcascts/epi-191-the-importance-of-foot-health-best-worst-sneakers-exercises-foot-strengthening-tools-healing-bunions-plantar-fasciitis-and-more What is Heel-to-Toe Drop and Why It Matters for Your Run . (n.d.). Flourish-Everyday. Retrieved from https://www.flourish-everyday.com/post/what-is-heel-to-toe-drop-and-why-it-matters-for-your-run How to Prevent Running Injuries . (n.d.). Route Printer. Retrieved from https://www.routeprinter.com/blogs/insights/how-to-prevent-running-injuries Running Shoe Comparison Guide to Find Your Perfect Fit . (n.d.). Flourish-Everyday. Retrieved from https://www.flourish-everyday.com/post/running-shoe-comparison-guide-to-find-your-perfect-fit Here at Flourish-Everyday , our goal is to give you the insights you need to find the perfect gear for your fitness journey. For more expert reviews and wellness tips, come see us at https://www.flourish-everyday.com .
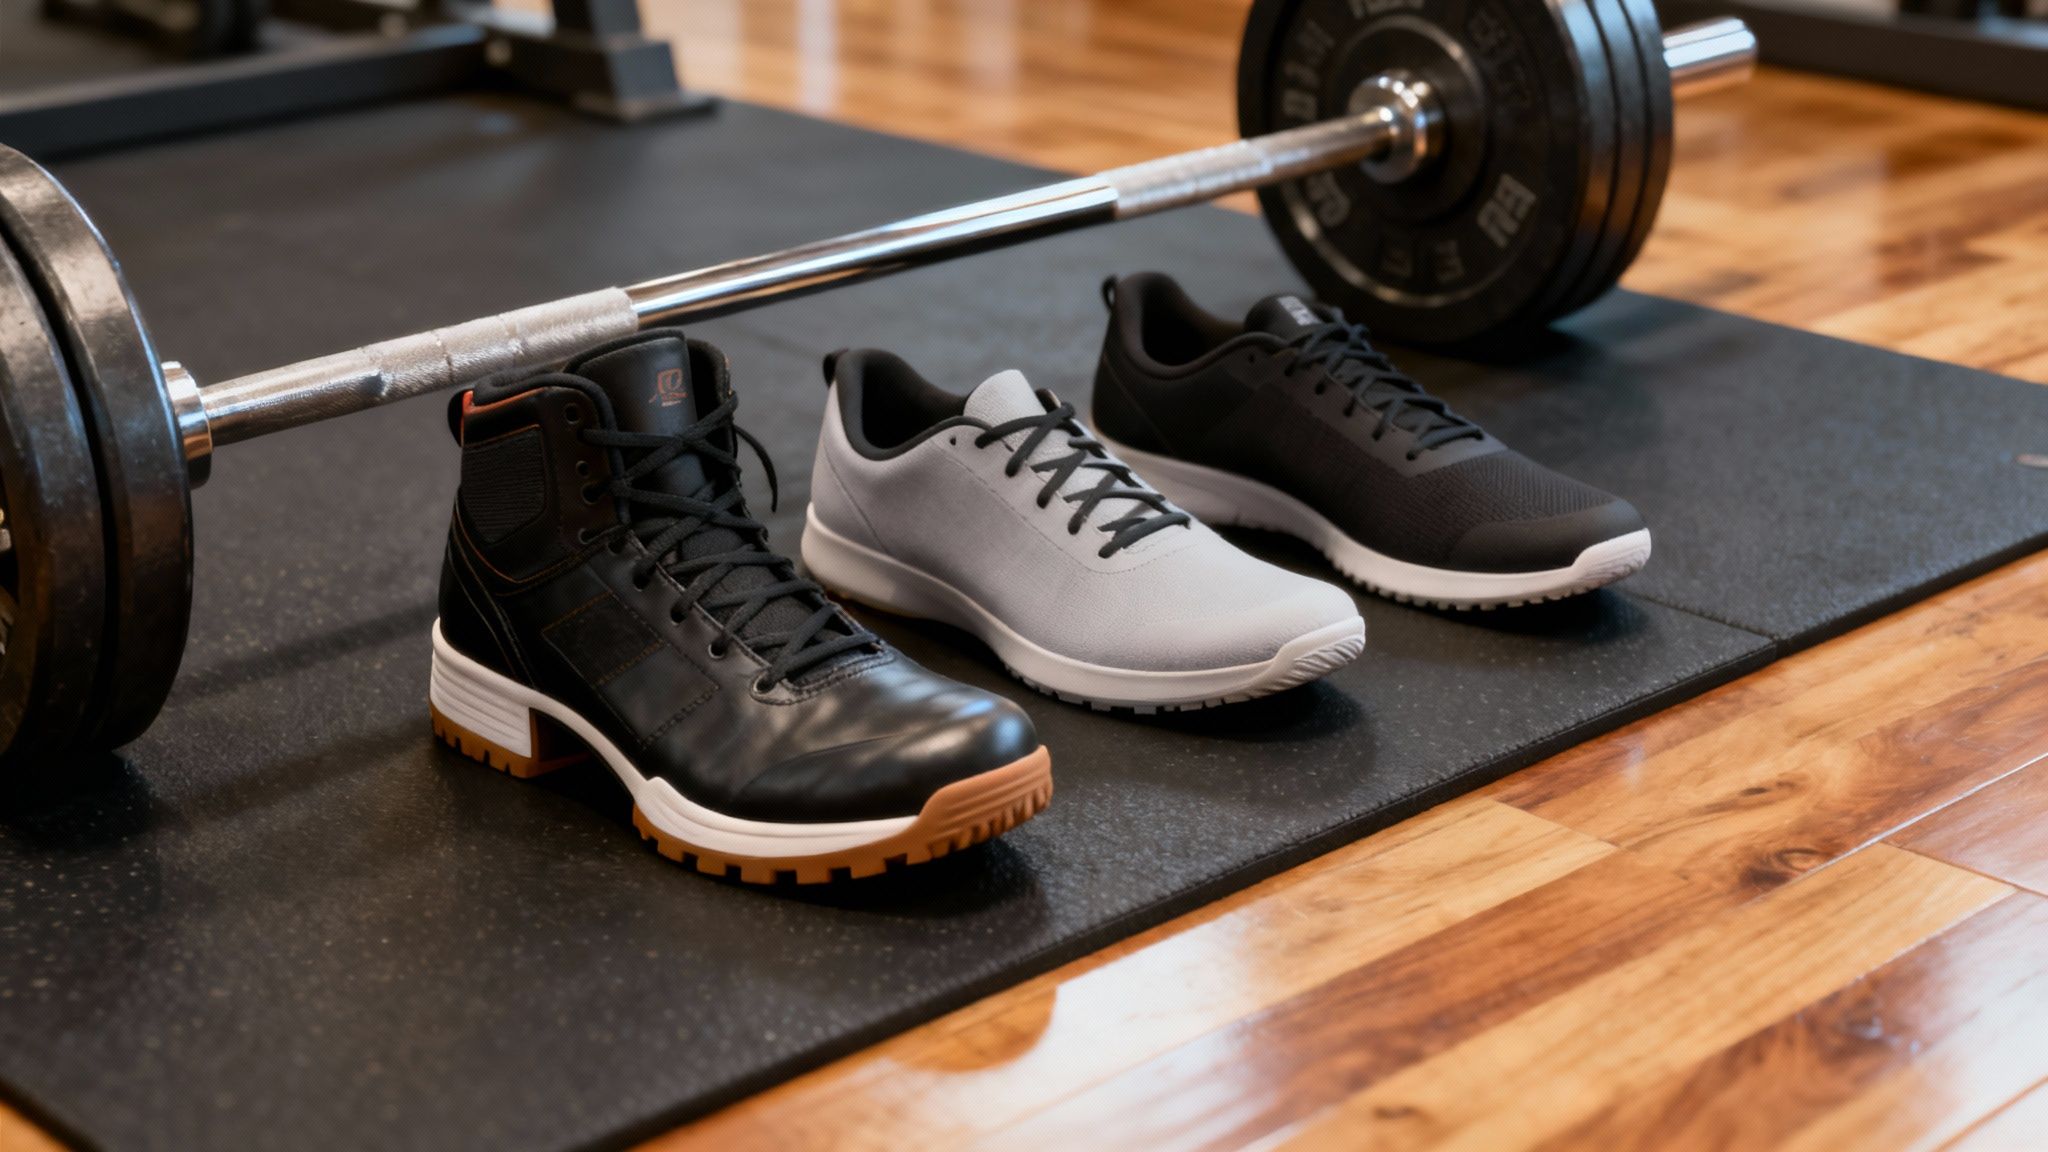
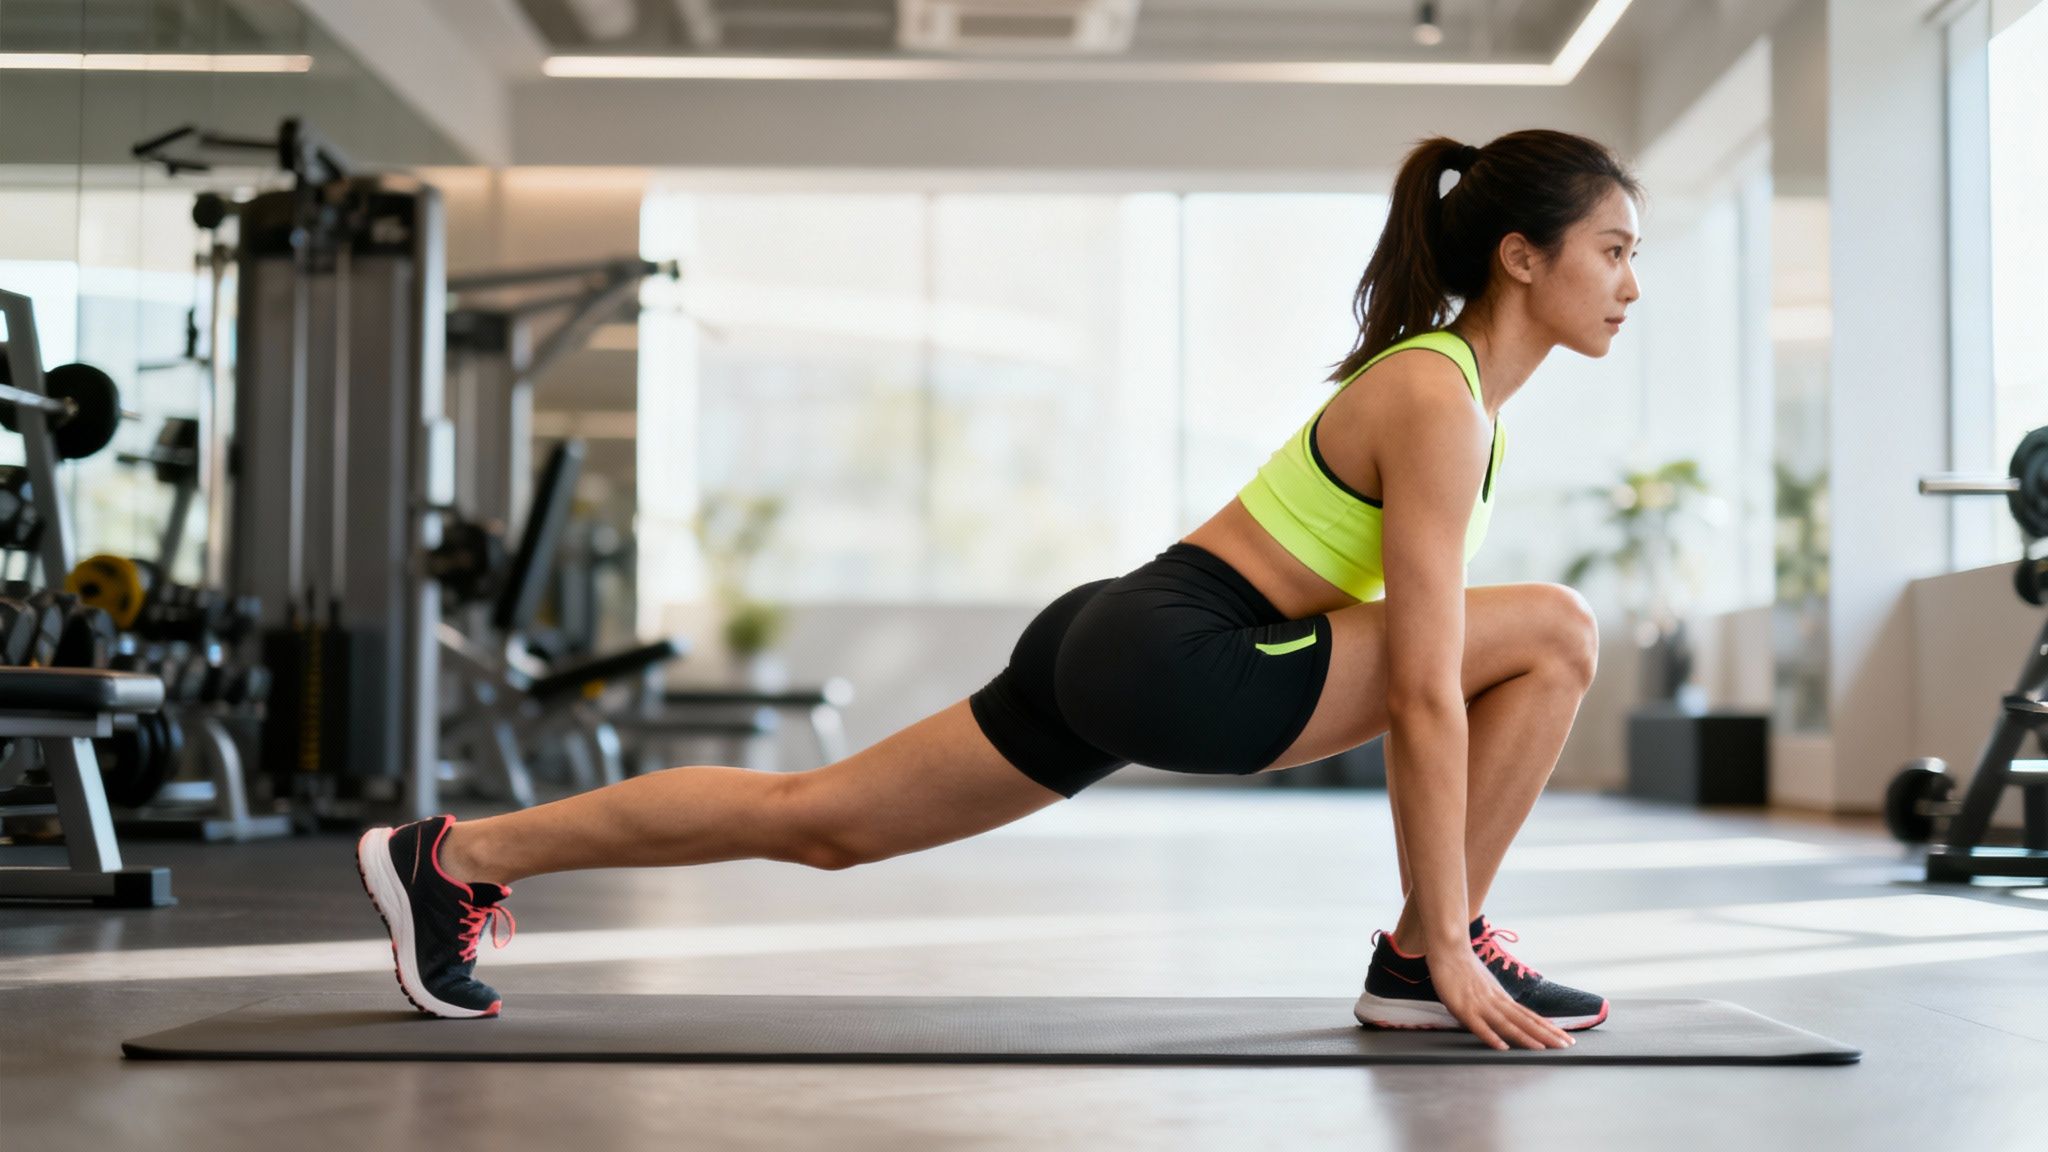
- The Ultimate Guide to Shoes for Strength Training
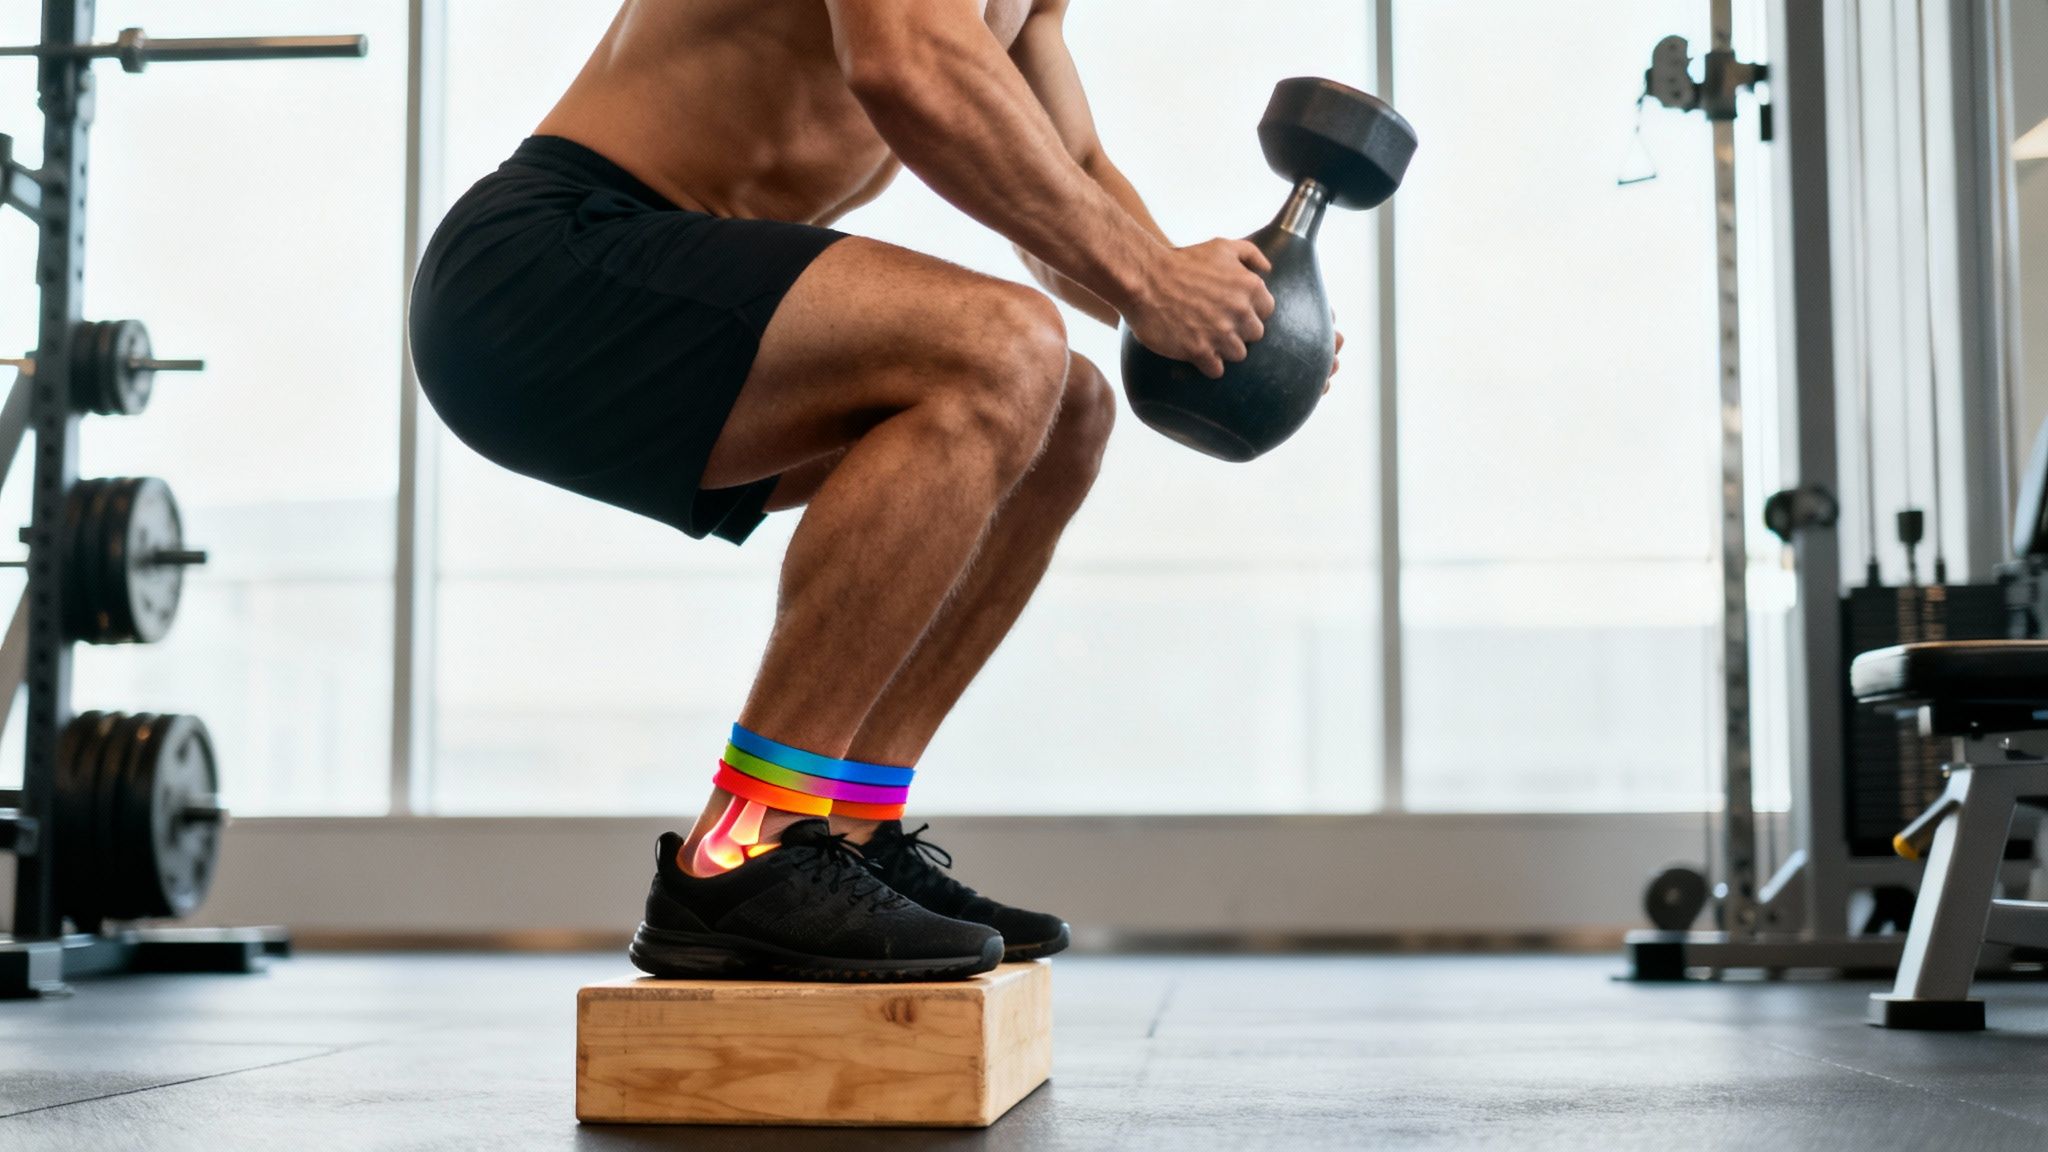
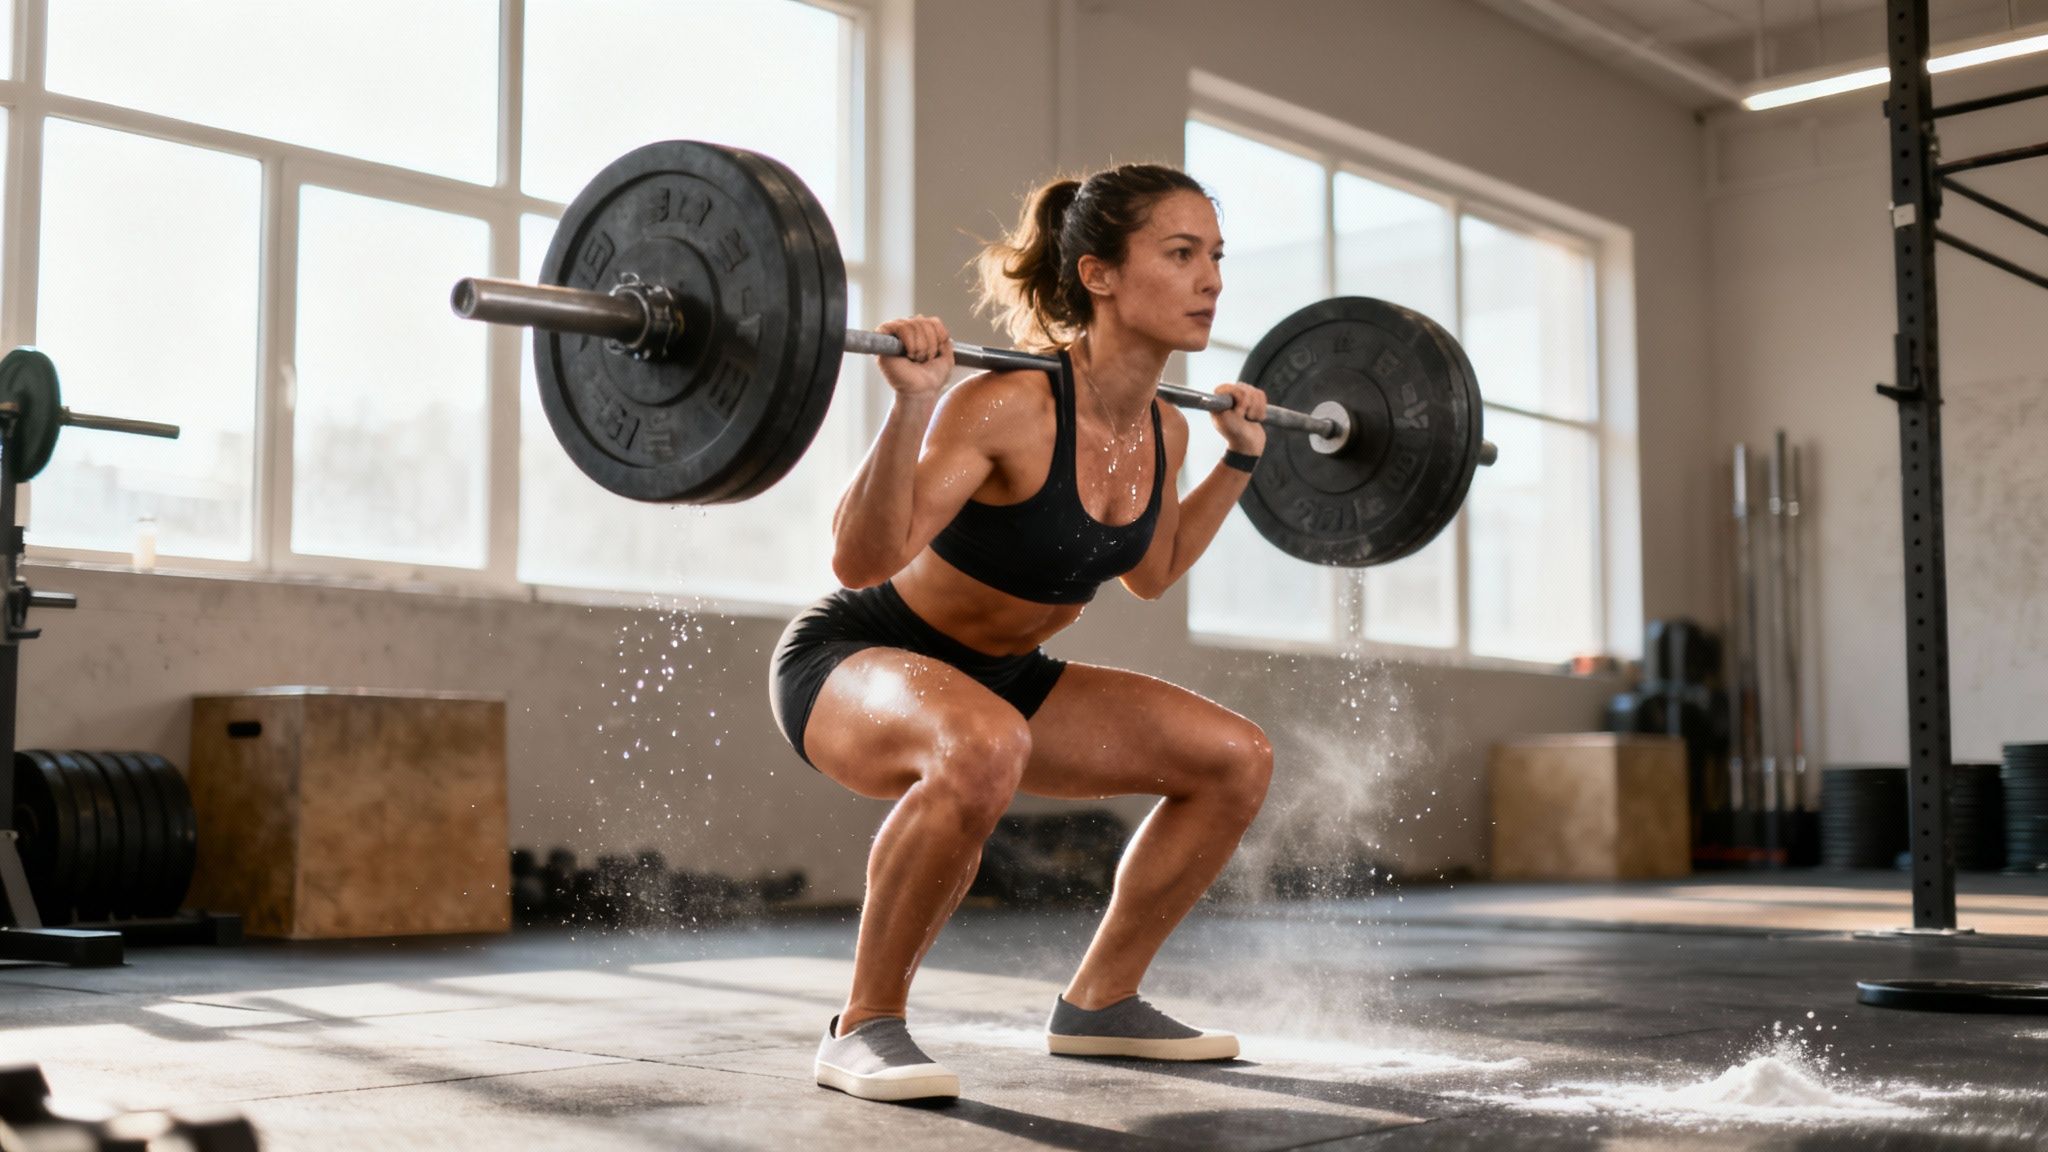
Lifting in the wrong shoes is likely to cause injury, fatigue, and eventually, pain. All your power fizzles out into the instability under your feet with the wrong shoes. The best shoes for strength training provide a flat, solid, and stable base so you can generate maximum force and sidestep injuries. This is why your cushioned running shoes are sabotaging your squats and deadlifts. Let's take a good look at what to do and why, to ensure the optimal strength training routine. Index of Sections Your Foundation for Every Lift The Anatomy of a Perfect Lifting Shoe Choosing Your Ideal Training Shoe Top Rated Shoes for Men and Women How Proper Footwear Impacts Your Biomechanics Your Smart Buying and Shoe Care Checklist Your Questions Answered References Your Foundation for Every Lift Think of your body during a lift as a skyscraper, your feet are the foundation. Building on sand, or in this case, soft running shoes, creates an unstable and inefficient structure. The pillowy soles of running shoes are designed to absorb impact, which is great for jogging but detrimental for moving heavy weight. When you drive your feet into the ground, that foam compresses, creating a wobbly surface. This instability forces your body to work overtime to stay balanced, robbing you of power and increasing injury risk (1). Top Rated Workout Socks The Power of a Stable Base A proper strength training shoe acts like a solid concrete foundation. Its firm, non-compressible sole allows for direct force transfer from your body, through your feet, and into the ground. When your feet are planted on a stable surface, your brain receives clear feedback, allowing for better muscular control and strength. This downward force is the bedrock of your exercise, enabling you to enlist the correct muscles and generate maximum power. This stability translates directly into better, safer lifts. You can focus on form without your body unconsciously compensating for an unsteady base. The Growing Importance of Specialized Footwear The fitness world has caught on to the importance of proper footwear. The global market for athletic footwear is projected to grow substantially, reflecting a worldwide shift toward healthier lifestyles (2). This trend has sparked a wave of versatile cross-training shoes designed to reduce injury risk during strength training. Picking the right footwear isn't just about comfort; it's about optimizing performance and ensuring longevity in your fitness journey. Investing in a quality pair of shoes for strength training is a smart move for your progress and well-being. For specific recommendations, check our guide on good shoes for squats and deadlifts . The Anatomy of a Perfect Lifting Shoe Before choosing the right shoes, you must understand their key components. A great lifting shoe is a piece of gear with specific features that directly impact safety and strength. Every part, from the sole to the upper, works to create a dependable platform. The All Important Sole The most critical feature of a lifting shoe is its firm, dense, and non-compressible sole . A cushioned sole absorbs the force you're trying to drive into the ground, much like pushing a car while standing on a trampoline. A solid sole ensures your energy transfers directly into the lift, providing a stable base for exercises like squats, deadlifts, and overhead presses. Heel-to-Toe Drop Explained Heel-to-toe drop is the height difference between the heel and the forefoot. This measurement significantly impacts lifting mechanics, especially in squats. For many lifters, an elevated heel helps them achieve greater squat depth by allowing for more ankle flexion. This can lead to a more upright torso position, which may reduce stress on the lower back and improve overall form. Shoes for strength training come with different drops: Zero-Drop (0 mm): Flat soled shoes that mimic a barefoot stance, ideal for deadlifts as they place you closer to the ground. Moderate Drop (4-8 mm): Common in cross-trainers, offering versatility for various gym activities. High Drop (12+ mm): Typical for dedicated weightlifting shoes, designed to improve squat mechanics. The Foundation of Stability and Grip A shoe's construction must prioritize stability. The outsole should be made of a high-traction material to prevent slipping. A wide toe box allows your toes to spread naturally, creating a wider, more stable base of support. Finally, a secure lacing system or midfoot strap locks your foot in place, preventing shifting that could compromise stability. To explore functional differences between shoe types, learn more about training vs. running shoes . Bluebird Botanicals Choosing Your Ideal Training Shoe The right footwear is foundational to your training. Your workout style dictates the type of shoe you need. We'll explore three main categories: dedicated weightlifting shoes, versatile cross-trainers, and minimalist shoes. Dedicated Weightlifting Shoes Weightlifting shoes are specialists, identifiable by their elevated and rigid heel . This design enhances ankle mobility, which is a essential for squats and Olympic lifts (cleans, jerks, snatches). The raised heel helps maintain an upright torso, achieve greater squat depth, and reduce lower back stress. They are the gold standard for serious powerlifters and Olympic lifters. Versatile Cross-Trainers Cross-trainers are the all rounders of gym footwear, built for varied workouts that include lifting, HIIT, and agility drills. They typically feature a minimal to moderate heel-to-toe drop (around 4-8 mm) , balancing stability for lifting with flexibility for dynamic movements. The sole is firm enough for squats but has enough cushion for box jumps. For athletes in dynamic sports like CrossFit, specialized insoles designed for CrossFit can add extra stability. Cross-trainers are the jack-of-all-trades. They provide a stable lifting platform without sacrificing the agility needed for hybrid workouts, making them an excellent choice for general gym-goers. Minimalist Flat-Soled Shoes Minimalist, or "barefoot," shoes aim to replicate training without shoes. They have a zero-drop platform , meaning the heel and toes are level, promoting a natural foot position and connection to the floor. They are ideal for deadlifts, where being low to the ground is advantageous. Research suggests that walking in minimalist shoes can strengthen feet as effectively as a dedicated exercise program (3). Comparison Review: Which Shoe is Right for You? Choosing the right shoe depends on your primary training style. This table compares shoe types to help you find the best fit. Shoe Type Best For Heel Drop Key Feature Who It's For Weightlifting Shoe Squats, Cleans, Snatches, Overhead Press High (12mm+) Elevated, non-compressible heel for maximum stability and improved squat mechanics. Dedicated powerlifters and Olympic weightlifters. Cross-Trainer HIIT, CrossFit, General Gym Workouts Low to Moderate (4-8mm) A balanced design offering both stability and flexibility. Fitness enthusiasts who enjoy a variety of exercises in a single session. Minimalist Shoe Deadlifts, Kettlebell Work, Functional Fitness Zero (0mm) A thin, flat, and flexible sole that promotes natural foot movement. Lifters who prioritize a barefoot feel and want to maximize foot strength. Matching your shoes to your workouts enhances performance and safety. For detailed model reviews, consider finding the best shoes for weightlifting in our complete guide . Top Rated Shoes for Men and Women Navigating the athletic shoe market is easier when you know what to look for. We've reviewed top performers from trusted brands like Nike, Reebok, and Adidas to guide your choice. Best for Heavy Lifting (Men & Women) For maximal weightlifting, stability is nonnegotiable. Dedicated weightlifting shoes provide an unshakeable base. Nike Romaleos 4 : A titan in the weightlifting world, the Romaleos 4 offers a wide, stable base and a significant heel lift to aid squat form. Dual straps lock your foot down, eliminating movement under a heavy barbell. Adidas Adipower III: Known for its rigid TPU midsole, the Adipower III is built for pure power transfer. It provides the secure, locked-in feel elite lifters depend on. Best for CrossFit and Hybrid Workouts (Men & Women) Hybrid workouts demand a versatile shoe that can handle lifting, jumping, and climbing. Reebok Nano X4 : A legend in the CrossFit community, the Nano X4 features a redesigned upper for breathability and the new Lift and Run (L.A.R.) Chassis system, which provides heel stability for lifting and forefoot cushioning for dynamic movements. Nike Metcon 9 : A powerhouse in the training space, the Metcon 9 has a wide, flat heel with an internal plate for stability. Its dual-density foam midsole offers responsive cushioning, and a durable rubber wrap resists abrasion during rope climbs. Best All-Around Gym Shoe (Men & Women) For those who mix various training styles, a versatile, all around shoe is the most practical choice. VivoBarefoot Primus Lite III : For lovers of the "barefoot" feel, this zero-drop shoe features a thin, flexible sole that helps strengthen feet by allowing natural movement. It's excellent for deadlifts and kettlebell work. Altra Solstice XT 2 : Altra is known for its FootShape™ toe box and zero-drop platform. The Solstice XT 2 is a great all around that gives toes room to spread, creating a naturally stable base for lifting and agility drills. How Proper Footwear Impacts Your Biomechanics The connection between your shoes and joint health is direct. Proper footwear is critical equipment that influences how your body moves, potentially preventing chronic pain and injury. Your body is a kinetic chain; a wobbly shoe breaks that chain at its foundation, forcing joints into inefficient positions and increasing the risks of injury during lifting . Top Rated Steel Water Bottles Health Information: Improving Form from the Ground Up In a barbell squat, the elevated heel of a weightlifting shoe allows for greater ankle dorsiflexion, helping you maintain an upright chest and reducing stress on the lower back. A wide toe box lets your toes splay, creating a larger, more stable base for pushing force into the floor during heavy lifts like deadlifts. The Hidden Dangers of Running Shoes Lifting in running shoes is a common mistake. Their soft cushioning absorbs the force you need to transfer into the ground, creating instability. Lifting on a cushioned sole is like standing on a soft mattress while trying to push a heavy piece of furniture. Much of your force is lost in the unstable surface, and your body has to work overtime just to stay balanced. This instability can lead to ankle rolling and knee valgus (inward collapse), increasing your risk for ligament strains and long term joint damage. Well-Being Trends: Investing in Longevity and Health More people are recognizing these biomechanical truths. Strength training requires shoes that offer unyielding stability. This awareness is an important well being trend, reflecting a shift towards injury prevention and performance optimization. Choosing the right footwear is an investment in your health, ensuring you can pursue your lifting goals safely and effectively for years to come. Your Smart Buying and Shoe Care Checklist This checklist helps you choose the right shoes for strength training and maintain them properly. View your shoes as a critical piece of equipment, an investment in your strength and safety. The In-Store Buying Guide Check the Fit: Try shoes on later in the day with your gym socks. There should be about a half inch of space between your longest toe and the shoe's tip. Ensure your heel is locked in with no slipping, but your toes can spread out. Test for Stability: Stand on one foot. A good strength training shoe should make you feel planted and balanced. Mimic Your Moves: Perform a few bodyweight squats. Your feet should feel connected to the ground and stable. Extending the Life of Your Shoes Gym Use Only: Restrict your lifting shoes to indoor training to preserve their soles and structure. Proper Cleaning: Avoid the washing machine. Use a soft brush, mild soap, and water to clean the exterior. Baking soda can freshen the interior. Air Them Out: Always air dry your shoes after a workout, away from direct heat sources. Your Questions Answered Here are answers to common questions about shoes for strength training. Can I Use Running Shoes for Lifting Weights? No. Running shoes have soft cushioning that creates an unstable platform for lifting. This instability can compromise your form, reduce power transfer, and increase your risk of injury, especially during compound lifts like squats and deadlifts. How Tight Should My Lifting Shoes Fit? Your lifting shoes should be snug and secure but not painful. Your heel should be locked in place with no slippage, while your toes should have enough room to wiggle and spread naturally. A proper fit ensures maximum stability and control. Do I Need Different Shoes for Deadlifts and Squats? While not essential for everyone, dedicated lifters often use different shoes for these lifts. A flat, zero-drop shoe is preferred for deadlifts to reduce the pull distance and improve leverage. For squats, the elevated heel of a weightlifting shoe can help improve depth and posture. A quality cross-trainer is a versatile option suitable for both lifts in a general workout. References Sato, K., Fortenbaugh, D., & Hydock, D. (2012). Kinematic changes using weightlifting shoes on barbell back squat. Journal of Strength and Conditioning Research, 26 (1), 28-33. Fortune Business Insights. (2023). Athletic Footwear Market Size, Share & COVID-19 Impact Analysis . Retrieved from athletic footwear market trends . Miller, E. E., et al. (2014). The effect of minimal shoes on arch structure and intrinsic foot muscle strength. Journal of Sport and Health Science, 3 (2), 74-85. At Flourish-Everyday , we make finding the right footwear simple. Check out our curated guides and expert advice on everything from strength training to running at https://www.flourish-everyday.com .
- What Causes IT Band Syndrome and How to Prevent It
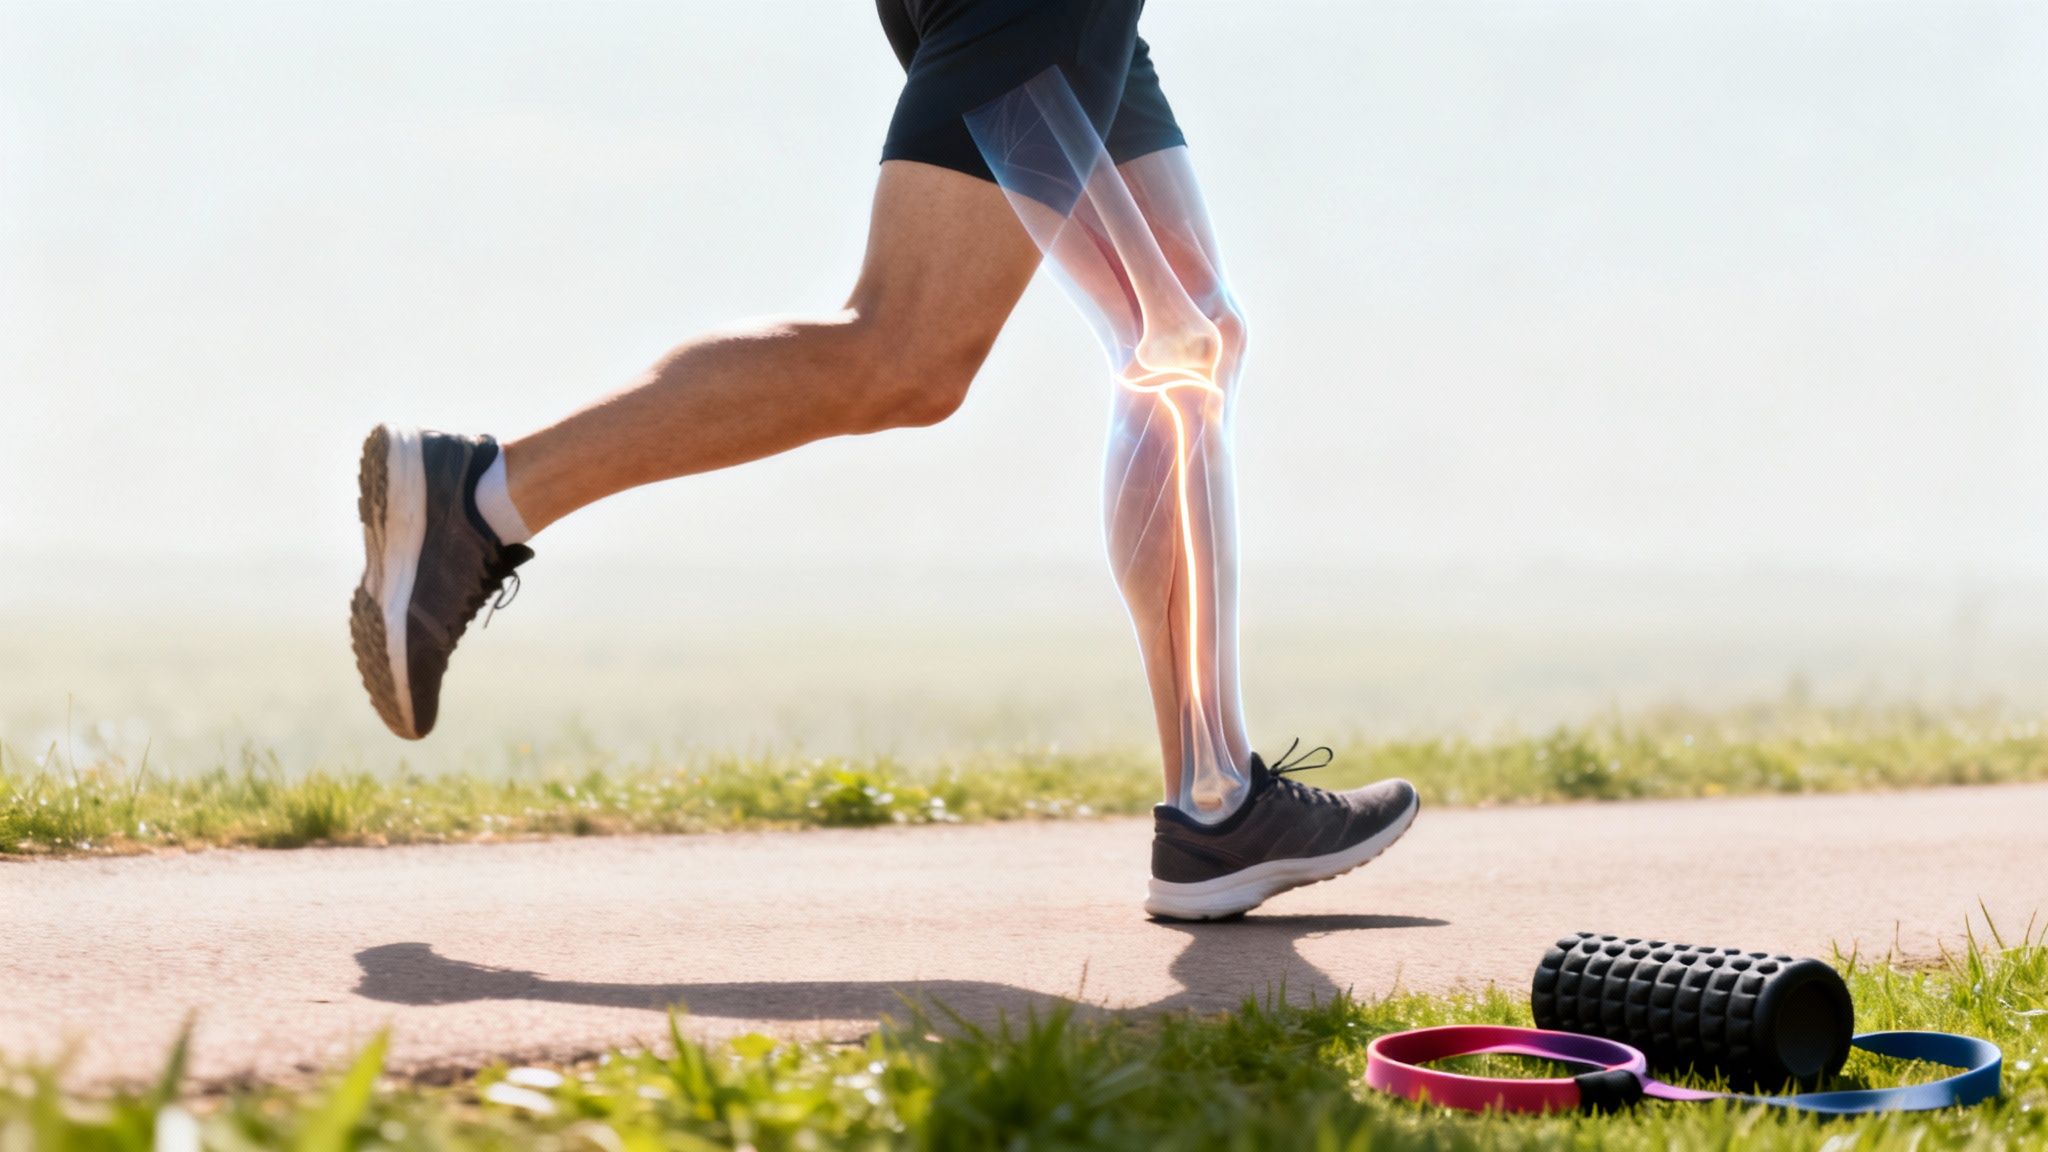
That sharp pain on the outside of your knee isn't just a random occurrence, it's your body signaling an issue. What causes IT Band Syndrome and how to prevent It? If you're a runner, cyclist, or anyone who stays active, you may have encountered Iliotibial (IT) Band Syndrome. It’s one of the most common overuse injuries out there. Think of your IT band as a thick, fibrous cable running down your outer thigh, not a muscle you can easily stretch. The pain flares up when this band gets irritated from rubbing against your thigh bone, usually because supporting muscles, like your glutes and core, aren't doing their job. Understanding how it fits into the broader picture of knee pain is key to addressing the root cause. This guide is your complete roadmap to understanding and preventing ITBS. We'll build your knowledge from the ground up, empowering you to fix the cause, not just chase symptoms. In This Guide The Real Culprits Behind IT Band Syndrome How to Recognize the Symptoms of ITBS Building Your Body's Defense Against Injury Choosing the Right Footwear for Prevention Common Questions About IT Band Syndrome References Before we look further, let's get a quick snapshot of the key players involved in IT band syndrome. This table breaks down the main contributing factors to give you a clear overview. Quick Guide to IT Band Syndrome Key Factors Causative Factor Brief Explanation Who Is Most at Risk? Training Errors Increasing mileage or intensity too quickly, excessive hill running, or sudden changes in routine. New runners, marathon trainees, or anyone rapidly escalating their workout volume. Muscle Imbalances Weak gluteus medius, hip abductors, and core muscles, leading to poor pelvic stability. Desk workers, athletes with quad dominant movement patterns, and individuals who neglect strength training. Poor Biomechanics Issues like excessive foot pronation, leg length discrepancy, or a crossover gait pattern. Individuals with specific anatomical traits or running form that needs correction. Footwear & Surfaces Worn out shoes, improper footwear for your foot type, or consistently running on banked surfaces. Runners who don't replace their shoes often enough or frequently run on uneven roads. Understanding these factors is the first step toward building a smarter, more resilient training plan. Now, let's explore these ideas in more detail. A Common and Treatable Injury ITBS is not a new phenomenon. It was first described in 1975 by Dr. James Renne, who observed it in U.S. Marine Corps recruits (Renne, 1975). Today, research shows ITBS accounts for up to 12% of all running injuries and is a leading cause of lateral knee pain in athletes (van der Worp et al., 2012). It's especially prevalent during high mileage training, highlighting how easily overuse can trigger it. The pain often begins as a minor annoyance but can quickly escalate, sidelining you from activities you enjoy. The good news? ITBS is highly treatable and, even better, preventable. The secret is to shift your focus. Stop obsessing over the sore spot on your knee and start strengthening the weak links in the chain, which almost always means your hips and glutes. This proactive approach is the foundation for lasting relief. By getting to the bottom of what causes your IT band to flare up, you can take targeted action, fix the underlying problem, and get back to moving pain free. The Real Culprits Behind IT Band Syndrome That nagging pain on the outside of your knee rarely just shows up out of the blue. It’s almost always a signal that something in your kinetic chain, the network of muscles and joints that work together, is off kilter. To figure out what’s causing IT band syndrome, we have to look past the pain point and dig into the real issues tied to your training, movement patterns, and muscle strength. Think of your IT band like a rope in a tug of war. If one team (your muscles) isn’t pulling its weight, the rope gets yanked and strained. Over time, this imbalance creates friction and irritation right where the band crosses your knee, sparking that all too familiar sharp pain of ITBS. The infographic below breaks down the main triggers, training mistakes, muscle imbalances, and wonky biomechanics, that all feed into this frustrating condition. As you can see, it’s usually not just one thing. Several factors often team up, creating the perfect storm for IT band irritation. Training Errors That Overload Your Body One of the most common reasons ITBS flares up is simply doing too much, too soon. Your connective tissues, like the IT band, adapt to stress much slower than your muscles or your cardiovascular system. When you jack up your training volume or intensity too quickly, you're basically outpacing your body’s ability to repair itself. This is a huge issue in repetitive, one directional activities. For runners and cyclists, the constant bending and straightening of the knee makes them prime candidates. A sudden jump in weekly mileage or throwing in a bunch of intense hill workouts can send your risk through the roof. Common training mistakes include: Jumping up in mileage too fast without letting your body adjust. Too much downhill running , which puts a ton of braking force on the structures around your knee. Adding intense speed work or hill repeats without a gradual buildup. Skimping on recovery days , allowing all that micro damage to pile up. Bluebird Botanicals The Critical Role of Muscle Weakness While training errors often light the match, it’s usually underlying muscle imbalances that provide the fuel. The number one offender? Weak hip abductor muscles, especially the gluteus medius . This muscle sits on the side of your hip and is absolutely vital for keeping your pelvis stable every time you're on one leg, which, for a runner, is every single step. When your gluteus medius is weak, it can't stop your opposite hip from dropping. This "pelvic drop" makes your thigh angle inward, which in turn yanks on the IT band and increases tension right over the outside of your knee. Here’s the key takeaway: ITBS is often not a problem with the IT band itself, but a symptom of weak hips. Your body is a master of compensation. When your glutes aren't doing their job, the IT band and other small muscles have to work overtime to provide stability they were never designed for. Fixing these weaknesses is nonnegotiable. If you're looking for a starting point, our guide on how to improve hip flexibility and unlock movement is a great complement to the strengthening work needed to stabilize your pelvis. Biomechanical Flaws and Environmental Factors Your unique anatomy and the way you move, your biomechanics, also play a huge part. Certain habits or physical traits can set you up for ITBS by changing the forces acting on your knee. For instance, a "crossover gait," where your feet cross over the midline of your body when you run, puts a lot of extra strain on the outside of your leg. Likewise, excessive foot pronation (when your foot rolls too far inward) can set off a chain reaction that travels all the way up your leg, messing with knee alignment and stressing the IT band. Finally, something most people don't consider is that always running on the same side of a sloped road or on a track in the same direction can create an artificial leg length difference, putting uneven stress on your body. Also, if your shoes are worn out and they’ve lost their cushioning and support, it forces your tissues to absorb more impact than they should. These outside factors can be the final straw that pushes an already stressed system over the edge into injury. How to Recognize the Symptoms of ITBS If you've been dealing with a nagging pain on the outside of your knee, there's a good chance you've wondered if IT band syndrome is the culprit. The good news is that identifying ITBS is usually pretty straightforward because the symptoms are distinct and tend to pop up in predictable patterns, especially when you're active. Knowing these clues can help you decode what your body is trying to tell you. The classic sign of ITBS is a sharp or burning pain located specifically on the outer side of the knee . This isn't some vague, all over ache; it's a pinpoint pain you can often touch with a single finger. For runners, this pain famously flares up at a consistent point during a run, maybe ten minutes in, and often fades away not long after you stop. Pinpointing Your Specific Symptoms Beyond that primary pain point, a few other tell tale signs can help you connect the dots. If ITBS is what you're dealing with, you'll probably notice a few of these: Tenderness to the Touch: The spot on the outside of your knee where the IT band connects will likely feel sore or tender when you press on it. Pain with Downhill Movement: Walking or running downhill, or even just tackling a flight of stairs, often cranks up the pain because of the increased braking forces. A Snapping or Popping Sensation: Some people report feeling a weird snapping or clicking on the outside of the knee as they bend and straighten it. Pain That Travels: While the main event is definitely at the knee, the discomfort can sometimes radiate up the outer thigh toward your hip. A key diagnostic clue is how the pain behaves. It often starts as a mild annoyance but can quickly escalate to a sharp, debilitating sensation that forces you to stop your activity. At rest, the pain usually fades, which is a hallmark of this overuse injury. When to Suspect It's Something Else Nailing down the source of your pain is the first step toward fixing it. But knee pain can be tricky, and several other conditions can mimic IT band syndrome. It's smart to be aware of these so you can get a proper diagnosis if your symptoms don't quite line up. For example, a lateral meniscus tear can also cause pain on the outside of the knee, but it’s often joined by clicking, locking, or a feeling that your knee might give out. Another common one, patellofemoral pain syndrome (runner's knee), usually causes pain around or behind the kneecap itself, not on the outer edge. To read more about runners knee see, What Causes Runner's Knee and How to Fix It for Good If your pain is severe, came on suddenly after a specific incident, or isn't getting better with rest, it's really important to see a healthcare professional. A doctor or physical therapist can perform a thorough physical exam to give you an accurate diagnosis. They might use specific tests, like the Noble Compression Test, to confirm ITBS and rule out other possibilities, making sure you get on the right recovery plan from the start. Building Your Body's Defense Against Injury The best way to beat IT Band Syndrome? Stop it before it even starts. Building a resilient body isn’t just about logging more miles; it’s about making sure your body’s support system is strong enough to handle the work you're putting in. Prevention is all about getting proactive with two key pillars: targeted strengthening and smart mobility. This isn't about some generic, one size fits all advice. We’re going to zero in on the specific movements that build stability in your hips and pelvis, what I like to call the true command center for fending off ITBS. By reinforcing this area, you directly reduce the strain and friction that angers the IT band. Fortifying Your Foundation with Targeted Strength Think of your glutes and core muscles as the anchor that keeps your pelvis from rocking side-to-side while you run or cycle. When these muscles are weak, your pelvis can dip with each step, causing your upper leg to angle inward and tug on the IT band. Our goal is to wake up these crucial stabilizers and strengthen them so they can do their job properly. There are three foundational exercises that are particularly effective for building this kind of stability. Try to work them into your routine two to three times per week . Clamshells: Lying on your side with your knees bent, keep your feet glued together and lift your top knee. This simple move specifically targets the gluteus medius, the primary muscle that stops that infamous pelvic drop. Hip Bridges: Lying on your back, you'll drive through your heels to lift your hips toward the ceiling. This one strengthens the entire glute complex and hamstrings, improving your overall power and stability from the back. Side Planks: This exercise is an absolute powerhouse for your core and hip abductors. It literally teaches your body to maintain a neutral, stable torso and pelvis, which is essential for solid running form. The "why" behind these exercises is simple: a strong and stable core and hip structure acts as a shock absorber. It distributes force evenly throughout your lower body, preventing any single structure, like the IT band, from taking on too much stress. Unlocking Movement with Smart Mobility Here’s where many people go wrong: they try to aggressively stretch the IT band itself. But the IT band is an incredibly tough piece of connective tissue, not a flexible muscle. You simply can't lengthen it with stretching, and trying to force it often just increases inflammation and pain. A much smarter approach is to focus on the muscles that attach to it, especially the glutes and the Tensor Fasciae Latae (TFL), a small muscle at the front of your hip. Releasing the tension in these areas is where you’ll find real, lasting relief. This is where a foam roller becomes your best friend. For more in-depth techniques, you might want to check out our foam rolling for runners guide . To directly tackle the tightness that contributes to ITBS, incorporating specific TFL release exercises with a foam roller can be the answer. Instead of rolling directly on the painful side of your knee, concentrate your efforts on these two key spots: Glutes: Sit on the foam roller and cross one ankle over the opposite knee. Gently lean into the side of the crossed leg to massage those deep gluteal muscles. TFL: Lie on your side and place the roller just below your hip bone, slightly toward the front of your body. Roll gently back and forth over this small area to release that built up tension. To make things even clearer, this table breaks down the core components of a solid prevention plan. Top Pick: Foam Roller Essential Exercises for IT Band Syndrome Prevention Exercise Type Specific Exercise Primary Goal/Benefit Strengthening Side Plank Builds core stability and strengthens hip abductors to prevent pelvic drop. Strengthening Clamshell Isolates and activates the gluteus medius to improve hip stabilization. Mobility Foam Roll Glutes Releases tension in the gluteal muscles, reducing the pull on the IT band. Mobility Foam Roll TFL Loosens the Tensor Fasciae Latae, a key muscle connected to the IT band. By consistently weaving this simple combo of strengthening and mobility work into your weekly schedule, you’re not just chasing symptoms away. You are fundamentally rewiring your body's mechanics to build a more resilient, balanced, and injury proof foundation for all your activities. Choosing the Right Footwear for Prevention Your shoes are literally where the rubber meets the road. They’re the first line of defense between your body and the hard ground, making them a massive factor in preventing IT band syndrome. Every single foot strike sends shockwaves up your leg, and your shoes are supposed to manage that impact and guide your foot’s movement. When shoes are worn out or just plain wrong for your feet, that whole system gets thrown out of whack. A shoe that has lost its cushioning and support forces your muscles and tissues, yes, including your IT band, to pick up the slack and work overtime just to keep you stable. That extra stress, repeated thousands of times over a run, is a classic recipe for ITBS irritation. Decoding Shoe Features That Matter Walking into a running store can feel a bit like trying to read a foreign language, but you only need to focus on a few key features that directly affect how force travels up your leg. Getting a handle on these will help you make a much smarter choice. Here are the three most important things to look at: Cushioning: This is simply the shoe's ability to absorb shock. The right amount of cushioning can soften the blow to your knees and hips, but be careful—too much can sometimes feel mushy and unstable. Stability Control: These are features, often bits of firmer foam on the inside of the shoe, designed to control excessive foot motion. They’re specifically for people who overpronate (when your foot rolls too far inward). Heel-to-Toe Drop: This is the height difference between the shoe's heel and the forefoot. A higher drop can put more pressure on the knees, while a lower drop tends to shift the workload down to your calves and Achilles tendon. The goal isn't to find the one "perfect" shoe on the market. It's to find the right shoe for your unique body and mechanics. A shoe that’s perfect for your friend could be the very thing that causes you problems. Neutral vs. Stability: What Your Foot Type Needs The biggest decision you'll make is whether you need a neutral shoe or a stability shoe. This choice is all about how your foot naturally moves when you run, and getting it right sets a proper foundation for your entire body. Neutral Shoes: These are for runners with a "normal" pronation pattern. This means your foot rolls inward just the right amount to absorb shock on its own. Neutral shoes provide cushioning without trying to "fix" your foot's motion. Stability Shoes: These are built for overpronators, people whose feet roll too far inward. By adding extra support on the inner side, stability shoes help keep your foot, ankle, and leg in better alignment. This can dramatically reduce the kind of rotational stress that irritates the IT band. Our detailed article on how to choose running shoes can give you more pointers here. Making an Informed Choice for Injury Prevention So, how do you figure all this out? The absolute best way is to go to a specialty running store and get a gait analysis. They'll watch you run on a treadmill and can pinpoint your foot type, pointing you toward the right category of shoe. Keep these simple tips in mind when you're ready to buy: Replace them regularly: Most running shoes have a lifespan of about 300-500 miles . After that, the foam is shot, even if the shoe still looks good from the outside. Shop in the afternoon: Your feet swell during the day, so trying on shoes later on gives you a much better chance of getting the right fit. Comfort is king: At the end of the day, the best shoe is the one you don't even notice you're wearing. If you feel any weird pressure points or it just feels "off" in the store, it's not the one for you. By picking shoes that work with your body's natural mechanics, you’re creating a stable base that takes unnecessary strain off your knees and hips. It’s one of the simplest and most effective things you can do to keep IT band syndrome from sidelining you. Owala Stainless Steel Water Bottle Common Questions About IT Band Syndrome Dealing with an injury like IT Band Syndrome can be confusing. You’re probably wondering how to change up your workouts, how long it’ll be before you feel better, or if you’re even doing the right things to get back on your feet. To help clear the air, I’ve put together some straightforward answers to the most common questions about ITBS. Think of this as your quick reference guide to bust some myths and lock in the key lessons from this guide. The goal is to give you the confidence you need to manage your recovery and stay injury free down the road. Can I Still Work Out with IT Band Syndrome? Yes, but you have to be smart about it. The main thing is to stop doing whatever is aggravating the IT band, which is usually any activity that involves repeatedly bending and straightening the knee under load. This means that for now, high impact exercises like running and cycling are off the table. Instead, shift your focus to low impact cross-training that keeps your cardio up without making the problem worse. A few great options include: Swimming: This is a fantastic zero impact workout that puts absolutely no stress on the knee joint. Using the Elliptical: The smooth, gliding motion is much kinder to your knees than the pounding of running. Upper Body and Core Work: There’s no better time to build strength everywhere else. Most importantly, this is the perfect opportunity to double down on those hip and glute strengthening exercises we talked about earlier. These are the moves that tackle the root cause of ITBS, the muscle imbalances. Just remember to always listen to your body; if something hurts, stop immediately. How Long Does Recovery from IT Band Syndrome Take? There's no magic number here; recovery can take anywhere from a few weeks to several months. It really depends on how bad your symptoms are and, frankly, how disciplined you are with your recovery plan. For milder cases, you could feel significant relief within four to eight weeks by sticking to a routine of rest, ice, and targeted exercises. But the most critical factor is fixing the underlying problem. Just resting until the pain goes away, without strengthening your weak glutes or correcting your form, is a recipe for disaster. Jumping back into your full training schedule too soon is the number one reason people get stuck in that frustrating cycle of pain. The goal isn't just to be pain free; it's to become resilient. Real recovery means you've built a stronger, more stable body so the problem doesn't pop up again the moment you start pushing yourself. Is Foam Rolling Directly on My IT Band a Good Idea? This is probably one of the biggest myths out there when it comes to ITBS. It might feel like you're "breaking up" knots and tightness, but aggressively foam rolling right on your IT band is not helping. The IT band is an incredibly tough strap of connective tissue, it’s not a muscle, so you can't actually stretch or lengthen it this way. Pushing hard on an area that's already inflamed and angry can often do more harm than good by making the irritation even worse. A much better strategy is to use the foam roller on the muscles that connect to the IT band. You'll want to focus your efforts on: The glutes (your butt muscles). The Tensor Fasciae Latae (TFL) , which is a small muscle up on the front and side of your hip. By loosening up these surrounding muscles, you take the tension off the IT band, which gets to the real source of the problem. When Should I See a Doctor or Physical Therapist? While you can manage many mild cases of ITBS on your own, there are definitely times when you need to call in a professional. It's time to make an appointment if the pain is severe, if it isn't getting any better after a week or two of rest and specific exercises, or if you're just not 100% sure what's going on. A physical therapist, especially, can be essential for your recovery. They can do a full biomechanical assessment and watch you move to pinpoint the exact weaknesses or movement patterns causing the issue. From there, they'll build a personalized rehab plan designed to get you back to your favorite activities safely and, more importantly, keep ITBS from coming back. References Renne, J. W. (1975). The iliotibial band friction syndrome. The Journal of Bone and Joint Surgery. American volume , 57 (8), 1110–1111. van der Worp, M. P., van der Horst, N., de Wijer, A., Backx, F. J., & Nijhuis-van der Sanden, M. W. (2012). Iliotibial band syndrome in runners: a systematic review. Sports medicine , 42 (11), 969–992. At Flourish-Everyday , we believe that the right information and the right gear are essential for a healthy, active lifestyle. From finding the perfect running shoes to understanding how to prevent common injuries, we're here to support your journey toward wellness. Explore our guides and reviews to empower your fitness goals. Find your inspiration at https://www.flourish-everyday.com .
- The Ultimate Guide to Fitness for Beginners
Everybody has advice on how to workout, so starting a fitness journey can feel overwhelming. With endless suggestions and complex workout plans, knowing where to begin is often the hardest part. The key to long term success isn't about diving into extreme workouts; it's about building a solid, sustainable foundation one practical step at a time. I will guide you through a plan that is designed to cut through the noise and provide clear, actionable fitness tips for beginners, focusing on fundamental principles that create lasting change, not quick fixes that lead to burnout. This detailed list will provide you with the necessary tools to begin intelligently, maintain motivation, and develop habits that effortlessly blend into your life. We will cover everything from establishing a realistic mindset and mastering basic movements to understanding the crucial roles of nutrition, recovery, and progressive overload. Whether your goal is to feel stronger in your daily activities or simply embrace a healthier lifestyle, these principles will guide your first steps with confidence. Forget the "all or nothing" mentality. True progress comes from consistency, patience, and a well rounded approach that respects your body's limits while gently pushing its boundaries. Index of Topics 1: Invest in Proper Footwear for Your Activity Top Athletic Shoe Reviews: Men and Top Athletic Shoe Reviews: Women 2: Start with a Realistic, Sustainable Routine 3: Master Basic Movement Patterns and Form 4: Incorporate Rest Days and Active Recovery 5: Focus on Consistency Over Intensity 6: Combine Cardio, Strength, and Flexibility Training 7: Establish a Structured Warm-Up and Cool-Down Routine 8: Track Progress Beyond the Scale 9: Gradually Progress Load, Duration, and Intensity 10: Adopt a Beginner Friendly Nutrition Approach 11. Well Being Trends and Methods References 1. Invest in Proper Footwear for Your Activity One of the most impactful yet frequently overlooked fitness tips for beginners is to start from the ground up: with your shoes. Proper footwear is engineered for your chosen activity, providing the correct balance of cushioning, stability, and support. This specialized design is foundational for preventing injuries and enhancing performance, as improper shoes can lead to issues like shin splints or plantar fasciitis (Nishida et al., 2018). Using activity specific shoes directly impacts your body's alignment and absorbs shock effectively, reducing stress on your feet, ankles, knees, and hips. For example, a runner experiencing shin splints might find relief by switching to shoes that correct for overpronation. Similarly, a weightlifter will feel more stable during lifts with a firm, flat soled cross-trainer compared to a heavily cushioned running shoe. Top Athletic Shoe Reviews: Men Brooks Ghost 15 (Running): Praised for its balanced cushioning and smooth ride, making it an excellent daily trainer for neutral runners. It provides reliable comfort for both short and long distances. Nike Metcon 9 (Cross-Training): A top choice for HIIT and weightlifting. Its wide, stable heel provides a solid base for lifts, while the forefoot is flexible enough for agility drills and short bursts of cardio. Hoka Clifton 9 (Max Cushion Running): Ideal for beginners seeking maximum shock absorption. It's lightweight yet highly cushioned, reducing impact on joints during road running. Top Athletic Shoe Reviews: Women ASICS GEL-Kayano 30 (Stability Running): A leading stability shoe that offers excellent support for overpronators without feeling overly rigid. Its responsive cushioning makes it comfortable for daily miles. New Balance Fresh Foam X 880v13 (Versatile Trainer): A reliable workhorse shoe perfect for those who mix walking and running. It offers a great blend of cushioning, responsiveness, and durability. On Cloud 5 (Lifestyle & Light Activity): Known for its unique CloudTec® cushioning and stylish design, this shoe is perfect for walking, travel, and light gym sessions, offering all-day comfort. 2. Start with a Realistic, Sustainable Routine A common pitfall for beginners is adopting an overly ambitious workout schedule. A better approach is to build a realistic and sustainable routine. Starting with three to four weekly sessions of 30-45 minutes allows your body to adapt, builds confidence, and establishes consistency. This method prioritizes long term adherence over short-term intensity. This gradual approach significantly reduces the risk of burnout and injury. For example, a new runner who commits to three 45-minute sessions a week is far more likely to stick with it than someone who attempts to run five miles every day. The goal is to make fitness an integral part of your lifestyle. Consistency, even in smaller doses, yields better results than sporadic, high intensity efforts. Bluebird Botanicals 3. Master Basic Movement Patterns and Form Prioritizing quality over quantity is essential. Before adding weight or intensity, master foundational movements: squats, lunges, push-ups, rows, and planks. Developing proper form builds correct neuromuscular pathways, ensuring your brain and muscles work together efficiently. This foundation is critical for preventing injury and targeting the intended muscles, making workouts safer and more effective (Rippetoe & Kilgore, 2011). Ignoring proper form leads to chronic pain and plateaus. For instance, a beginner who masters the air squat with perfect depth and a neutral spine will progress safely to weighted squats. In contrast, rushing this process with poor form risks back or knee injuries. This principle is heavily emphasized by respected strength coaches and physical therapists worldwide. 4. Incorporate Rest Days and Active Recovery Fitness gains occur during recovery, not the workout itself. Incorporating dedicated rest days and active recovery is nonnegotiable. This is when your body repairs muscle tissue, replenishes energy stores (glycogen), and adapts to become stronger. Skipping recovery is a fast route to burnout, injury, and stalled progress. This crucial downtime prevents overuse injuries like tendonitis and stress fractures. A rest day can include low intensity activities like walking, gentle yoga, or swimming. This practice, known as active recovery, promotes blood flow to muscles, which can help reduce soreness and speed up repair (Dupuy et al., 2018). For more tips, learn Recovery Techniques for Athletes 5. Focus on Consistency Over Intensity Prioritize showing up over showing off. The allure of high intensity workouts can lead to burnout. The true key to long term success is consistency, a principle popularized in habit formation research (Clear, 2018). Training at a manageable 70-80% effort most days is more effective than sporadic, maximal effort sessions. This approach allows your body to adapt and grow stronger over time, creating a powerful compounding effect. A beginner who walks for 30 minutes four times a week for a year will see superior results compared to someone who quits after two weeks of grueling workouts. Consistency builds the aerobic base, solidifies proper technique, and transforms exercise into a durable, lifelong habit. 24oz Steel Btl 6. Combine Cardio, Strength, and Flexibility Training An effective fitness plan is a balanced one. Focusing solely on one type of exercise can lead to muscle imbalances and overuse injuries. The key is a holistic approach integrating the three core pillars of fitness: cardiovascular exercise, strength training, and flexibility work. This strategy ensures well rounded development, promoting heart health, muscular power, mobility, and injury resilience. This principle is validated by leading health organizations like the American College of Sports Medicine (ACSM), which recommends a combination of modalities for optimal health (Garber et al., 2011). Cardio strengthens your heart, strength training builds a robust musculoskeletal frame, and flexibility training maintains a healthy range of motion in your joints. 7. Establish a Structured Warm-Up and Cool-Down Routine Jumping straight into a workout and stopping abruptly is a common mistake. A structured warm-up and cool-down are vital. A proper warm-up gradually increases heart rate, primes your nervous system, and delivers oxygen rich blood to your muscles, making them more pliable and ready for work. This is essential for preventing injuries and maximizing performance. Similarly, a cool-down is the first step in recovery. It allows your heart rate and blood pressure to return to normal gradually, which helps prevent dizziness. For example, finishing a hard run with a few minutes of walking and light static stretching helps muscles transition out of an intense state, reducing soreness and improving flexibility. 8. Track Progress Beyond the Scale Measure success with more than just a number on the scale. Fixating on weight can be misleading, as it doesn't account for muscle gain or fat loss. A holistic approach to tracking provides a more accurate picture of your progress, keeping you motivated even when weight plateaus. Adopting this broader perspective helps you recognize non-scale victories. A runner might notice their mile time has dropped, or a strength trainee might lift a heavier weight for the same reps. These performance gains, along with improved energy levels and better fitting clothes, are tangible proof that your hard work is paying off. 9. Gradually Progress Load, Duration, and Intensity The cornerstone of long term fitness is progressive overload . This involves systematically and gradually increasing the demands placed on your body. Without this, your body adapts and progress stalls. Progressive overload provides a safe, structured path to getting stronger and fitter while minimizing the risk of injury. This principle applies to every fitness discipline. A runner progressively increases mileage, a cross-trainer adds resistance, and a strength trainee adds weight to the bar. By making small, manageable increments, you consistently challenge your muscles and cardiovascular system to adapt and grow stronger. 10. Adopt a Beginner Friendly Nutrition Approach You cannot out train a poor diet. For beginners, nutrition doesn't need to be complex. Focusing on foundational principles like adequate protein intake, whole foods, and proper hydration provides the fuel your body needs to recover, build muscle, and perform. Adopting a beginner friendly approach means aligning food choices with fitness goals. Someone focused on strength training will prioritize protein to facilitate muscle growth, aiming for 1.6-2.2 grams per kilogram of body weight (Jäger et al., 2017). The core idea is to support your new activity level with nutrient dense foods. Consider exploring approaches like intuitive eating for a sustainable relationship with food. Comparison Review: Well-Being Trends and Methods Well-Being Method Target Audience Key Principles Pros Cons CrossFit Individuals seeking high-intensity, community-driven workouts. Constantly varied functional movements performed at high intensity (HIIT). Combines weightlifting, gymnastics, and metabolic conditioning. Strong community, measurable progress, highly effective for building strength and endurance. Higher risk of injury if form is compromised, can be intimidating for absolute beginners, expensive membership. Mindful Movement (Yoga/Tai Chi) Those looking for low-impact exercise focusing on the mind-body connection. Slow, controlled movements synchronized with breath. Emphasis on flexibility, balance, and mental focus. Low injury risk, reduces stress, improves balance and flexibility, accessible to all fitness levels. May not be sufficient for significant cardiovascular or strength gains alone, progress can be slow. Peloton (At-Home Fitness) People who prefer the convenience of working out at home with guided instruction. Instructor-led classes (cycling, running, strength) streamed live and on-demand. Fosters a virtual community. Highly convenient, motivating instructors, wide variety of classes, tracks performance metrics. High initial equipment cost, requires subscription, lacks in-person social interaction and form correction. Intuitive Eating Individuals tired of restrictive diets, seeking a sustainable relationship with food. Honors hunger and fullness cues, rejects diet mentality. Focuses on body respect and satisfaction from food. Promotes a healthy long-term relationship with food, reduces stress around eating, sustainable. May not lead to weight loss for everyone, requires unlearning years of diet culture, can be challenging without professional guidance. Embrace the Journey and Keep Moving Forward Embarking on a fitness journey is a rewarding investment. Success isn't about drastic transformations but laying a strong foundation. This guide's fitness tips for beginners are designed to empower you, not overwhelm you. The path ahead is a personal marathon, not a sprint. Remember, the "perfect" routine is the one you can stick with consistently. References Clear, J. (2018). Atomic Habits: An Easy & Proven Way to Build Good Habits & Break Bad Ones . Avery. Dupuy, O., Douzi, W., Theurot, D., Bosquet, L., & Dugué, B. (2018). An Evidence-Based Approach for Choosing Post-exercise Recovery Techniques to Reduce Markers of Muscle Damage, Soreness, Fatigue, and Inflammation: A Systematic Review With Meta-Analysis. Frontiers in Physiology, 9 , 403. Garber, C. E., Blissmer, B., Deschenes, M. R., Franklin, B. A., Lamonte, M. J., Lee, I. M., Nieman, D. C., & Swain, D. P. (2011). American College of Sports Medicine position stand. Quantity and quality of exercise for developing and maintaining cardiorespiratory, musculoskeletal, and neuromotor fitness in apparently healthy adults: guidance for prescribing exercise. Medicine and Science in Sports and Exercise, 43 (7), 1334–1359. Jäger, R., Kerksick, C. M., Campbell, B. I., Cribb, P. J., Wells, S. D., Skwiat, T. M., Purpura, M., Ziegenfuss, T. N., Ferrando, A. A., Arent, S. M., Smith-Ryan, A. E., Stout, J. R., Arciero, P. J., Ormsbee, M. J., Taylor, L. W., Wilborn, C. D., Kalman, D. S., Kreider, R. B., Willoughby, D. S., Hoffman, J. R., Krzykowski, J. L., & Antonio, J. (2017). International Society of Sports Nutrition Position Stand: protein and exercise. Journal of the International Society of Sports Nutrition, 14 , 20. Nishida, K., Suda, Y., Fukuhara, K., Iwanaga, H., Yamashita, M., Akiyama, Y., & Ohta, Y. (2018). The effect of shoe and insole on the medial longitudinal arch. Journal of Physical Therapy Science, 30 (6), 843–846. Rippetoe, M., & Kilgore, L. (2011). Starting Strength: Basic Barbell Training . The Aasgaard Company. Ready to build your foundation with the right gear? The journey to a healthier you starts from the ground up. At Flourish-Everyday , we specialize in curating high-performance athletic footwear and wellness essentials specifically chosen to support beginners. Explore our expertly selected collections at Flourish-Everyday to find the perfect tools to make your first steps safe, comfortable, and effective.
- Comprehensive Guide to the Best Athletic Shoes of 2026
Choosing best athletic shoes is more than a simple purchase, it's an investment in your performance and health. The right pair supports every step, jump, and lift, while the wrong one can lead to preventable injuries. This guide provides a clear roadmap to finding your ideal fit, ensuring you feel confident in your choice. Table of Contents Cushioning And Stability Best Athletic Shoe Reviews The Smart Way to Try On Shoes and Avoid Mistakes Answers to Common Shoe Questions Once you know your activity, it's time to understand what to look for. A shoe consists of three main parts: the upper (fabric portion), the midsole (cushioning and support layer), and the outsole (rubber bottom). Cushioning And Stability: The Dynamic Duo The midsole is where most of the technology resides. Cushioning ranges from soft for maximum shock absorption to firm for a responsive feel. Long distance runners may prefer high cushioning, while weightlifters need a firm midsole that won't compress. Stability features , such as firmer foam on the inner edge or a rigid heel counter , help control excessive foot motion for overpronators. Key Takeaway: A supportive shoe should bend only where your foot naturally bends, at the ball. It should resist twisting, indicating a stable midsole. Heel Drop And Shoe Anatomy The heel-to-toe drop is the height difference between the heel and forefoot. A higher drop (8-12mm) is common in traditional running shoes and can reduce strain on the Achilles tendon. A lower drop (0-6mm) promotes a more natural midfoot strike and provides a stable base for lifting. Learn more about what heel-to-toe drop is and why it matters . Other important elements include: The Upper: Look for breathable materials like mesh. Trail or court shoes need more durable, reinforced uppers. The Toe Box: It should be wide and high enough for your toes to spread naturally. The Outsole: The tread indicates the shoe's intended surface. Deep lugs are for trails, while flatter rubber is for pavement or gyms. 24oz Steel Top Athletic Shoe Reviews Here are my recommendations and examples of popular shoes, and why they excel for specific activities and genders. Best Athletic Shoes for Women Best for Road Running (Neutral): Hoka Clifton 9 - Known for its maximalist cushioning, the Clifton 9 provides exceptional shock absorption without feeling heavy. It's ideal for women seeking joint protection during long runs. The engineered mesh upper offers breathability and a secure fit. Best for Cross-Training: Reebok NanoX5 - This shoe is uniquely designed for the female foot and versatile activities. It combines the bounce of a running shoe with the stability of a trainer, making it perfect for workouts that mix cardio with strength training. Best Athletic Shoes for Men Best for Road Running (Stability): Brooks Adrenaline GTS 23 - A long time favorite for overpronators, the Adrenaline features GuideRails® technology to keep excess movement in check. It offers a reliable balance of soft cushioning and whole body support. Best for Lifting & CrossFit: NOBULL Trainer+ - Built for durability and stability, the NOBULL Trainer+ has a flat, stable platform and a rugged upper that can withstand rope climbs and intense workouts. Its minimal drop is ideal for heavy lifting. Individual Brand Spotlights Nike: A leader in innovation, Nike is known for its responsive ZoomX foam in running shoes like the Vaporfly and the versatile, stable design of the Metcon series for cross-training. Adidas: Adidas excels with its Boost and Lightstrike cushioning technologies, offering high energy return for runners. The Ultraboost line is a popular choice for both performance and lifestyle wear. New Balance: Known for offering a wide range of widths, New Balance focuses on comfort and support. The Fresh Foam series provides plush cushioning for runners, while the Minimus line appeals to those seeking a more minimalist feel. For a deeper dive into lifting footwear, check our guide on finding the best shoes for weightlifting . The Smart Way to Try On Shoes and Avoid Mistakes Trying on shoes is the final, critical step. Always shop for shoes later in the day, as your feet naturally swell. This ensures a comfortable fit when you're active. Your In-Store Test Drive Checklist Bring the socks you typically wear for workouts. Once the shoes are laced, perform these checks: Length Check: Ensure a thumb's width of space between your longest toe and the shoe's tip. Width Check: The fit should be snug but not tight. No pinching. Heel Lock: Your heel should be secure with minimal slipping. Test Them: Jog, do squats, and shuffle side-to-side to simulate workout conditions and check for rubbing or instability. Common Mistakes to Sidestep Avoid these common pitfalls: Choosing looks over function: A stylish shoe is a poor investment if it doesn't support your activity. Assuming your size is unchanged: Feet can change over time. Always get measured. Expecting a "break-in" period: A good shoe should feel comfortable from the start. The Rise of Sustainable Choices Sustainability is a growing factor for consumers. The global footwear market is increasingly driven by eco-friendly materials. Top performing shoes now often feature recycled content, like uppers made with recycled polyester, reducing waste without sacrificing durability. Bluebird Botanicals Answers to Common Shoe Questions Knowing how to care for your shoes and when to replace them is as important as the initial selection. How Do I Know When It's Time for a New Pair? A general guideline is to replace shoes every 300-500 miles , but physical clues are more reliable. Look for a compressed midsole that stays wrinkled after pressing it or a worn-out outsole tread. Most importantly, listen to your body. If new aches and pains appear after workouts, your shoes have likely lost their shock absorption. Can I Just Wear My Running Shoes to the Gym? It's not recommended. The high, cushioned heels of running shoes are unstable for lateral movements and heavy lifting, increasing the risk of an ankle sprain. A proper cross-trainer is a safer choice for versatile gym workouts. Keeping Your Shoes in Top Shape Proper care extends the life of your shoes. Avoid the washing machine: Heat can break down adhesives and damage materials. Hand wash: Use a soft brush, mild soap, and cold water. Air dry: Stuff shoes with newspaper to absorb moisture and help them retain their shape. Never use a dryer. A well maintained shoe performs better. Proper cleaning preserves the integrity of the materials, ensuring they continue to provide the intended support and cushioning. References Nielsen, R. O., Buist, I., Parner, E. T., Nattestad, A., Andersen, J. L., Rasmussen, M., & Sørensen, H. (2014). Foot pronation is not associated with increased injury risk in novice runners wearing a neutral shoe: a 1-year prospective cohort study. British Journal of Sports Medicine, 48 (6), 440-447. At Flourish-Everyday , we are your go-to destination for health and fitness information, helping you find the perfect shoes to support your wellness journey. Discover your next pair at https://www.flourish-everyday.com .
- Ankle Mobility Exercises for Squats to Unlock Deeper Squats
Many health influencers on social media are recommending heavy weight exercises for life longevity and overall health. One of the best exercises is the squat. Regardless of which form of squat you prefer, the squat has long been an essential part of weightlifting. If you’ve hit a wall with your squat depth, the problem might not be your hips or your back, it’s often your ankles. Poor range of motion in the ankle, specifically dorsiflexion (pulling your toes toward your shin), can prevent a deep, full range squat. When you can't bend your ankle enough, your body compensates in ways that can hinder progress and increase injury risk. This guide provides targeted ankle mobility exercises for squats to help you build a stronger, deeper, and safer squat. Table of Contents Why Ankle Mobility Is the Foundation of a Better Squat The Most Effective Ankle Mobility Exercises for Squats Common Squat Flaws That Signal Poor Ankle Mobility How Your Choice of Shoes Impacts Your Squat Common Questions About Squat Mobility References Why Ankle Mobility Is the Foundation of a Better Squat Many lifters focus on hip flexibility and core strength, overlooking the critical role of the ankles. Your body is a kinetic chain; if one link is stiff, the others must compensate. In a squat, your ankles are the first link. When ankle dorsiflexion is limited, a cascade of form breakdowns begins as your body finds risky ways to get lower. Here’s what that compensation looks like: Heels Lift Off the Ground: This is the most obvious sign. Your body tries to create artificial dorsiflexion by lifting your heels, which throws your weight forward and makes the lift unstable. Chest Collapses Forward: Because your knees can't track forward, your torso leans over to keep you from falling backward. This puts unnecessary strain on your lower back. Knees Cave Inward (Valgus Collapse): As your body struggles for stability with restricted ankles, the knees often buckle inward, which can lead to knee injuries over time. The Real World Biomechanics Proper ankle dorsiflexion lets your shins travel forward over your feet, allowing your hips to sink down between your heels. Without it, your hips get pushed too far back, killing your depth and robbing you of power. This is a solvable problem. By adding specific ankle mobility exercises into your routine, you can directly address these restrictions and build a safer, stronger squat from the ground up. Before you start, you need a baseline. The Knee-to-Wall Test is a simple diagnostic to measure your ankle dorsiflexion. How to Do the Knee-to-Wall Test You will need a wall and a tape measure. Get Set: Face a wall in a half kneeling position, with your front foot's big toe a few inches from the wall. Drive the Knee: Slowly push your knee straight forward to touch the wall, keeping your front foot completely flat. Do not let your heel lift up. Find Your Max: Inch your foot backward until you find the furthest point where your knee can still touch the wall with your heel glued to the floor. Measure and Switch: Measure the distance from your big toe to the wall. Test the other side to check for imbalances. What Your Results Mean Good Mobility (5+ inches): If you can get your big toe more than 5 inches from the wall, your ankle mobility is likely not holding back your squat. Restricted Mobility (Less than 5 inches): Anything under 5 inches points to a significant restriction in ankle dorsiflexion that is likely impacting your squat form. It is common to have a difference between ankles, often due to an old injury or movement habits. A study found that poor ankle mobility directly affected the ability of subjects to perform deep squats ( 1 ). Using this test provides a clear path to improving your squat. The Most Effective Ankle Mobility Exercises for Squats You have your baseline; now it's time to improve it. The following exercises tackle both tight muscles and stiff joint capsules, which is key for effective mobility work. Performing these drills for just a few minutes before your leg days can make a significant difference. Weighted Goblet Squat Ankle Stretch This exercise uses a weight ( kettlebell or dumbbell ) as a counterbalance to help you sit deep into a squat and focus on dorsiflexion. Grab a light kettlebell and sink to the bottom of your squat, keeping your heels on the floor. Gently use your elbows to press your knees outward and rock side to side. Breathe and relax into the stretch. This helps your ankles get comfortable in that end-range of motion under load. Kettlebell Assisted Ankle Dorsiflexion This movement targets one ankle at a time for an intense, focused stretch, addressing tightness in the calf muscles and Achilles tendon. Get into a half kneeling position. Rest a kettlebell on top of your front knee. Keeping your heel planted, let the kettlebell's weight gently push your knee forward over your toes. Hold for a couple of seconds, then ease off. Pulse into the stretch for several reps. The targeted pressure helps release soft tissue restrictions. For more ways to boost performance, see our guide on the top 8 mobility exercises for athletes to unlock performance . Banded Joint Mobilization This drill targets the joint capsule itself. Sometimes the talus bone in your ankle gets "stuck" and needs help gliding properly. Loop a heavy resistance band around a low anchor point. Step your foot into the band, positioning it where your foot meets your shin. Walk forward to create tension, then drop into a lunge. As you drive your knee forward, the band pulls the talus bone backward, helping restore proper joint mechanics. Wall Calf Stretch (Gastrocnemius and Soleus) Tight calf muscles are a major cause of poor ankle mobility. Your calf has two main muscles, the gastrocnemius and soleus, which require different stretches. To stretch both muscles: Gastrocnemius Stretch: Face a wall and step one foot back. Keep the back leg straight and heel pressed to the floor. Lean in to feel the stretch in your upper calf. Soleus Stretch: From the same position, bend the knee of your back leg while keeping your heel down. The stretch will shift lower, targeting the soleus. Eccentric Calf Raises Mobility requires strength and control. Eccentric calf raises build control in the stretched position. Stand on the edge of a step with your heels off. Press up with both feet into a calf raise. Lift one foot off and slowly (3-5 seconds) lower the other heel down as far as mobility allows. This controlled lowering strengthens muscles and tendons while they are stretched, building resilient, mobile ankles. Integrate these drills into a well rounded beginner gym workout plan for the best results. Bluebird Botanicals Ankle Mobility Exercise Programming Guide Exercise Focus When to Perform Sets & Reps / Duration Weighted Goblet Squat Stretch Muscle Warm-up (before squats) 2 sets of 30-60 seconds Kettlebell-Assisted Dorsiflexion Muscle Warm-up or cool-down 2 sets of 10-12 reps per side Banded Joint Mobilization Joint Warm-up (before squats) 2 sets of 15-20 reps per side Wall Calf Stretch (Gastroc/Soleus) Muscle Cool-down or on rest days 2 sets of 30 sec holds (each) per leg Eccentric Calf Raises Muscle After workout 3 sets of 10-15 reps per side Common Squat Flaws That Signal Poor Ankle Mobility Your squat form tells a story. Learning to spot common form breakdowns that indicate poor ankle mobility is the first step to fixing the problem. Once you identify these compensations, you can apply targeted mobility work for better progress and long term joint health. Heels Lifting Off the Floor This is the most obvious red flag. If your heels lift, your body is faking dorsiflexion to allow your shins to travel forward. Squatting on your toes is unstable, shifts tension away from your glutes and hamstrings, and puts excessive pressure on your knees. Excessive Forward Lean If your squat resembles a "good morning," your ankles may be locked up. When your knees can't track forward, your body must shoot your hips backward to maintain balance, causing your chest to collapse. This turns a leg dominant movement into one that stresses your lower back. Research confirms that limited ankle dorsiflexion is strongly correlated with forward lean in a squat ( 2 ). Knees Caving Inward Knee valgus, where your knees collapse inward, is often a direct result of stiff ankles, though weak glutes can also contribute. When ankles can't bend, your feet often roll inward (pronate) to gain extra range. This starts a chain reaction up the leg, forcing the knees to follow and placing dangerous stress on knee ligaments. Improving hip flexibility can also help address this issue; learn more in our guide on how to improve hip flexibility and unlock movement . How Your Choice of Shoes Impacts Your Squat While ankle mobility exercises for squats create lasting change, your footwear can significantly impact your performance right now. The right shoes support your mechanics, while the wrong ones work against you. A soft running shoe creates instability, whereas a solid lifting shoe provides a firm base to generate power. The Role of Heel Elevation The most important feature of a squatting shoe is the heel-to-toe drop . A raised heel provides artificial ankle mobility, reducing how much your own ankles must bend to keep your chest up and heels down. For those with tight ankles, this can make all the difference, but it should be seen as a tool, not a permanent fix. Comparing Common Gym Footwear Different gym shoes are designed for different purposes and will affect how you move. Athletic Shoe Comparison for Squatting Shoe Type Key Feature Impact on Ankle Mobility Best For Running Shoes Soft, cushioned sole; high 8-12mm drop Creates instability, negating the benefit of the heel drop. Running, walking—anything but heavy squats. Minimalist Shoes Zero-drop, thin sole Requires maximum natural ankle mobility; unforgiving. Lifters with excellent mobility who want to build foot strength. Cross-Training Shoes Stable base, modest 4-7mm drop Provides a stable foundation with slight assistance. All-around gym use, CrossFit, and general strength training. Weightlifting Shoes Hard sole, high 15-25mm drop Significantly reduces the need for ankle mobility. Heavy squatting, Olympic weightlifting, and powerlifting. For a deeper dive, check out our breakdown of good shoes for squats and deadlifts . Making the Right Choice for Your Goals The best shoe depends on your current mobility and goals. A cross-trainer is often a good middle ground, offering support without masking the mobility problem. For competitive lifters, a dedicated weightlifting shoe is essential for stability and force transfer. The right shoe supports your training while you work on improving your natural range of motion. Top Workout Gloves Common Questions About Squat Mobility Here are answers to some common questions about improving ankle mobility for squats. How Often Should I Be Doing These Drills? Consistency is more important than intensity. Aim for 5-10 minutes of focused work 3-5 times per week . Integrating the drills into your warm-up on leg days is an effective strategy, as it prepares your ankles for the session ahead. A light mobility session on rest days can also aid recovery. Can This Ankle Stuff Actually Help My Knee Pain? Yes, it often makes a significant difference. When ankles are locked up, the knees often compensate by caving inward or tracking improperly, which puts unhealthy stress on the joint. Improving ankle dorsiflexion allows the knees to track correctly over the feet, distributing the load more evenly across your hips, knees, and ankles, which can alleviate strain related knee pain. Why Does One of My Ankles Feel Way Tighter Than the Other? Imbalances are very common and can be caused by old injuries, your dominant side, or sport specific movement patterns. If you notice one side is tighter during the Knee-to-Wall Test, give that ankle extra attention by performing an extra set of mobility drills on that side. The goal is to ensure your tighter side has enough mobility to squat correctly without forcing compensation. Will Lifting Shoes Fix My Ankle Mobility Problem? Weightlifting shoes with a raised heel are a tool that works around poor ankle mobility; they do not fix it. The elevated heel reduces the dorsiflexion required for a deep squat, which can instantly improve your form. Use them as a training aid to practice better squat patterns while you continue to perform your ankle mobility exercises for squats . Relying solely on the shoes masks the underlying issue. At Flourish-Everyday , we believe that having the right information and gear is essential for your wellness journey. From detailed shoe reviews to practical fitness guides, we provide the resources you need to perform at your best. Explore our site to find everything you need to support a healthier, happier you. https://www.flourish-everyday.com References Lima, Y. L., Ferreira, V. M. L. M., de Paula Lima, P. O., Bezerra, M. A., de Oliveira, R. R., & Almeida, G. P. L. (2018). The association between ankle mobility and deep squatting in asymptomatic individuals. Gazzetta Medica Italiana - Archivio per le Scienze Mediche , 177 (4), 143-148. Sourced from https://www.ncbi.nlm.nih.gov/pmc/articles/PMC5036723/ . Nuckols, G. (2017). Ankle Mobility and Squat Form. Stronger By Science . Sourced from https://www.strongerbyscience.com/research-spotlight-ankle-mobility/ .
- 10 Proven Benefits of High Intensity Interval Training for 2026
High Intensity Interval Training (HIIT) is more than just a fitness trend; it's a scientifically proven method for achieving significant results in record time. It involves short bursts of all out effort followed by brief recovery periods, a powerful formula that challenges your body in ways steady state exercise cannot. This approach maximizes physiological adaptations, making it a cornerstone for runners, cross-trainers, and anyone seeking peak efficiency in their fitness routine. At Flourish-Everyday.com , we understand that your time is valuable, and your footwear is critical. Quality cross-training or running shoes are essential for supporting the explosive movements in HIIT, ensuring you can perform safely and effectively. This article breaks down the ten key benefits of high intensity interval training, supported by research and practical advice. You'll discover the specific physiological mechanisms that drive HIIT's effectiveness, from boosting your metabolism to enhancing cardiovascular health. We'll also provide the newest actionable insights, including sample workouts, tips for runners and cross-trainers, and essential information on selecting the right athletic shoes to prevent injury and maximize performance. Article Index Increased Cardiovascular Efficiency Accelerated Fat Burning and Metabolic Boost Time-Efficient Workout Solution Improved Muscular Strength and Endurance Enhanced Oxygen Utilization and VO2 Max Blood Sugar Regulation and Metabolic Health Improved Athletic Performance and Power Output Increased Growth Hormone and Anabolic Response Mental Toughness and Psychological Resilience Joint-Friendly Alternative to Steady Long-Distance Running Choosing the Right Gear: HIIT Shoe Reviews Putting It All Together: Your HIIT Action Plan References 1. Increased Cardiovascular Efficiency One of the most significant benefits of high intensity interval training is its profound impact on cardiovascular health. HIIT conditions your heart to operate more efficiently by alternating between intense anaerobic exercise and brief recovery periods. This structure pushes your heart to its maximum capacity, then allows it to recover, effectively training it like any other muscle. This process strengthens the heart muscle, increases stroke volume (the amount of blood pumped per beat), and improves the body's ability to utilize oxygen (VO2 max). This method forces physiological adaptations that surpass those seen in many forms of steady state cardio, often in a fraction of the time. Research published in the Journal of Physiology highlights that even short term HIIT can induce rapid improvements in skeletal muscle oxidative capacity and cardiorespiratory fitness (Perry et al., 2008). This makes it a powerful tool for athletes and fitness enthusiasts looking to enhance performance and overall heart function. How It Works in Practice The magic of HIIT lies in its structured intensity. Instead of maintaining a moderate pace for 45 minutes, you might perform an all out effort for just 20-60 seconds. This demand triggers a cascade of adaptations, from mitochondrial biogenesis to improved vascular function. For Runners: Perform 400-meter sprints at 90% effort, followed by a 400-meter walk or slow jog for recovery, repeated 4-6 times. For Cross-Trainers: The popular Tabata protocol involves 20 seconds of maximum effort work (like kettlebell swings) followed by 10 seconds of rest, repeated for eight rounds (4 minutes total). Actionable Tips for Implementation Warm-Up is Non-Negotiable: Always start with a 5-10 minute dynamic warm-up. Monitor Your Recovery: During rest intervals, your heart rate should drop to around 50-60% of your maximum. Progress Gradually: Begin with shorter work intervals or longer rest periods and slowly increase the challenge. 2. Accelerated Fat Burning and Metabolic Boost Another key benefit of HIIT is its efficiency at incinerating fat and elevating metabolism. HIIT workouts trigger excess post exercise oxygen consumption (EPOC), or the "afterburn effect." This means your body's metabolic rate remains elevated for hours after you've finished, causing you to burn additional calories even at rest. This makes HIIT a superior method for fat loss compared to many longer, steady state cardio sessions. The intense demands of HIIT place significant metabolic stress on the body, forcing it to work harder to return to homeostasis. This recovery process requires oxygen and energy, fueling the calorie burn long after the workout ends. A study in the Journal of Obesity found that HIIT was more effective at reducing total body and abdominal fat than moderate-intensity continuous training (Viana et al., 2019). How It Works in Practice HIIT pushes your body into an anaerobic state, creating an "oxygen debt" that must be repaid post workout. This repayment process fuels the EPOC effect, turning your body into a fat-burning machine for up to 24-48 hours. For Runners: A potent fat-burning session involves 10 rounds of a 1-minute sprint, followed by a 2-minute recovery jog. For Cross-Trainers: A circuit using exercises like burpees, kettlebell swings, and box jumps is highly effective. Perform each for 45 seconds of max effort followed by 15 seconds of rest for 3-4 rounds. Actionable Tips for Implementation Schedule Wisely: Perform HIIT sessions 2-3 times per week, with at least 48 hours of recovery between them. Fuel for Recovery: Consume a meal with protein and carbohydrates within an hour post workout. Combine with Strength: Pair HIIT with traditional strength training to build lean muscle and further increase your resting metabolic rate. 3. Time Efficient Workout Solution One of the most practical benefits of HIIT is its incredible efficiency. It delivers profound fitness results in a fraction of the time required by traditional cardio, making it perfect for demanding schedules. Workouts can be completed in just 15-30 minutes yet elicit physiological responses comparable to or greater than those from a 60-minute moderate-intensity session. The "more results in less time" principle is validated by numerous studies. Research in the Journal of Strength and Conditioning Research demonstrated that HIIT can improve VO2 max and metabolic health as effectively as traditional endurance training, despite requiring significantly less time (Foster et al., 2015). How It Works in Practice The brevity of HIIT doesn't compromise its effectiveness; it enhances it by focusing on workout density. By packing high effort work into a short window, you maximize every minute. For Runners: Perform stroller-friendly sprints by running hard for 90 seconds while pushing a stroller, followed by a 90-second recovery walk. Repeat 10 times for a potent 30-minute workout. For Cross-Trainers: A 30-minute class format is common. This could involve a 5-minute warm-up, a 20-minute circuit of intense intervals, and a 5-minute cool-down. Actionable Tips for Implementation Plan Ahead: Have your workout written down before you start to eliminate wasted time. Use a Timer App: Download an interval timer app to automate your work and rest periods. Choose Compound Movements: Prioritize exercises like squats, deadlifts, and thrusters that engage multiple muscle groups. Bluebird Botanicals 4. Improved Muscular Strength and Endurance Beyond its cardiovascular prowess, HIIT simultaneously builds muscular strength and endurance. It challenges muscles through explosive, high resistance efforts followed by short recovery periods. This dynamic process trains muscles to generate power quickly (strength) and sustain high level output over repeated intervals (endurance). This dual adaptation occurs because HIIT recruits fast twitch muscle fibers, responsible for power and strength, while the repetitive nature of the intervals improves the muscle's ability to buffer lactic acid. This approach creates functional fitness that translates directly to improved performance in sports and daily activities. How It Works in Practice HIIT builds muscular capacity by placing a significant metabolic and mechanical load on the targeted muscles in short bursts. This stress stimulates muscle protein synthesis and enhances neuromuscular coordination. For Runners: Hill sprints are a perfect example. Sprint uphill for 30 seconds to recruit glutes, hamstrings, and calves powerfully, followed by a slow walk down for recovery. Repeat 6-8 times. For Cross-Trainers: Kettlebell circuits are highly effective. A routine might involve 45 seconds of kettlebell swings, 15 seconds of rest, then 45 seconds of goblet squats, 15 seconds rest, repeated for several rounds. Actionable Tips for Implementation Incorporate Compound Movements: Use exercises that engage multiple muscle groups at once, such as squats, push-ups, and burpees. Prioritize Proper Footwear: For jumping movements like box jumps, wear shoes with good lateral support to protect your joints. Allow for Adequate Recovery: Intense HIIT sessions require 48-72 hours of rest between them for proper muscle repair. 5. Enhanced Oxygen Utilization and VO2 Max A primary benefit of HIIT is its ability to improve your VO2 max, the maximum amount of oxygen your body can utilize during intense exercise. This metric is a gold standard indicator of cardiorespiratory fitness. HIIT workouts, with their repeated, near maximal efforts, directly challenge your body's oxygen delivery systems. This training style stimulates physiological changes that enhance how efficiently your heart, lungs, and muscles work together. Research by Dr. Martin Gibala at McMaster University has demonstrated that short, intense intervals are exceptionally effective at boosting VO2 max, often producing similar or superior results to traditional endurance training in less time (Gibala et al., 2012). How It Works in Practice HIIT pushes your cardiovascular system to its limits, creating a significant oxygen deficit. This triggers your body to adapt by increasing mitochondrial density in muscle cells and improving capillary networks, which enhances oxygen transport. For Runners: A classic VO2 max workout involves track intervals like 6 x 800-meter repeats at 90% of your maximum effort, with a 400-meter recovery jog. For Cross-Trainers: On a rowing ergometer, perform 5 sets of 3-minute intervals at a high power output, followed by 3 minutes of easy rowing. Actionable Tips for Implementation Establish a Baseline: Use a fitness tracker or get a VO2 max test to measure your starting point and track progress. Integrate Wisely: Incorporate one or two VO2 max focused HIIT sessions into your weekly routine, balanced with lower intensity training. Support Cellular Adaptation: Proper recovery nutrition is crucial for repairing muscle and supporting physiological changes. For more, learn more about how to improve your VO2 max with a practical guide . 24oz Steel 6. Blood Sugar Regulation and Metabolic Health Another crucial benefit of HIIT is its powerful effect on metabolic health, specifically in regulating blood sugar. HIIT dramatically improves insulin sensitivity, the body's ability to use glucose for energy. Intense muscle contractions rapidly deplete muscle glycogen, prompting your muscles to pull more glucose from the blood to refuel. This enhanced glucose uptake makes HIIT an exceptional strategy for managing blood sugar. Research highlighted by the American Diabetes Association shows that HIIT can improve glycemic control more effectively than continuous moderate-intensity exercise in some populations (Little et al., 2011). How It Works in Practice HIIT’s impact on metabolic health stems from the intense physiological stress it creates. The all out efforts trigger cellular adaptations that enhance the efficiency of glucose transport proteins (like GLUT4), allowing muscle cells to absorb glucose without a heavy reliance on insulin. For Cyclists: A common protocol involves a 30-second all out sprint on a stationary bike, followed by a 90-second easy recovery, repeated for 15-20 minutes. For Cross-Trainers: Metabolic conditioning (MetCon) workouts combine strength and cardio in short, intense bursts designed to maximize metabolic demand. Actionable Tips for Implementation Time It Right: Consider performing HIIT sessions post meal to help your body manage the incoming glucose spike. Stay Hydrated: Proper hydration is critical for optimal cellular function, including glucose metabolism. Combine with Resistance Training: Pairing HIIT with strength training offers synergistic effects, further boosting insulin sensitivity. 7. Improved Athletic Performance and Power Output One of the most compelling benefits of HIIT is its direct impact on athletic performance. HIIT excels at developing explosive power, agility, and speed by training your neuromuscular system to recruit fast twitch muscle fibers rapidly. This translates into faster sprint times, more powerful jumps, and quicker changes of direction. The intense, short bursts of effort mimic the demands of many competitive sports. This approach conditions the body to produce maximum force in minimal time. Research consistently shows that HIIT can significantly improve anaerobic capacity, which is the body's ability to perform short, high intensity work without oxygen. How It Works in Practice By repeatedly pushing your body to produce maximal effort, you train the connection between your brain and muscles to fire more quickly and forcefully. This leads to greater muscle fiber recruitment and improved coordination. For Runners: An effective track session could be 8 x 200-meter sprints at 95% effort, with a full 2-3 minute recovery walk between each interval. For Cross-Trainers: A benchmark workout like "Helen" (three rounds of a 400m run, 21 kettlebell swings, 12 pull-ups) blends cardiovascular demand with explosive power. Actionable Tips for Implementation Prioritize Freshness: Perform power focused HIIT sessions when your central nervous system is fresh, not after a heavy lifting day. Allow Full Recovery: Power development requires longer rest intervals and adequate recovery (often 48-72 hours) between sessions. Focus on Form: As fatigue sets in, technique can break down. It's better to stop a set early than to complete it with poor form. 8. Increased Growth Hormone and Anabolic Response A potent, less discussed benefit of HIIT is its ability to stimulate a powerful anabolic hormonal response. The extreme physiological stress from a total effort triggers a significant release of human growth hormone (HGH), a key player in muscle repair, cell regeneration, and body composition. Research has repeatedly shown that exercise intensity is the primary determinant of HGH secretion (Wahl et al., 2010). By pushing the body far beyond its comfort zone, HIIT creates the necessary stimulus for this beneficial hormonal upregulation, supporting tissue repair. For those looking to understand more, researching HGH supplements can provide additional insights. How It Works in Practice This benefit lies in reaching an intensity threshold that traditional steady state exercise often misses. Pushing past the anaerobic threshold forces the body to signal for robust repair and growth mechanisms, mediated by hormones like HGH. For Runners: Perform 6-8 rounds of 30-second all out sprints on an incline, followed by 2-3 minutes of complete recovery. For Cross-Trainers: The Wingate protocol is a perfect example: a 30-second maximum effort sprint on a bike against high resistance, followed by a 4-minute recovery, repeated 4-6 times. Actionable Tips for Implementation Prioritize Sleep: HGH is primarily released during deep sleep. Aim for 7-9 hours of quality sleep per night. Fuel for Recovery: Consume 20-40 grams of high-quality protein within an hour post-workout. Manage Cortisol: Overtraining can elevate cortisol, which blunts HGH release. Ensure you schedule 1-2 complete rest days per week. 9. Mental Toughness and Psychological Resilience Beyond physical adaptations, HIIT forges mental fortitude. It systematically exposes you to discomfort, teaching you to push through perceived limits. This repeated practice of overcoming intense challenges builds profound psychological resilience and a stronger mindset. This process is a form of stress inoculation, where controlled exposure to a stressor (intense exercise) improves your ability to handle future challenges. The discipline required to finish a demanding interval session develops mental toughness that extends far beyond the gym. How It Works in Practice The structured discomfort of HIIT is key to its mental benefits. Pushing through the final 10 seconds of an interval when you're exhausted trains your brain to remain focused under duress. For Runners: Completing a challenging track workout, like "Yasso 800s" (10 x 800m runs with equal recovery jogs), builds immense mental resolve. For Cross-Trainers: Finishing a benchmark workout like "Fran" (21-15-9 reps of thrusters and pull-ups) demands pushing past significant discomfort, building grit. Actionable Tips for Implementation Positive Self Talk: During the toughest intervals, consciously use positive affirmations to override negative thoughts. Set Micro Goals: Focus only on completing the current interval, not the entire workout. Join a Community: Working out with a group provides accountability and shared motivation. 10. Joint Friendly Alternative to Steady Long Distance Running An often overlooked benefit of HIIT is its role as a joint sparing alternative to traditional long distance running. The high volume of repetitive impact from long runs can lead to cumulative stress on the joints. HIIT provides a potent training stimulus in a shorter duration, significantly reducing the total number of foot strikes and associated mechanical strain. This approach is about achieving more with less volume. By focusing on intensity, you can elicit similar physiological adaptations compared to longer, slower efforts, helping build speed and endurance while minimizing the risk of overuse injuries. How It Works in Practice The goal is to replace high volume, high impact sessions with short, effective workouts. This reduces the time your joints are subjected to repetitive pounding while still challenging your cardiovascular and muscular systems. For Runners: Instead of a long, slow 10-mile run, a session might consist of 3 x 2-mile repeats at race pace, with several minutes of active recovery. For Cross-Trainers: Incorporate low impact modalities like rowing or cycling intervals: 60 seconds of maximum effort followed by 60 seconds of easy recovery, repeated 10-15 times. Actionable Tips for Implementation Prioritize Mobility: Always begin with dynamic stretches to prepare your joints and muscles. Mix Impact and Non Impact: Combine running intervals with low impact alternatives like cycling or swimming. Learn more about how cross-training for runners can boost performance and prevent injuries . Invest in Proper Footwear: Wear high quality running or cross-training shoes with appropriate support. Strengthen Supporting Muscles: Consistently perform strength training for your glutes, quads, and core to act as shock absorbers for your joints. Best Selling Workout Socks Integrating HIIT: Your Next Steps and Gear Guide The evidence is compelling: the benefits of high intensity interval training are vast, establishing it as one of the most effective training modalities available. Throughout this guide, we've explored ten powerful advantages, from supercharging your cardiovascular efficiency to building mental toughness. Mastering this approach means moving from theory to practice. Your success hinges not just on pushing hard but on recovering smartly, listening to your body, and using the proper equipment. Gear Guide: The Foundation of High Impact Performance Success in HIIT begins from the ground up. You need footwear that provides stability for lateral movements, cushioning for high impact jumps, and a solid platform for lifting. Top Athletic Shoes for Men : Nike Metcon 9 : A gold standard for versatile HIIT. Its stable heel is perfect for squats and lifts, while the flexible forefoot accommodates plyometrics. Reebok Nano X4 : Known for its wide toe box and durable construction, this shoe offers exceptional stability for lateral bounds and agility drills. Top Athletic Shoes for Women: Nike Metcon 5 : A true cross-trainer designed for the female foot, it blends the bounce of a running shoe with the stability of a trainer. Puma PWR XX Nitro : Engineered specifically for women, this shoe provides incredible cushioning and responsiveness, perfect for high impact classes. HIIT vs. Other Wellness Trends HIIT vs. LISS (Low Intensity Steady State Cardio): While LISS is excellent for building an aerobic base, HIIT provides superior metabolic and time-efficient cardiovascular benefits. A balanced routine often includes both. HIIT vs. Yoga/Pilates: These practices improve flexibility, core strength, and the mind-body connection. They are complementary to HIIT; using yoga for recovery on "off" days can reduce muscle soreness and improve mobility. By thoughtfully selecting your gear and strategically integrating 2-3 HIIT sessions into your weekly routine, you are investing in a more powerful, resilient, and healthier version of yourself. References Foster, C., Farland, C. V., Guidotti, F., Harbin, M., Roberts, B., Schuette, J., ... & Porcari, J. P. (2015). The effects of high intensity interval training vs steady state training on aerobic and anaerobic capacity. Journal of sports science & medicine , 14 (4), 747. Gibala, M. J., Little, J. P., Macdonald, M. J., & Hawley, J. A. (2012). Physiological adaptations to low-volume, high-intensity interval training in health and disease. The Journal of physiology , 590 (5), 1077-1084. Little, J. P., Gillen, J. B., Percival, M. E., Safdar, A., Tarnopolsky, M. A., Punthakee, Z., ... & Gibala, M. J. (2011). Low-volume high-intensity interval training reduces hyperglycemia and increases muscle mitochondrial capacity in patients with type 2 diabetes. Journal of applied physiology , 111 (6), 1554-1560. Perry, C. G., Heigenhauser, G. J., Bonen, A., & Spriet, L. L. (2008). High-intensity aerobic interval training increases fat and carbohydrate metabolic capacities in human skeletal muscle. Applied Physiology, Nutrition, and Metabolism , 33 (6), 1112-1123. Viana, R. B., Naves, J. P. A., Coswig, V. S., de Lira, C. A. B., Steele, J., Fisher, J. P., & Gentil, P. (2019). Is interval training the magic bullet for fat loss? A systematic review and meta-analysis comparing moderate-intensity continuous training with high-intensity interval training (HIIT). British journal of sports medicine , 53 (10), 655-664. Wahl, P., Zinner, C., Mester, J., & Bloch, W. (2010). Hormonal responses to different interval exercise protocols. Journal of sports science & medicine , 9 (3), 442. Ready to gear up for your HIIT journey? At Flourish-Everyday , we test and curate the top athletic shoes, so you can train with confidence. Explore our in-depth reviews and find the perfect pair at Flourish-Everyday .
- How to Improve Grip Strength: A Complete Guide for Athletes
Hi, workout artists. There has been a lot of talk about grip strength lately, especially how the determination of life expectancy can be measured by your overall grip strength. Grip strength is essential for lifting heavy or for endurance lifting so that you keep form and prevent injuries. If you want to build a truly powerful grip, you need a plan that hits all three types of strength: crush , pinch , and support . How to Improve Grip Strength? This goes beyond just squeezing a hand gripper. We're talking about adding exercises like heavy carries, timed hangs, and plate pinches to build functional power that translates to everything you do. Table of Contents Why Grip Strength Is Your Secret Performance Metric How to Test Your Grip Strength at Home Core Exercises for Building a Vice-Like Grip Weaving Grip Training Into Your Weekly Routine Smart Recovery for Healthy Hands and Forearms Got Grip Questions? We’ve Got Answers References Why Grip Strength Is Your Secret Performance Metric Real world strength, the kind that helps you dominate a CrossFit WOD or stay steady on a trail run, begins in your hands. Grip strength is more than a firm handshake; it's a powerful indicator of your overall health and athletic potential. Your grip is the critical link between your body and whatever you're trying to move. Whether it's a barbell, a kettlebell, or your own body on a pull-up bar, the moment your grip gives out, the lift is over. Top Workout Gloves More Than Just Muscle But its importance goes far beyond the gym. A meta analysis of studies involving 2.4 million adults found a direct link between hand strength and longevity. Grip strength tends to peak between ages 30-39 before declining. For every 5-kg increase in handgrip strength, researchers found a 14% lower risk of all cause mortality (Duchowny, 2019). Grip strength isn’t just about performance; it’s a practical biomarker for your health. A weaker grip is consistently linked to a higher risk of health issues, making it a key metric to track as you age. Understanding this reframes grip training from a niche hobby to a core part of any fitness plan. It’s a foundational piece of effective strength and conditioning to boost athletic performance and supports long-term wellness. The Three Pillars of Functional Grip To build a grip that performs, you must understand its three main components. Each plays a unique role in your daily life and athletic goals. Training all three builds balanced, truly functional strength. Grip Type What It Measures Athletic Application Crush The force of your fingers closing against your palm. Squeezing a hand gripper, crushing a can, or gripping a thick rope for a pull-up. Pinch Strength between your thumb and fingertips. Holding a weight plate by its edge or carrying a heavy book. Support Your ability to hold onto an object for an extended time. Performing a dead hang, carrying heavy groceries, or a farmer's walk. When you address each of these pillars, you aren't just getting stronger hands—you're building a more capable and resilient body from the ground up. How to Test Your Grip Strength at Home Before starting a training plan, establish a baseline to track your progress. You don't need expensive gear for a solid read on your current grip strength. Perform these simple at-home tests after a quick warm-up and when you're feeling fresh, not right after a workout, for accurate results. Record your numbers to re-test in a few weeks and see your hard work paying off. Testing Your Support Grip: The Timed Dead Hang Your support grip is about endurance. The dead hang is the gold standard for testing this at home. Find a sturdy pull-up bar or a solid tree branch. Grab the bar with both hands, palms facing away, shoulder width apart. Lift your feet so you're hanging freely with your arms completely straight. Start a timer and hang for as long as you can. The test ends when your hands slip off. Jot down your maximum time. This is a fantastic, no frills way to measure your starting point. Gauging Your Pinch Strength: The Plate Pinch Hold Pinch strength is the power between your thumb and fingertips, used for fine control and dexterity. Test this with a single weight plate or a thick, heavy book. How to do it: Stand straight and hold a weight plate (a 10 lb plate is a good start) or a large book in one hand. The key: Grip it only with your fingertips and thumb. Let your arm hang straight by your side, ensuring your palm isn't supporting the weight. Measure it: Time how long you can hold the object before it slips. Test both hands and record the time for each. This test isolates the muscles in your thumb and fingers. It’s common to find that one hand is stronger than the other, revealing an imbalance you can work on. Approximating Your Crush Grip (Without a Dynamometer) Crush grip is the raw power you feel in a firm handshake. While a dynamometer gives the most precise reading, you can get a good estimate with a bathroom scale. The Scale Squeeze Test: Place a bathroom scale on a sturdy table at waist height. Make a fist and press down on the scale with your knuckles as hard as you can for about 5 seconds . Get Your Number: Note the peak weight displayed on the scale. While not a perfect scientific measurement, it’s a consistent and repeatable way to track progress. Test both hands to check for differences. Core Exercises for Building a Vice Like Grip Forget endless forearm curls; a targeted plan that challenges your hands in different ways is key to improving your grip. We'll cover essential exercises for support, crush, and pinch strength, focusing on good form and real world application. These aren't just isolated drills; they are fundamental strength movements that build resilience from your fingertips to your shoulders. Mastering the Support Grip Support grip is your foundation, crucial for everything from carrying groceries to hanging from a pull-up bar. The two pillars of support grip training are dead hangs and farmer's walks. Dead Hangs: Deceptively simple yet incredibly effective, the dead hang targets endurance muscles, teaching your hands to stay clamped under tension. How to Perform: Grab a pull-up bar with an overhand, shoulder width grip. Let your arms fully extend and relax your shoulders. The goal is to hold on for as long as possible with perfect form. Progression: Start with timed holds. If you can only hang for 15 seconds , aim for multiple sets of 15 seconds . Gradually increase the hold time until you can hang for a minute or more. Common Mistake: Avoid shrugging your shoulders or bending your elbows. This exercise is about isolating the grip. Farmer's Walks: This total body movement builds a powerful support grip while strengthening your core, back, and legs. How to Perform: Pick up heavy dumbbells or kettlebells, one in each hand. Stand tall with your shoulders back and core tight. Walk forward with controlled steps for a set distance or time. Progression: Simply increase the weight or the distance you walk. Challenge your grip to the point where it’s about to give out by the end of each set. Real World Benefit: This directly translates to carrying heavy items and maintaining good posture under load. Beyond building muscle, exercises like heavy farmer's walks impact long-term health. The Prospective Urban Rural Epidemiology (PURE) study found a strong link between grip strength and longevity. It showed that for every 5-kg drop in handgrip strength, the risk of all cause mortality increased by 16% . Conversely, a 5-kg increase was linked to a 14% drop in mortality (Leong et al., 2015). You can read more in their full study on grip strength and mortality . Developing a Powerful Crush Grip Crush grip is the force you generate between your fingers and palm, essential for big lifts and gymnastic movements. Gripper Training: Hand grippers are a classic tool because they work. Adjustable grippers allow for precise, measurable progress. How to Perform: Squeeze the gripper until the handles touch. Control the movement on the way back to the start; don't just let it spring open. Progression: Start with a gripper you can close for 8-10 reps . Once you can hit 12-15 reps , move up to the next resistance level. Common Mistake: The eccentric (opening) part of the movement is just as important as the squeeze. Towel Pull-ups or Hangs: This brutal variation forces your hands to work harder. Draping a towel over a pull-up bar significantly increases the challenge. How to Perform: Throw one or two towels over a pull-up bar. Grip the towels and either perform a pull-up or hang for time. Progression: Start with timed hangs. Once you can hang for 30 seconds , try to incorporate pull-ups. Real World Benefit: This is fantastic for climbers, martial artists, and anyone whose sport requires gripping awkward objects. Pro Tip: When starting with towel hangs, use a thick, sturdy towel. The thicker the material, the tougher the grip. Honing Your Pinch Strength Pinch strength is the power between your thumb and fingertips, essential for dexterity and control. Plate Pinches: This is the gold standard for pinch strength, directly targeting the thumb and finger pads. How to Perform: Place two weight plates together, smooth sides out. Pinch them with one hand using only your fingertips and thumb. Lift them and hold for as long as possible. Progression: Start with two 10 lb plates. Increase the hold time or move to heavier plates. Common Mistake: Don't let your palm support the bottom of the plates. The work must be done entirely by the pinch. Hex Dumbbell Holds: This exercise provides a different angle for pinch training. How to Perform: Stand a hex dumbbell on its end. Grip the head of the dumbbell with your fingertips and thumb. Lift it and hold it by your side for time. Progression: Increase the dumbbell's weight or the hold's length to make it harder. Real-World Benefit: This movement simulates picking up awkward objects and builds exceptional thumb strength. For a deeper dive into structuring these movements, check our guide on the top resistance training exercises to unleash your strength . Weaving Grip Training Into Your Weekly Routine Knowing the right exercises is a great start, but a smart, consistent plan is where the magic happens. Weave grip work into your existing schedule so it enhances, not competes with, your primary training. You don't need to dedicate hours a week; a little focused effort goes a long way. A pilot study in The Sport Journal found that a simple 12-week handgrip program boosted strength by a significant 7% . Participants trained three times a week with a few sets of maximum effort reps, proving you can get measurable results without overhauling your routine (Hussain & Satar, 2021). You can check out the full handgrip training program study for details. An effective grip program is built on three pillars: Support, Crush, and Pinch. Neglecting one leaves a hole in your strength. This process shows why you need dedicated exercises for each grip type to build well rounded, functional strength. Sample Weekly Grip Training Schedules Here’s how different athletes can fit targeted grip training into their week. These schedules are designed to complement existing programs without causing burnout. Athlete Profile Day 1 Focus Day 2 Focus Integration Tip General Fitness Support Grip (Farmer's Walks) Crush & Pinch (Grippers, Plate Pinches) Add as finishers at the end of your main workouts twice a week. Runner Support & Stability (Dead Hangs) Dynamic Grip (Kettlebell Swings) Perform once or twice a week on cross-training days to build resilience. CrossFitter Thick Bar/Towel Work (Towel Hangs) Heavy Carries (Farmer's Walks) Use as warm-up activators or intense post-WOD finishers. These are starting points. Listen to your body and find a rhythm that helps you get stronger without feeling overworked. Smart Recovery for Healthy Hands and Forearms Pushing your grip is only half the battle. Smart recovery is nonnegotiable for preventing injuries and coming back stronger. Intense grip work stresses the small muscles and tendons in your hands, wrists, and forearms. Without proper care, you risk issues like tendonitis or elbow pain that can derail your progress. This section covers preparation and restoration, preventative maintenance for your most important lifting tools. Priming Your Hands for Performance Before lifting, prepare the tissues for action. A good dynamic warm-up gets blood flowing to the muscles and improves joint mobility. Wrist Circles: Gently roll your wrists clockwise for 10-15 seconds , then switch directions. Finger Extensions: Squeeze your hand into a tight fist, then extend your fingers as wide as you can. Repeat 10 times . Tendon Glides: Move your fingers through their full range of motion—from a flat hand to a hook fist, then a full fist. A proper warm-up isn't just about avoiding injury; it's about performance. Prepped muscles and tendons produce more force, meaning you'll get more out of your grip training session. Effective Post Workout Restoration Strategies What you do after your workout is just as critical. Recovery is an active process that helps your muscles repair, adapt, and grow stronger. Set aside a few minutes after a tough grip session for these practices. Essential Stretches and Mobility Work Stretching helps ease tension and brings muscles back to their natural resting length. Prayer Stretch: Place your palms together in front of your chest. Slowly lower your hands toward your waist until you feel a gentle stretch in your forearms. Hold for 20-30 seconds . Extensor Stretch: Hold one arm straight out, palm facing down. With your other hand, gently bend your wrist downward. Hold for 20-30 seconds , then switch sides. Bluebird Botanicals Advanced Recovery Techniques For a full rundown of how elite athletes stay in the game, check out these proven recovery techniques for athletes . Massage Ball Release: Use a lacrosse or massage ball to roll out tight spots in your forearms. Contrast Baths: Alternate soaking your hands and forearms in cold water for one minute, then warm water for one minute. Repeat 3-4 times to help reduce soreness. Many athletes also explore the benefits of magnesium oil spray for muscle comfort to help ease soreness after tough workouts. Got Grip Questions? We’ve Got Answers This section tackles the most common questions about improving grip, providing clear, straightforward answers to keep you moving forward. How Long Until I See Real Improvements in Grip Strength? While you might feel a difference after a few sessions, significant, measurable gains take time. Studies show a consistent program can increase strength by a noticeable 7% in as little as 12 weeks (Hussain & Satar, 2021). The keys are consistency and progressive overload, training two to three times a week and always pushing to do a little more than last time. Can I Build My Grip Without Special Equipment? Absolutely. You can build a strong grip using just your body weight and common household items. For Support Grip: Timed dead hangs from a pull-up bar, tree branch, or even the top of a door. For Crush Grip: Drape a thick towel over a bar for hangs or pull-ups. For Pinch Grip: Hold a heavy book or two smooth weight plates by your side for time. The principle is always the same: consistently challenge your hands to hold, squeeze, and pinch. Should I Use Lifting Straps on Heavy Lifts? Lifting straps are a tool, not a crutch. If you use them for every set, you are holding back your grip development. A balanced approach is smarter. The best strategy? Do all your warm-up sets and as many main working sets as you can without straps. This is where you actively train your grip under heavy loads. Only use straps for your absolute heaviest sets where your grip is the only thing stopping you from finishing the lift. What Is the Difference Between Grip and Forearm Strength? Many use these terms interchangeably, but they are slightly different. Forearm Strength involves the larger muscles between your wrist and elbow that power wrist flexion and extension. Grip Strength is more specific to what your hands and fingers can do: crushing , pinching , and supporting an object. While strong forearms are crucial for a powerful grip, you need direct grip training to target the smaller, intrinsic muscles inside your hands. References Duchowny, K. (2019). Untangling the Association Between Grip Strength and Cognitive Health in a National Sample of Older Adults. SSM - population health , 7, 100371. Hussain, J., & Satar, M. (2021). Efficacy of 12-week Handgrip Strength Training Program Amongst Older Adults: A Pilot Study. The Sport Journal . Leong, D. P., Teo, K. K., Rangarajan, S., Lopez-Jaramillo, P., Avezum, A., Jr, Orlandini, A., Seron, P., Ahmed, S. H., Rosengren, A., Kelishadi, R., Rahman, O., Swaminathan, S., Iqbal, R., Dagenais, G. R., Lear, S. A., & Yusuf, S. (2015). Prognostic value of grip strength: findings from the Prospective Urban Rural Epidemiology (PURE) study. Lancet (London, England) , 386(9990), 266–273. At Flourish-Everyday , we believe functional strength is the foundation of a healthy, active life. Whether you're a runner, a CrossFitter, or just starting out, a powerful grip supports everything you do. Find the gear, guidance, and inspiration you need to hit your goals at https://www.flourish-everyday.com .
- A Complete Guide to the CrossFit Workout: Grace Method
The CrossFit world is vast and specializes in getting you fit. Their various programs and philosophies have helped many people with their health. I want to cover one of the methods taught by CrossFit so you can get an idea of what you can expect from this training method. If you've been in the CrossFit world for any length of time, you've heard the name: Grace . A Complete Guide to the CrossFit Workout: Grace, a renowned benchmark, offers a straightforward challenge focused solely on one task: 30 clean and jerks for time . The prescribed (Rx) weight is 135 pounds (61 kg) for men and 95 pounds (43 kg) for women. It's an all out sprint from the very first rep, a workout that challenges your power, speed, and ability to cycle a barbell efficiently when your lungs are screaming. Table of Contents A True Test of Grit and Grace Perfecting Your Clean and Jerk Technique for Grace Smart Strategies and Pacing to Conquer Your Best Time Scaling Grace for Your Current Fitness Level Choosing the Best Shoes for Grace and Barbell Lifts Essential Warm-Ups and Mobility for Peak Performance Common Questions About Grace A True Test of Grit and Grace The beauty of Grace lies in its simplicity. With only one movement and a fixed number of reps, there's absolutely nowhere to hide. Your final time is a direct reflection of how well you can move the barbell and how long you can sustain a high power output without breaking down. This isn't just about raw strength; it's a delicate dance between brute force and smooth technique. As one of the original "Girl" (Workout Of the Day) WODs, Grace has been a cornerstone of the community for years, serving as a universal benchmark. It officially appeared on the CrossFit website way back on June 24, 2004 , and has been a rite of passage ever since. Its structure is a gut punch to your metabolic conditioning and a serious test of mental fortitude, all packed into a few short, intense minutes. CrossFit Grace WOD At a Glance The table below breaks down the essential components of the Grace benchmark workout, from prescribed weights to typical time goals. Metric Men (Rx) Women (Rx) Objective Workout 30 Clean and Jerks 30 Clean and Jerks For Time Weight 135 lbs / 61 kg 95 lbs / 43 kg Complete all reps Good Time 3:00 - 5:00 4:00 - 6:00 Benchmark goal Elite Time Under 2:00 Under 3:00 Competitive goal Time Cap 5-7 minutes 5-7 minutes Common class cap This table provides a clear snapshot of the workout's demands and what you should be aiming for. What This Guide Covers This guide is your complete playbook for Grace. We’re going to break down every single element to help you smash your personal best. Here’s what you can expect: Perfecting Your Clean and Jerk Technique for Grace Smart Strategies and Pacing to Conquer Your Best Time Scaling Grace for Your Current Fitness Level Choosing the Best Shoes for Grace and Barbell Lifts Essential Warm-Ups and Mobility for Peak Performance Frequently Asked Questions About Grace Understanding the principles of circuit training can also offer insight. While Grace is one movement, its non stop nature mirrors the high intensity effort needed for circuit style conditioning. For a broader look, check out our guide on the 10 of the best CrossFit workouts to build elite fitness . Grace is more than just a workout; it's a diagnostic tool. It quickly exposes inefficiencies in your barbell cycling, weaknesses in your posterior chain, and any hesitation in your mental game. A sub 3-minute time is often considered a significant milestone for competitive athletes. Perfecting Your Clean and Jerk Technique for Grace A fast time in Grace requires more than brute strength; it demands ruthless efficiency. Muscling through a single ugly clean and jerk is one thing, but doing it 30 times is a recipe for burnout. Mastering the technique is the only way to the top. Think of each rep as a fluid cycle. The goal is to get your entire body working together, making the barbell feel almost weightless. Breaking the movement down and polishing each piece is key. This simple flowchart nails the essence of the workout. As you can see, Grace is a straight shot: 30 reps, for time. Every second saved through better technique is a second shaved off your final score. 24oz Steel Bottle Mastering the Clean The clean starts with launching the weight from the floor to your shoulders. It consists of two "pulls." The first pull gets the bar off the ground; maintain a flat back, proud chest, and loaded hips. The second pull is the explosion. As the bar passes your knees, violently extend your hips, knees, and ankles, a "jump and shrug" motion. This explosive pop sends the bar flying upward, creating a moment of weightlessness. A classic rookie mistake is pulling with the arms too early. Your arms are just ropes; keep them straight until your hips have done the heavy lifting. The real power comes from your legs and hips. Once the bar is floating, pull yourself under it quickly, catching it in a solid front rack position. For any serious barbell athlete, developing core strength and power is non negotiable for stability and force transfer. Nailing the Jerk With the bar on your shoulders, the jerk gets the weight overhead. This starts with the "dip and drive." The dip is a short, controlled drop, like coiling a spring with your legs. The drive is the explosive uncoiling, launching the barbell up. As the bar travels, punch yourself down underneath it, catching it with locked out arms. You have a couple of options for the jerk: Push Jerk: Catch the bar overhead with your feet landing in their starting spot. It’s quick and perfect for cycling reps fast. Split Jerk: Drop under by splitting your feet, one forward and one back. This provides a more stable base, which is helpful for heavier weights or when fatigue sets in. For most people, the power clean and push jerk are the most efficient choices for Grace. They are faster and more economical over 30 reps. A full squat clean or split jerk might be necessary if the weight is a true grinder, but they will slow you down. Find the most efficient technique you can maintain from rep one to thirty. Smart Strategies and Pacing to Conquer Your Best Time Great technique gets you in the game, but a smart race plan wins the day. Going all out from rep one is a recipe for disaster. Your strategy should be honest about your current fitness and capacity. Think of Grace as one single effort to manage. The goal is to minimize rest and move at a sustainable pace. The difference between a three minute, and a six minute Grace often comes down to set breaks and fatigue management. Breaking Down the Reps Your Way There’s no single “best” way to chip away at the 30 reps. The right strategy is tied to your barbell cycling ability and muscular endurance. Big Sets to Start: A high risk, high reward approach is starting with a large, unbroken set of 10-15 reps. It can give you a head start, but only if you can recover quickly. Consistent Small Sets: A more conservative strategy is breaking the reps into manageable chunks like 10 sets of 3 or 6 sets of 5. This helps control your heart rate and avoid redlining. Fast Singles: For many, the fastest route is hitting all 30 reps as quick singles. Drop the bar after each rep, take a quick breath, and get back on it. This keeps your heart rate from spiking. The secret to fast singles is simple: don't let the barbell spend much time on the floor. Elite athletes are often back on the bar in under three seconds. Practice a smooth, efficient setup for every lift. Touch-and-Go vs. Dropping the Bar Knowing when to do touch-and-go (TNG) reps versus dropping the bar is a massive part of your game plan. TNG reps are faster rep for rep but are very taxing on your grip and lungs. Dropping the bar provides a micro-rest to reset your grip and breathing. A hybrid plan often works best: hit small TNG sets early on, then switch to fast singles as fatigue creeps in. This lets you bank time upfront while saving gas for the home stretch. Scaling Grace for Your Current Fitness Level Grace is a sprint. Your limiting factor should be your metabolic capacity, not your one rep max. Smart scaling is crucial to maintain high intensity. The goal is to choose a load you can cycle for at least 5-10 reps unbroken when fresh. If you're grinding out singles from the start, the weight is too heavy. The Rx weight is just a suggestion. The "real" workout is the one that pushes you appropriately. Finishing a scaled Grace in four minutes is a much better workout than gutting out the Rx weight for ten. Choosing the Right Weight Picking your weight is the most important decision. You need a weight that allows for solid technique, high speed, and serious intensity. Here are some guidelines: Beginner: Aim for a weight around 30-40% of your one rep max clean and jerk. Intermediate: Target somewhere between 40-50% of your max. Advanced: You should be comfortable cycling 50% or more of your best lift. The goal is to finish in the target time frame (under six minutes for most) to get the intended speed and power endurance stimulus. Movement Modifications and Alternatives For athletes still getting comfortable with the barbell, dumbbells or kettlebells are great alternatives. A common substitution is 30 dual dumbbell or kettlebell clean and jerks , which builds unilateral strength and coordination. The table below breaks down common scaling paths for Grace, all designed to maintain the stimulus of a fast, high power effort. Grace WOD Scaling Options and Target Stimulus Level Suggested Weight (Men/Women) Movement Focus Target Time Range Rx 135 lbs / 95 lbs Barbell cycling, speed, and power endurance Under 5:00 Intermediate 95-115 lbs / 65-85 lbs Maintaining form under fatigue with a challenging load 4:00 - 6:00 Beginner 65-75 lbs / 45-55 lbs Developing technique and barbell confidence 5:00 - 7:00 No Barbell 2x35-50 lb DBs / 2x20-35 lb DBs Coordination and full-body conditioning with dumbbells 4:00 - 7:00 Ultimately, scaling is about making the workout fit you . The right adjustments allow you to hit Grace with proper intensity, push your fitness forward, and stay safe. Choosing the Best Shoes for Grace and Barbell Lifts Your shoes matter more than you might think. Hitting a fast time in cushioned running shoes is like lifting on a mattress, it bleeds power and increases injury risk. Running shoes are designed with soft soles to absorb impact, which is a disaster for lifting. In a clean and jerk, you need to drive force from the ground into the barbell. A mushy sole eats up that force. A solid, stable shoe provides a firm foundation, ensuring every ounce of effort goes into the lift. Cross-Training Shoes: The Versatile Contender For a high rep burner like Grace, a solid pair of cross-training shoes is usually your best bet. They are built to handle lifting, jumping, and short bursts of running. Key features include: Minimal Heel-to-Toe Drop: Most cross-trainers have a drop of about 4-7mm , keeping your feet relatively flat for a stable lifting stance. Dense, Stable Sole: The sole is firm enough for a solid platform but allows for quick foot movement. Durable Construction: Built to take a beating, making them a smart long-term investment. Top tier cross-training shoes, like the Nike Metcon series or Reebok Nanos , strike a perfect balance between stability and responsiveness for Grace. Weightlifting Shoes: The Stability Specialist Dedicated weightlifting shoes ("lifters") are engineered for maximum weightlifting from a rock solid base. Their most noticeable feature is a hard, elevated heel. This raised heel helps athletes with tight ankles achieve a deeper, more upright squat during the clean. For a workout like the CrossFit workout Grace, the rigidity of lifters can be a drawback. They can feel clunky and slow down your footwork between reps, where every fraction of a second counts. While lifters are king for a one rep max, a versatile cross-training shoe is generally the smarter choice for Grace. It provides the necessary stability while letting you stay nimble. For a more detailed look, check our guide on finding the best shoes for weightlifting . The right shoe will make your lifts feel more grounded and powerful. Essential Warm-Ups and Mobility for Peak Performance A killer time in Grace is set long before the clock starts. A smart, purposeful warm-up is your secret weapon for unlocking max power and efficiency. The mission is to raise your core temperature, mobilize key joints, and activate the exact muscle groups you’re about to use. A well designed warm-up primes your body for the intensity to come, so you can move smoothly and powerfully from the first rep. Phase 1: Raising Your Core Temperature First, get the blood flowing. This phase should take about 5-7 minutes and consist of low impact, full body movements. Rowing: Engages the entire body and mimics the pulling pattern of the clean. Assault Bike: Quickly gets the heart rate up and warms the legs and shoulders. Jumping Jacks and High Knees: Simple, effective dynamic movements. This step is nonnegotiable for safety and performance, preparing muscles and connective tissues for the work ahead. Phase 2: Dynamic Mobility and Activation Next, zero in on mobility drills for the specific ranges of motion needed for a clean and jerk. Open up your hips, shoulders, and thoracic spine. Spend a good 10 minutes on these movements. Banded Pass-Throughs: Improves shoulder mobility and warms up the rotator cuffs. Cat-Cow Stretches: Mobilizes the thoracic spine, crucial for a stable overhead position. Spiderman Lunges with Rotation: Opens up your hips and T-spine simultaneously. Goblet Squats: Primes your squat pattern while firing up your glutes and core. These aren't just stretches; they're active preparation. Exploring the top mobility exercises for athletes can unlock performance will pay huge dividends. Phase 3: Movement-Specific Preparation Finally, get your hands on an empty barbell and drill the clean and jerk. This grooves the movement patterns and preps your central nervous system. Start with the bar and run through 5-10 reps of each piece: deadlifts, hang power cleans, front squats, and strict presses. Post-Activation Potentiation (PAP) is a concept where lifting something heavy "wakes up" your nervous system, making subsequent explosive movements feel easier. Slowly building up the weight in your warm-up primes your muscles. After drilling the pattern with an empty bar, add weight over 2-4 sets . Your last warm-up should be a single, smooth rep at or just above your workout weight. This confirms your body is prepped for the all-out sprint. Common Questions About Grace As you prepare for the CrossFit workout Grace, you're bound to have questions. Getting the finer points right can change your time and how you feel afterward. Let's dive into some common questions to help you build a solid strategy. What is a Good Grace Time to Aim For? A "good" time depends on your fitness level, but here are some general targets: Beginner athletes: Typically aim to finish under 7 minutes . Intermediate athletes: Usually land between 4-6 minutes . Advanced athletes: Push to get under 3 minutes , with elites finishing under 2 minutes . The most important goal is to pick a weight that lets you move fast with good form and feel the burn of a true power sprint. Should I Do Touch-and-Go Reps or Singles? This is a key strategic decision. Touch-and-go (TNG) reps are faster per rep but will fry your grip and spike your heart rate. If you're excellent at cycling a barbell, you might manage a few quick sets this way. For most people, fast singles are the smarter, and often faster, approach. Drop the bar from overhead, take one quick breath, and get back to it. Keep the rest short, no more than 3-5 seconds . This helps manage fatigue and maintain a steady pace. Pro Tip: If you choose singles, practice your reset. The sequence of dropping the bar, resetting your feet and grip, and starting the pull should be a smooth, automatic motion. A sloppy reset wastes energy and time. I hope this article has given you all the necessary information to get the best out of your workout. If you would like to read more on optimizing your health and wellness, and see the latest reviews on athletic shoes, please visit me at flourish-everyday.com
- How to Do Reverse Lunges for a Stronger Lower Body
The reverse lunge is a cornerstone for building lower body strength and stability. To perform it, take a large step back with one foot, lower your hips until both knees are at a 90-degree angle, then push through your front heel to return to the start. This exercise effectively targets the glutes and hamstrings. Table of Contents Why Reverse Lunges Deserve a Spot in Your Workout Executing The Perfect Reverse Lunge Functional Benefits for Runners and Athletes Fixing the Most Common Form Mistakes How to Progress and Program Your Lunges Your Reverse Lunge Questions Answered References Why Reverse Lunges Deserve a Spot in Your Workout The reverse lunge is more than just another leg day exercise; it's a foundational movement that builds functional strength, improves balance, and is notably joint friendly. By stepping backward, the movement becomes more controlled and stable compared to a forward lunge. This makes it an excellent choice for individuals at all fitness levels, from beginners to seasoned athletes. This controlled backward step is precisely why the reverse lunge is a safer option for many people, especially those with sensitive knees. A Knee-Friendly Powerhouse One of the most significant benefits of the reverse lunge is its kindness to your joints. Forward lunges can place considerable stress on the knee, but stepping backward naturally helps keep your front shin more vertical. This alignment change can reduce pressure on the knee joint by approximately 30% . This is particularly beneficial for runners who accumulate high mileage, such as 20+ miles a week. The movement also shifts the muscular focus to the posterior chain, the hamstrings, glutes, and calves. A 2022 study found these muscles showed 20-40% greater activation in reverse lunges compared to forward movements [1]. You can find more details on lunge benefits at Healthline . The reverse lunge is a secret weapon for building a resilient lower body. It trains your body to decelerate and stabilize under control, which translates directly to better performance in sports and everyday life. Correcting Imbalances and Building Stability Most people have a dominant leg, which can lead to muscular imbalances and increase the risk of injury over time. As a unilateral exercise, working one leg at a time, the reverse lunge is the perfect solution. It compels your weaker side to work independently and build strength. This single leg focus offers several advantages: Enhanced Balance: Stepping backward challenges your proprioception, your body’s awareness of its position in space. Improved Core Engagement: Your core must activate significantly to maintain an upright torso and prevent instability. Better Hip Mobility: The lunge provides a gentle stretch for the hip flexor of the back leg, helping to counteract tightness from prolonged sitting. Incorporating this move into your routine is a strategic way to build a balanced, powerful, and injury resistant lower body, setting the stage for more advanced strength training. It's useful to compare the reverse lunge with the more common forward lunge. While they appear similar, they target the body in subtly different ways. Quick Guide Reverse Lunge vs Forward Lunge Feature Reverse Lunge Forward Lunge Stability More stable; stepping back is a controlled motion. Less stable; requires more deceleration to control momentum. Muscle Focus Emphasizes glutes and hamstrings more. Places more emphasis on the quads. Joint Impact Easier on the knees due to a more vertical shin angle. Can place more stress on the front knee joint. Both exercises are effective. However, if you need a knee friendly option that specifically targets the glutes and hamstrings, the reverse lunge is an excellent choice. Executing The Perfect Reverse Lunge Proper execution of the reverse lunge is about control, not speed. Every part of the movement, from the initial setup to the final push, is crucial for maximizing benefits and ensuring safety. When form is correct, this exercise becomes a true powerhouse for the lower body. Begin by standing tall with your feet hip width apart and a slight bend in your knees. Before moving, engage your core by drawing your belly button toward your spine. This action creates the solid foundation needed for the exercise. Mastering The Descent And Ascent From your braced stance, take a deliberate step straight back with one foot, landing on the ball of that foot. The step should be long enough to allow both knees to form approximately 90-degree angles as you lower your body. Allow your back knee to hover about an inch from the floor without touching it. As you descend, focus on keeping your torso upright with your chest lifted. A common error is leaning too far forward, which shifts the work away from your glutes and strains your lower back. Ensure your front knee remains aligned directly over your ankle; do not let it collapse inward or drift past your toes. This alignment is vital for joint protection. To return to the starting position, drive forcefully through the heel of your front foot. This is where your glutes and hamstrings engage most intensely. Squeeze your glutes and think about pushing the floor away as you bring your back foot forward to meet the front. This infographic breaks down the main benefits you achieve with this controlled movement: enhanced knee safety, better balance, and significant muscle activation. The mechanics of the lunge directly contribute to a stronger posterior chain and improved stability, making it a well rounded and effective exercise. Essential Cues For Flawless Form To master how to do reverse lunges correctly, using internal cues can be very effective. Think of these as reminders from a personal trainer during each set. "Chest Up, Shoulders Back" : This cue helps prevent your back from rounding and keeps the focus on your legs. Imagine a string pulling the top of your head toward the ceiling. "Push the Floor Away" : Instead of just thinking "stand up," concentrate on driving your front heel down into the floor to generate maximum power from your glutes. "Keep Your Hips Square" : Your hips should always point straight ahead. Avoid twisting or opening your torso as you step back. A good reverse lunge should feel smooth and intentional. If you find yourself wobbling or rushing, you're missing the stability benefits. Slow down and control every inch of the movement. Start with your body weight to master the form before adding resistance. If you're building a routine, you can find other great foundational bodyweight exercises to complement your workout. Focusing on these details will make every rep more effective. Functional Benefits for Runners and Athletes The reverse lunge offers more than just muscle growth. For runners and other athletes, it provides specific, functional advantages that improve performance. It is a precision tool for correcting weaknesses, generating explosive power, and increasing injury resilience. One of its key benefits is its ability to target and correct muscle imbalances. As a unilateral movement, it prevents the dominant leg from taking over, forcing the weaker side to build equal strength. This is crucial for runners who need a balanced gait to prevent overuse injuries. Building Posterior Chain Power The true value of the reverse lunge lies in its intense focus on the posterior chain, the group of muscles including your glutes and hamstrings. This group is the engine for explosive movements like sprinting, jumping, and accelerating. When you learn how to do reverse lunges with proper form, you target these critical muscles more effectively than with many other common exercises. The backward motion naturally places the load on your glutes and hamstrings, building the raw strength needed for a powerful finish in a race. My guide on strength training for distance runners provides more detail on how a strong posterior chain can boost speed and endurance. Reverse lunges became a staple in physical therapy following the post-2005 ACL injury epidemic, which still affects over 200,000 athletes in the US annually [2]. Studies show they activate the glutes and hamstrings 28% more than forward lunges, which helps significantly reduce stress on the knee joint. Enhancing Mobility and Core Stability For athletes who spend significant time sitting, the reverse lunge also serves as a dynamic stretch for tight hip flexors. As you step back, the hip on your trailing leg opens, helping to counteract the effects of prolonged sitting and improve overall mobility. Simultaneously, the movement requires significant core engagement. Your abs and obliques must work to keep your spine stable and prevent you from wobbling. A strong, stable core is the foundation for almost every athletic movement. The reverse lunge trains your core to stay braced and active during a dynamic, single-leg motion, which is exactly what it needs to do when you're navigating a technical trail run or powering through a CrossFit WOD. This combination of benefits makes the reverse lunge essential for any serious athlete. It builds balanced strength, develops explosive power, and improves the mobility and stability needed to perform at your peak. Fixing the Most Common Form Mistakes Even with knowledge of the steps, small errors can compromise your reverse lunge results. Correct form is essential for protecting your joints and ensuring the right muscles are engaged. Let’s review common mistakes and how to fix them. A major issue is allowing the front knee to collapse inward. This often indicates weak glute medius muscles, which are crucial for hip stabilization. When the knee caves in, it places excessive stress on the joint, potentially leading to pain. To fix this, consciously push your front knee slightly outward, keeping it aligned with your second and third toes. Imagine trying to spread the floor apart with your feet. Adding exercises like clamshells and lateral band walks to your warm-up can also help strengthen these key hip stabilizers. Maintaining an Upright Torso Another frequent problem is leaning the torso too far forward. While a slight forward hinge is natural, excessive leaning shifts the focus from your glutes to your lower back. This often occurs due to a disengaged core or tight hip flexors. To correct this, keep your chest lifted and shoulders back throughout the movement. Brace your core as if preparing for an impact; this tension will provide the stability needed to stay upright. Pro Tip: If possible, perform your lunges in front of a mirror. Instant visual feedback is one of the best ways to identify and correct a forward lean or a caving knee in real-time. Tight hip flexors are often the primary cause, pulling your torso forward and making good posture difficult. For additional help, see our post on how to improve hip flexibility . It offers targeted stretches that can significantly improve your lunge form. Correcting Your Push-Off The final major mistake is pushing off from the wrong part of your foot. Many people push from the ball of their back foot or the toes of their front foot, which wastes energy and fails to engage the target muscles. All power to return to the starting position should come from driving through the heel of your front foot. This ensures your glutes and hamstrings are activated to complete the movement. Imagine squishing a bug under your front heel as you press back up to a standing position. This simple cue can instantly improve the effectiveness of each rep. How to Progress and Program Your Lunges Once you've mastered the bodyweight reverse lunge with solid form, it's time to progress. Advancing the exercise is essential for continued strength gains and avoiding performance plateaus. This progression should be strategic, not just about lifting heavier weights. The core principle for improvement is progressive resistance training , which involves gradually increasing the challenge to your muscles over time. This consistent challenge forces them to adapt and grow. Adding Resistance for Strength Gains The most straightforward way to make the lunge more challenging is by adding weight. This forces your muscles to work harder, which is key for building both strength and size. Here are some effective ways to load your lunges: Dumbbells or Kettlebells : Holding a weight in each hand is a classic method that also challenges your grip strength and core stability. Goblet Hold: Holding a single heavier weight at your chest is excellent for core activation and naturally promotes an upright torso. Barbell : For advanced strength development, a barbell across your upper back allows for the heaviest loads. Always choose a weight that makes the last two reps of each set challenging but achievable with good form. Quality of movement should always take priority over quantity of weight. Dynamic Variations for Athleticism Beyond adding weight, you can make the reverse lunge more dynamic to improve coordination, balance, and explosive power, all of which enhance athletic performance. A popular progression is the reverse lunge with a knee drive. After lunging back, drive forcefully through your front heel to stand up, bringing your back knee forward and up toward your chest in a single, fluid motion. This variation adds a significant balance challenge and mimics running mechanics. Another great option is the slider reverse lunge . Placing your back foot on a slider disc forces your front leg to control the movement during both the descent and ascent, creating constant tension in the glute and hamstring. For more ways to target these key muscles, explore our ultimate guide to powerful exercises for hamstrings . 24oz Steel Water Bottle Structuring Your Workouts How you incorporate reverse lunges into your routine depends on your fitness goals. The sets, reps, and rest periods should be tailored to what you aim to achieve. Below is a simple table to guide your programming. Reverse Lunge Programming for Different Goals Fitness Goal Sets Reps per Leg Recommended Variation Rest Period Strength 3-4 6-8 Barbell or Heavy Dumbbells 90-120 seconds Hypertrophy 3-4 8-12 Goblet or Dumbbell Lunge 60-90 seconds Endurance 2-3 15-20 Bodyweight or Light Weight 30-45 seconds By intelligently adding weight, incorporating dynamic variations, and programming sets and reps for your specific goals, the reverse lunge can remain a staple in your routine that consistently delivers results. Your Reverse Lunge Questions Answered Even after mastering a new exercise, questions can arise. To ensure you feel confident with your reverse lunges, here are answers to some of the most common inquiries. Which Muscles Do Reverse Lunges Work The Most? The reverse lunge is a comprehensive lower-body exercise that targets several major muscle groups simultaneously. The primary muscles engaged are the gluteus maximus (the largest muscle in your buttocks) and the quadriceps (the front of your thighs). However, the hamstrings are also heavily involved, controlling the descent and powering the ascent. Additionally, your calves, core, and hip stabilizer muscles work to maintain balance and stability throughout the movement. Are Reverse Lunges Better Than Forward Lunges For Bad Knees? For many people, the answer is a resounding, yes! Stepping backward instead of forward alters the exercise's mechanics, making it significantly more knee friendly. The backward motion helps maintain a more vertical front shin, which reduces pressure and shearing force on the kneecap. A forward lunge involves momentum that must be decelerated, which can be stressful on the knee joint. In contrast, the reverse lunge is a more controlled, deliberate movement, making it a preferred variation for individuals with sensitive knees or those undergoing rehabilitation. Fitness experts often point out that the controlled backward step is inherently more stable. This reduces strain on the patellar tendon, making it a fantastic choice for building strength without flaring up old knee issues. How Many Reverse Lunges Should I Do In My Workout? The ideal number of reps and sets depends on your specific fitness goals. Here are some general guidelines: For General Strength: Aim for 3 sets of 8-12 reps per leg . This range is effective for building a solid strength foundation. For Muscular Endurance: To build stamina for activities like running, perform 2-3 sets of 15-20 reps per leg . For Maximal Strength: When lifting heavy to build raw power, reduce the reps. Focus on 3-4 sets of 5-8 reps per leg . Regardless of your goal, prioritize perfect form over hitting a specific number. Quality always surpasses quantity. Can I Do Reverse Lunges Every Day? It is not recommended. Like any strength exercise, your muscles require time for recovery and rebuilding. Training the same muscles daily can lead to overtraining, which hinders progress and increases injury risk. For optimal results, incorporate reverse lunges into your routine 2-3 times per week , allowing at least one day of rest in between sessions. This gives your lower body the necessary 48 hours to recover and grow stronger. References [1] Schutz, P., et al. (2022). "Joint-angle-specific muscle-tendon interaction in the human triceps surae during jumping." Journal of Biomechanics .[2] Prodromos, C. C., et al. (2007). "A meta-analysis of the incidence of anterior cruciate ligament tears as a function of gender, sport, and a knee injury-reduction regimen." Arthroscopy: The Journal of Arthroscopic & Related Surgery , 23(12), 1320-1325. At Flourish-Everyday , we're committed to providing the information you need to build a stronger, healthier lifestyle. From exercise guides to reviews on the best athletic shoes, find everything you need to support your fitness journey at https://www.flourish-everyday.com .