Flourish-Everyday
Search Results
309 results found with an empty search
- Guide to Pre-and Post-Workout Nutrition for Maximum Results
Maximizing the effectiveness of your workouts goes beyond the sweat and effort you put in at the gym. A crucial but often overlooked aspect is your nutrition before and after exercise. Properly fueling your body can dramatically enhance your workout performance, speed up recovery, and improve your overall results. In this guide, we explore why pre-and post-workout nutrition matters and provide specific guidance on what to consume for maximum fitness benefits. The Importance of Pre-Workout Nutrition There is a lot of discussions today about the right nutrition before a workout and how/if it is essential for peak performance. Consuming adequate fuel helps sustain energy levels, delays fatigue, and can even enhance your strength and endurance. During exercise, your body primarily uses glycogen, which is the stored form of carbohydrates, as an energy source. To maximize these glycogen stores, it’s essential to eat a meal or snack packed with carbohydrates before heading to the gym. A balanced pre-workout meal should contain carbohydrates, protein, and a small amount of healthy fat. Aim to eat this meal 30 to 90 minutes before you start exercising, depending on what you eat and how your body digests food and the intensity of your workout. Consider these ideal pre-workout foods: Whole grain toast with peanut butter and banana: This combo provides complex carbs and healthy fats. Greek yogurt with berries and honey: Packed with protein, vitamins, and antioxidants. Oatmeal topped with nuts and sliced fruits: A slow releasing source of energy. For those in a rush, a quick smoothie made with protein powder, bananas, and spinach can offer a nutritious fuel source. Delicious pre-workout oatmeal rich in nutrients. Timing Your Pre-Workout Meal The timing of your pre-workout meal is crucial. Eating too close to your workout can lead to discomfort, as your body is still digesting the food. Here are some guidelines: 30-60 Minutes Before: Choose a light snack with easy to digest carbohydrates and protein, such as a fruit smoothie or a piece of toast with a spread. 1-3 Hours Before: Opt for a more balanced meal containing whole grains, lean proteins, and healthy fats, which will provide you with sustained energy. Making wise food choices allows your body to be well prepared for high intensity sessions or extended cardio workouts. Top Rated Workout Water Bottle The Role of Hydration Hydration cannot be overlooked. Water is vital for many bodily functions, including temperature regulation and transporting nutrients, both of which are particularly important during exercise. To improve performance, drink water before your workout. For longer or more intense sessions, consider electrolyte rich beverages to help replenish lost minerals. Staying hydrated not only enhances your performance but also supports quicker recovery. Importance of Post Workout Nutrition Once your workout is complete, your body enters recovery mode. Nutrition becomes a critical factor in repairing muscles and restoring energy levels. Eating the right foods after your workout can significantly improve recovery and enhance the benefits of your exercise. Focus on replenishing glycogen stores and repairing muscle tissues with a post-workout meal that is rich in protein and minimal carbs. There is no rush post- workout. Eat when your body tells you to, not because you think you have to. Allergy Free Mixes Ideal Post-Workout Foods Here are some great options for post workout meals: Grilled chicken, quinoa, and roasted vegetables: A balanced meal providing lean protein and complex carbs. Protein shake with fruit and nut butter: A quick, portable option that packs a nutritional punch. Cottage cheese with pineapple: This is a simple way to combine protein with carbs for recovery. Smoothie with spinach, protein powder, and mixed berries: A blend of nutrients for a refreshing recovery drink. Nutrient-dense post-workout meal featuring grilled chicken and vegetables . The Importance of Snacks If a full meal isn't practical after a workout, nutrient-dense snacks can still be beneficial. Consider keeping healthy, ready-to-eat options on hand to ensure you nourish your body effectively. No sugary coffee drinks or beverages . You will eliminate the full benefits of your workout. Great snack ideas include protein bars, Greek yogurt, or homemade energy balls. The focus should be on choosing options that are rich in nutrients and easy to grab when you’re busy. Recap of Key Nutrition Insights Optimizing your pre-and post-workout nutrition can have a profound effect on your results and overall fitness journey. A balanced intake of protein and carbohydrates fuels performance during workouts and aids recovery afterward. Stay alert to your hydration needs, and remember that snacks can offer great convenience. By making informed food choices, you can see improved performance, faster recovery, and better results in your fitness efforts. Finally, individual nutritional needs vary, so consulting with a healthcare professional or a registered dietitian can help tailor a nutrition plan that suits your unique fitness goals. Vibrant post-workout smoothie rich in nutrients. Incorporating proper nutrition into your fitness routine will not only enhance your performance but can also serve as a key to achieving and maintaining your fitness goals over time. I hoped this helped you better understand the role of food in your workout journey. Be well, and have a great workout. Get Protected!
- Split Squat Vs Lunge A Complete Guide to Leg Day
When it comes to leg day, the split squat vs. lunge debate is a classic. At first glance, they look similar, but the core difference is simple. A split squat is a static exercise where your feet stay planted, designed to build strength and stability. In contrast, a lunge is a dynamic movement that challenges your balance and coordination as you step. So, which one should you choose? It boils down to your goals. Are you looking to lift heavy and build power from a stable base, or are you aiming for more athletic, functional movement that translates to sports and daily life? The Foundation of Unilateral Leg Training Both the split squat and the lunge are cornerstones of unilateral training, working one leg at a time. This approach is essential for building a balanced, resilient lower body. Training one leg at a time helps spot and fix muscle imbalances between your left and right sides, which is a huge factor in reducing injury risk. It also engages your core and stabilizer muscles, improving coordination and building functional strength you'll notice in everything you do. What's Inside This Guide This guide breaks down everything you need to know about these two powerhouse exercises. My goal is to give you a clear path so you can decide which one fits best with your fitness goals. At a Glance Comparison: A quick-reference table to see the key differences. Form and Technique Deep Dive : Step-by-step instructions and common mistakes. Muscle Activation and Biomechanics : A look at which muscles each exercise hits hardest. Programming for Your Goals : How to fit these movements into your routine. Essential Footwear for Stability: Why the right shoes matter for these lifts. Frequently Asked Questions: Clear answers to common questions. Once you understand the subtle but critical differences between a split squat and a lunge, you'll be able to make smarter programming choices to build stronger, more balanced legs. Split Squat Vs Lunge At a Glance The biggest difference between the split squat and the lunge isn't how they look, it's how they move. One is a static strength builder, while the other is a dynamic, athletic movement. This distinction changes everything, from muscle activation to which exercise best fits your goals. The split squat is a stationary powerhouse. Your feet are glued to the floor, providing a rock solid base. This stability lets you focus on raw vertical power, load heavier weights, and target the working leg to build strength and muscle mass. The lunge , on the other hand, is all about motion. You step forward (or backward) with every rep. This introduces a major challenge to your balance and coordination. You must control momentum on the way down and then explode back to the start, firing up more stabilizer muscles and translating better to real-world activities like running or sports. Core Differences Split Squat vs Lunge To help you decide which one belongs in your workout, here’s a quick breakdown of their main characteristics. This side-by-side comparison shows how each exercise carves out its own unique role. Attribute Split Squat Lunge (Forward) Movement Pattern Static (feet are fixed in place) Dynamic (involves a stepping motion) Primary Goal Strength, Hypertrophy, Stability Balance, Coordination, Functional Power Stability Level High (stable base allows for heavier loads) Moderate (requires constant stabilization) Coordination Demand Low (simple up and down motion) High (involves deceleration and propulsion) Muscle Focus Concentrated tension on quads and glutes Broader activation, including stabilizer muscles Knee Friendliness Generally lower impact due to control Can place more stress on the front knee Ultimately, the split squat is your standard exercise for building a strong foundation, while the lunge is what you use to make that strength athletic and functional. Your Primary Goal Decides The Exercise Still not sure which one to pick? This simple decision tree strips it down to what really matters: your immediate training goal. As you can see, it's straightforward. If your main objective is to get as strong as possible, the split squat's stability is your best friend. If you're more focused on improving balance, coordination, and athletic movement, the dynamic challenge of the lunge is the clear winner. A Deep Dive into Form and Technique Proper form is what separates an effective exercise from a risky one. While split squats and lunges might look similar, their techniques have key differences that dictate their safety and effectiveness. To maximize results and avoid injury, you need to nail these details. The biggest distinction comes down to their movement patterns. The split squat is a stationary, up and down motion, whereas the lunge is dynamic, involving a step. This single contrast changes everything, from foot placement to torso angle. Executing the Perfect Split Squat Think of the split squat as a pure, controlled vertical drop. Because your feet stay planted, you can channel all your focus into driving force through the front leg. Setup and Execution: Stance: Get into a staggered stance with one foot forward and the other back. Your feet should be about hip width apart and separated by 2-3 feet from front to back, allowing both knees to bend to 90 degrees at the bottom. Torso Position: Pull your shoulders back, keep your chest up, and brace your core. Stay mostly upright to target the quads or lean forward slightly to engage the glutes more. Descent: Lower yourself straight down until your back knee nearly touches the floor. Your front shin should stay vertical, and your front knee should track over your ankle, not past your toes. Ascent: Explode back up by driving hard through the heel of your front foot. The front leg should do most of the work. The most well known variation is the Bulgarian Split Squat , where you elevate your back foot on a bench. This increases the range of motion and stability challenge, seriously firing up your glutes and quads. Mastering the Dynamic Lunge The lunge adds movement, forcing you to control deceleration on the way down and re-accelerate on the way up with every rep. This makes it a more athletic movement that demands more coordination. Setup and Execution: Starting Position: Stand tall with your feet together, chest proud, and core tight. The Step: Take a deliberate, controlled step forward with one leg. Stride length is key; too short puts pressure on your knee, while too long makes you unstable. Descent: Once your front foot plants, sink your hips until both knees form a 90-degree angle. Your front knee should be stacked over your ankle, while your back knee hovers just off the ground. Return: Push off forcefully from your front foot to drive yourself back to the starting position in one smooth motion. Common Form Errors and How to Fix Them Tiny mistakes can sabotage your gains and lead to injury. Both exercises demand good hip mobility. If that's a weak point, check out our guide on how to improve hip flexibility and unlock movement . Split Squat Mistakes: Pushing with the back leg: Your back leg is for balance. Power should come from driving through the front heel. Knee collapsing inward (valgus): This common error stresses the knee joint. Actively push your front knee slightly outward to keep it aligned with your foot. Leaning too far forward: Keep your torso stable. A significant forward lean can transfer stress to your lower back. Lunge Mistakes: Front knee drifting past toes: This usually means your step was too short. Take a long enough stride so your front shin can stay vertical. Losing balance: A wobbly lunge is ineffective. Widen your stance (think railroad tracks, not a tightrope) and keep your core engaged. Slamming your back knee: Control the descent. Your back knee should gently tap the ground or stop just above it. Comparing Muscle Activation and Biomechanics While split squats and lunges work similar muscles, quads, glutes, and hamstrings, how they activate them differs. The distinction lies in biomechanics: one is a stable, vertical movement, while the other is a dynamic, horizontal action. Understanding this is key to picking the right tool for your goals. The split squat's stationary design is its biggest advantage for creating mechanical tension. With your feet locked in place, you have a stable base to generate maximum force. This allows for a pure up and down motion, putting non-stop, targeted stress on the quads and glutes of the front leg. Split Squat vs Lunge This focused tension often makes the split squat superior for hypertrophy (muscle growth). You can generally load it heavier and maintain consistent form, creating ideal conditions for muscle breakdown and growth. Glute and Quad Emphasis You can tweak your form in both exercises to target different muscles. For more Quads: Keep your torso more upright. This posture shifts your center of gravity forward, making your quadriceps do most of the work. For more Glutes: Hinge forward slightly at your hips. This forward lean stretches your glutes at the bottom, forcing them to contract harder to return to the top. This principle applies to both movements, but the stability of a split squat allows for more deliberate control over these form changes. Best Selling Workout Water Bottles The Dynamic Challenge of the Lunge The lunge's dynamic stepping motion completely changes the muscular demand. That forward and back step forces you to control momentum, which recruits a host of stabilizer muscles. As you step into a lunge, your body must brake horizontally before you can push off vertically. This action heavily engages your gluteus medius (a key hip stabilizer) and your entire core to keep your hips level and prevent your knee from caving inward. Research from the Journal of Orthopaedic & Sports Physical Therapy confirms that exercises requiring single-leg stability, like lunges, significantly activate the gluteus medius (Bolgla & Uhl, 2007). The Biomechanical Bottom Line: The split squat is an exercise in pure vertical force. The lunge, however, is an exercise in managing horizontal deceleration and vertical propulsion, making it a more complex and athletic movement. This constant need for stabilization is what makes the lunge such a great functional exercise. It teaches your body to control movement across different planes, a skill that translates directly to real world activities like running, jumping, and cutting. It may not isolate major muscles as intensely as a split squat, but it builds a more connected and coordinated type of strength. So when framing the split squat vs lunge debate, the choice becomes clearer. For packing on muscle with isolated tension, the split squat is your gold standard. For building functional, athletic strength that requires balance and coordination, the lunge is the superior tool. Programming for Your Specific Fitness Goals Knowing when to use each exercise in your workout is what unlocks results. The choice isn't about which is "better" overall, but which is the better tool for your current goal. For building maximum strength and muscle mass, the split squat is the champion. Its static nature provides a stable base, letting you focus purely on driving heavy loads. This stability minimizes the balance challenge, so all your energy can go toward creating the mechanical tension needed for hypertrophy. Building Raw Strength with Split Squats The stability of split squats often allows lifters to use significantly heavier weights compared to lunges. This makes them a powerhouse for building raw leg strength. The stationary foot position removes the balance component, letting you concentrate on pushing heavy loads through your quads and glutes. In fact, research has shown that single leg exercises like the Bulgarian split squat can be just as effective for building lower body strength as traditional bilateral squats (Speirs et al., 2016). This makes programming straightforward: if leg day is about getting stronger and bigger, prioritize split squats. Sample Strength Protocol: * Exercise: Barbell or Dumbbell Split Squats * Sets & Reps: 3-4 sets of 6-10 heavy reps per leg. * Placement: Use as a primary or secondary compound lift early in your workout. For pure muscle growth, the Bulgarian split squat is a top-tier choice. Elevating the rear foot increases the range of motion and the stretch on the quads and glutes, leading to greater muscle fiber recruitment. To get the most out of your training, don't forget pre-workout nutrition. The best pre workout snacks for muscle gain can provide the energy needed for heavy sets. Enhancing Athleticism with Lunges If your goal is to improve coordination, dynamic balance, and functional performance, the lunge is your go-to. Athletes and runners benefit hugely from the lunge's dynamic motion, which mimics the demands of sports. Each rep forces you to control momentum, decelerate, stabilize, and then accelerate. This dynamic control is crucial for building agility and preventing injuries. For runners, walking lunges enhance stride stability and hip control, while split squats build the raw power for hills. The two exercises complement each other perfectly in a well-rounded athletic program. If you want to build more explosive power, check out our guide on how to design a plyometric leg workout . Sample Athletic Protocol: * Exercise: Walking Lunges or Reverse Lunges * Sets & Reps: 3 sets of 12-15 reps per leg. * Placement: Use as a conditioning finisher or a primary movement on athletic development days. Ultimately, the split squat vs. lunge decision is strategic. Use split squats to build the engine and lunges to learn how to drive it. The Best Footwear for Unilateral Training Your shoes are your foundation, the critical link between you and the ground that can impact your power, form, and safety. What works for a static split squat isn't necessarily ideal for a dynamic lunge. When you're loading a heavy split squat, stability is everything. A cross-training shoe with a flat, rigid sole is best. This design minimizes compression, creating a solid base to transfer maximum force from the ground through your legs. Footwear for Heavy Split Squats The best split squat shoes create an unshakeable platform. Look for these features: Minimal Heel-to-Toe Drop: A lower drop ( 0-4mm ) keeps your foot flatter, enhancing stability. Wide, Flat Outsole: More surface area contact with the floor reduces foot roll. Rigid Midsole: A dense midsole prevents energy absorption, so all your power goes into the lift. Soft, cushioned running shoes are the worst choice for heavy unilateral lifts. Their plush soles create an unstable surface, which sabotages force production and can increase injury risk. Shoes for Dynamic Lunges For dynamic lunges, where you're stepping and controlling momentum, your footwear needs change. You still need stability, but also more flexibility. A versatile cross-trainer is the perfect middle ground. It should provide a stable heel and a supportive upper, but with more give in the forefoot. This allows for a natural step and a powerful push-off, supporting movement without sacrificing a solid base. Making the right choice is crucial. Dive deeper with our ultimate guide to shoes for strength training . Matching your shoe to the exercise, stability for split squats, versatile support for lunges, will lead to better, safer results. Top Rated Workout Socks Frequently Asked Questions When fine tuning lower body workouts, a few key questions about the split squat vs. lunge debate always arise. Let's clear them up. Can I Substitute Split Squats for Lunges in My Workout? While they work many of the same muscles, they aren't a direct swap because they have different goals. If your workout calls for lunges, it's likely targeting dynamic balance and coordination, which a static split squat won't provide. However, if your main goal is building raw strength and muscle, swapping lunges for a heavier split squat can be a great move. Ensure the exercise you pick aligns with your specific goal. Which Is Better for Bad Knees: Split Squat or Lunge? For most people with knee issues, the split squat is often the friendlier option. Because your feet stay planted, you avoid the jarring deceleration of a forward lunge, which can irritate the knee joint. The split squat's controlled motion makes it easier to maintain good alignment. If you still want the benefits of a lunge, try a reverse lunge . Studies suggest that reverse lunges place significantly less stress on the knee joint compared to forward lunges, making them a safer alternative for those with knee concerns (Riemann et al., 2018). Disclaimer: Always consult a physical therapist or doctor for persistent knee pain. They can provide personalized advice for safe training. How Do I Make Split Squats and Lunges Harder? Progressing these exercises is straightforward. The simplest way is to add weight with dumbbells, kettlebells, or a barbell. But weight isn't your only option: Split Squat Progression: Elevate your back foot on a bench for a Bulgarian Split Squat . This increases the range of motion, stretches the hip flexor, and challenges your stability and glute strength. Lunge Progression: Move from static lunges to dynamic walking lunges . To increase the challenge, hold a weight overhead for an overhead lunge or add a jump between reps for a plyometric lunge jump to build explosive power. At Flourish-Everyday , we provide expert reviews on athletic footwear and clear, actionable health info to support your fitness journey. Find everything you need to feel empowered and inspired at https://www.flourish-everyday.com . References Bolgla, L. A., & Uhl, T. L. (2007). Reliability of electromyographic normalization methods for evaluating the gluteus medius and gluteus maximus. Journal of Orthopaedic & Sports Physical Therapy , 37 (10), 617-621. Riemann, B. L., Conger, J. L., & Ward, R. (2018). Matching the Lunge to the Demands of the Athlete. Strength and Conditioning Journal , 40 (5), 79-90. Speirs, D. E., Bennett, M. A., Finn, C. V., & Turner, A. P. (2016). Unilateral vs. Bilateral Squat Training for Strength, Sprints, and Agility in Academy Rugby Players. The Journal of Strength & Conditioning Research , 30 (2), 386-392.
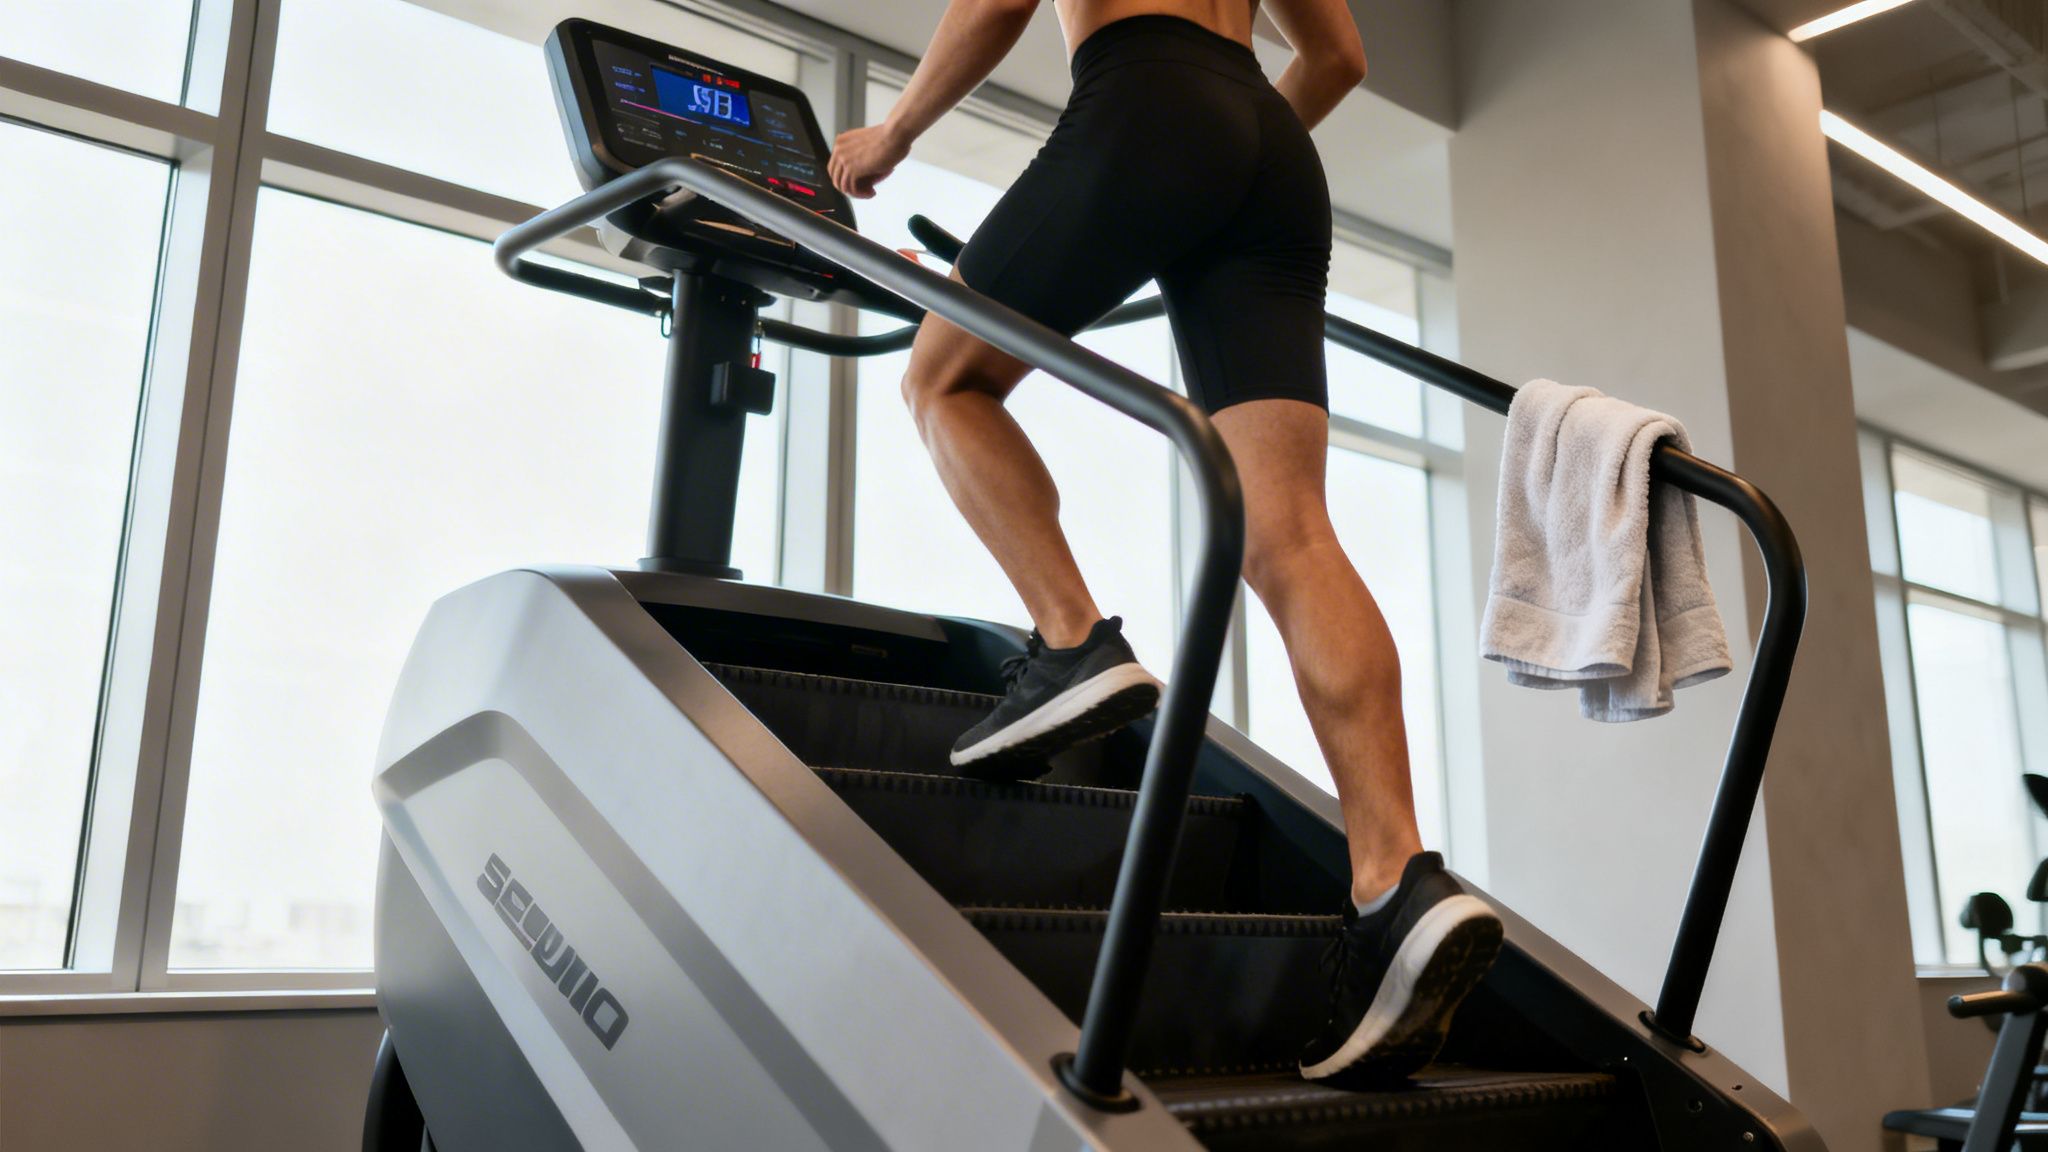
- StairMaster Workout Plan: A Complete Guide for All Fitness Levels
We have all looked over at the StairMaster area of the gym and asked ourselves, "Should I try it?" We see gym-goers stepping away, sweat dripping from their efforts, and wonder if it's better than my cardio exercises. Let's take a closer look at StairMaster workout plans that will fit your needs. A good StairMaster plan isn't complicated. It's about consistency, hitting it 2-3 times per week , and always pushing yourself just a little bit more by adding time, speed, or resistance. Plan for sessions lasting anywhere from 20-45 minutes , making sure you always bookend your main workout with a proper warm-up and cool down. The StairMaster is so much more than just another cardio machine tucked in the corner of the gym. It's a powerful tool for building serious lower body strength and lung capacity at the same time. Unlike jogging on a treadmill, every single step you take is a fight against gravity. This constant resistance hammers your glutes, hamstrings, quads, and calves in a smooth, low impact motion that’s much kinder to your joints than pounding pavement. This unique mix of resistance and cardio makes it incredibly efficient. StairMaster workouts are famous for how many calories they torch. Just a half hour session can burn anywhere from 180-260+ calories , depending on your body weight and how fast you're climbing. For example, a 180-pound person will burn more than a 125-pound person at the same pace. Building Your Foundational Plan To get real, lasting results, you need a plan. Let’s break it down into frequency, duration, and intensity. Getting on the machine consistently is what truly moves the needle. Frequency: Aim for 2-3 sessions a week . Schedule them on non-consecutive days to give your muscles time to recover and strengthen. Duration: If you're just starting out, 15-20 minutes is a perfect target. As you get fitter, work your way up to 30-45 minutes per session. Intensity: A great way to measure this is the Rate of Perceived Exertion (RPE) scale, where 1 is sitting on the couch and 10 is an all-out sprint. Most of your workouts should be in the 5-7 RPE range , you're breathing hard, but you could still manage a short conversation. I’ve put together a quick table that outlines the core elements you'll build your week around, whether you're a beginner or a pro. Core Components of a Balanced StairMaster Week A quick look at the fundamental elements of a StairMaster workout plan, adaptable for your current fitness level. Component Beginner Recommendation Intermediate/Advanced Recommendation Steady State Cardio 1-2 sessions, 20-30 mins at RPE 4-5 1 session, 30-45 mins at RPE 5-6 Interval Training 1 session, 15-20 mins (e.g., 1 min hard, 2 mins easy) 1-2 sessions, 20-30 mins (e.g., 1 min hard, 1 min easy) Active Recovery Gentle walk, stretching on off days Light climbing (Level 1-3), yoga, or foam rolling This framework gives you the flexibility to mix and match workouts, keeping things interesting while ensuring you're hitting all the right notes for steady progress. The Core Components of Every Session Every single time you step on that machine, your session should have three distinct parts. Skipping any of these is a fast track to injury or a frustrating plateau. Dynamic Warm-Up (5 minutes): Get the blood flowing and prepare your body. Start with easy climbing on a low level (1-3), then hop off for some dynamic stretches like leg swings or walking lunges. Main Workout (15-35 minutes): This is the heart of your session. It might be a steady climb at a challenging pace or an interval workout where you push hard for short bursts and then recover. Cool-Down (5 minutes): Don't just jump off! Lower the speed to a slow walk (level 1-2) for the last few minutes. Follow it up with static stretches, holding each for 20-30 seconds . Focus on your quads, hamstrings, glutes, and calves. A structured approach is everything. Just mindlessly climbing without a plan will only get you so far. By intentionally changing up your intensity and duration, you're using the principle of progressive overload, which is the secret sauce for continuous improvement. Why The StairMaster Delivers Powerful Results Ever wonder why just a few minutes on the StairMaster can feel more intense, and get you results faster, than other cardio machines? The secret isn't complicated. It's the unique combination of heart pumping cardio and constant resistance. Every single step is a mini battle against gravity. You’re not just moving; you're actively lifting your body weight, forcing your muscles to engage with every push. This isn’t just your average cardio session. Think of it as a low impact strength workout in disguise. Unlike the pounding your joints take from running, the StairMaster offers a smooth, controlled motion that’s much kinder to your knees and ankles while still delivering a high intensity challenge. This blend is why it's a favorite for everyone, from physical therapists to elite athletes. Best Selling Steel Water Bottles A Full Lower Body Workout That continuous climbing motion is a masterclass in activating your lower body. It systematically targets all the major power producing muscles, creating a sculpting and strengthening effect that few other machines can replicate. Here’s a quick look at the primary movers: Glutes: When you drive through your heels on each step, you're directly firing up your gluteus maximus. Quadriceps and Hamstrings: The front and back of your thighs work together to lift your entire body weight, step after step. Calves: These muscles constantly work to provide stability and help propel you upward. By hitting these large muscle groups all at once, you're not just building functional strength, you're also torching a significant number of calories. The real power of a StairMaster workout plan is its dual action nature. You’re building the engine (your cardiovascular system) and strengthening the chassis (your lower body) at the same time, without the wear and tear of high impact alternatives. Boosting Your Aerobic Engine One of the biggest payoffs from sticking with a StairMaster plan is the incredible boost to your VO2 max . This is the maximum amount of oxygen your body can effectively use during intense exercise, and a higher number is a key marker of cardiovascular fitness. Better VO2 max translates directly to improved performance in just about everything, from running a 5k to crushing a demanding CrossFit WOD. Remarkably, the fitness gains from climbing stairs can rival those from more traditional forms of cardio. A landmark trial found that people on a stair climbing program boosted their relative VO2 max by an impressive 20.1% . On top of that, both the stair climbers and a walk/run group lost an average of 2.7 kg of fat mass. This research highlights how effective a solid stairmaster workout plan can be for elevating your endurance. Beyond just strengthening your heart, regular StairMaster sessions are fantastic for your overall vitality. They are one of the best ways to improve blood circulation naturally . The constant demand helps your body deliver oxygen rich blood more efficiently, which is a huge plus for muscle recovery and general health. This powerful trio, muscle engagement, low impact intensity, and profound cardiovascular benefits, is exactly why the StairMaster delivers such incredible results. Progressive 4-Week StairMaster Workout Routines If you want to see real, consistent results from your StairMaster sessions, you need a plan that grows with you. Just climbing at the same speed every time is a surefire way to hit a plateau. That's why I've mapped out these 4-week plans to gradually ramp up the intensity, ensuring you're always building strength and endurance. The whole idea is to start by building a solid aerobic foundation and then start weaving in more intense interval work. This keeps your body adapting and getting stronger. This visual gives you a quick look at how your intensity should build over four weeks, taking you from a steady walking pace all the way to peak performance. As you can see, each week is designed to be a stepping stone to the next, demanding just a little bit more from your muscles and cardiovascular system. Beginner 4-Week StairMaster Plan This plan is your perfect entry point if you're new to the StairMaster. The main goal here is to build foundational endurance and get your body comfortable with the climbing motion. A quick tip: focus on keeping your posture upright and only use the handrails for balance, not to hold yourself up. Week 1: Kick things off with two 15-minute sessions. Stick to a comfortable pace (around Level 3-5 ) where you could still hold a conversation. Week 2: Bump it up to two 20-minute sessions. Keep the level the same; the focus is on extending your time to build stamina. Week 3: Time to add another day. Aim for three 20-minute sessions this week. Increasing your weekly frequency is a great way to accelerate conditioning. Week 4: Push yourself to two 25-minute sessions. For an extra challenge, try bumping the level up by one for the last 5 minutes of each workout. Intermediate 4-Week Plan Once you can handle 25-30 minutes of steady climbing without feeling gassed, you're ready for intervals. By alternating between high intensity bursts and recovery periods, you'll boost your fitness in a big way. Plus, it makes the time fly by. If you're new to this style of training, our guide on 10 interval running workouts to supercharge your speed in 2026 is a great resource. Here’s what a typical interval workout might look like: Warm-up: 5 minutes at Level 4-5 . Workout: Go through 8 rounds of 1 minute at a tough pace ( Level 7-8 ) followed by 2 minutes of recovery ( Level 4-5 ). Cool-down: 5 minutes at Level 3-4 . The real magic of interval training is its efficiency. You can achieve significant cardiovascular improvements in less time compared to longer, slower sessions. It teaches your body to recover more quickly under stress. Advanced 4-Week Plan For seasoned climbers, the game is all about pushing your limits with high intensity interval training (HIIT) and longer endurance climbs. These workouts are tough, so ensure you give your body enough time to recover between sessions. Week 1: Schedule two HIIT sessions and one 30-minute endurance climb. For HIIT, try 10 rounds of 60 seconds at Level 9-11 and 60 seconds of recovery at Level 5 . Your endurance day should be a steady climb at Level 7-8 . Week 2: Stick with two HIIT sessions, but extend your endurance climb to 35 minutes . To up the intensity, shorten your HIIT recovery time to 45 seconds . Week 3: Mix it up with one HIIT session, one pyramid workout, and one 40-minute endurance climb. A pyramid workout involves increasing the level each minute for 10 minutes , then stepping it back down. Week 4: Finish strong with two challenging HIIT workouts (like 30 seconds all-out, 30 seconds rest for 15 rounds ) and one easy 30-minute recovery climb ( Level 5-6 ). To help you visualize how this all fits together, here’s a quick comparison of what a beginner's week might look like compared to an advanced user's. Sample Weekly Schedules By Fitness Level Day of Week Beginner Focus (Example) Advanced Focus (Example) Monday Session 1: 20 min steady climb (Level 4) HIIT Session 1: 25 min (10x 60s hard/60s easy) Tuesday Rest or Active Recovery (Walk) Active Recovery or Strength Training Wednesday Session 2: 20 min steady climb (Level 4) Endurance Climb: 40 min steady (Level 7) Thursday Rest or Active Recovery (Walk) Rest Day Friday Session 3: 20 min steady climb (Level 4) HIIT Session 2: 25 min (15x 30s max/30s rest) Saturday Rest Day Active Recovery (Light jog, stretching) Sunday Rest Day Rest Day This table just shows one possible way to structure your week. The key is to listen to your body and find a schedule that allows for both hard work and proper recovery. The Viral 25-7-2 Workout You might have seen the 25-7-2 StairMaster workout making the rounds online, and for good reason. The plan is simple: climb at level 7 for 25 minutes, twice a week . This routine hits that sweet spot of moderate intensity, aligning perfectly with the American Heart Association’s guidelines for weekly aerobic exercise. For someone weighing around 150 pounds , this type of workout can burn roughly 544 calories per hour , making it an incredibly efficient choice. Mastering Form to Maximize Results and Prevent Injury Any solid StairMaster workout plan is only as good as your form. Getting your movement right is the secret to firing up the right muscles, like your glutes and hamstrings, and protecting your joints. When you nail your technique, the StairMaster becomes a serious tool for sculpting your lower body. To make sure your routine is both effective and safe, mastering proper form is nonnegotiable to prevent sports injuries . The Most Common Form Mistakes to Fix It’s easy to fall into bad habits on the StairMaster, especially when you start to get tired. These common slip-ups will sabotage your results and can leave you with aches and pains. Leaning on the Handrails: This is mistake number one. Gripping the rails and letting your body weight hang forward takes the load right off your legs. You're cheating yourself out of the workout's biggest benefits. Slouching or Hunching: A rounded back and slumped shoulders don't just look sloppy; they can lead to lower back pain. This posture disengages your core, which is your foundation for stability. Pushing Off Your Toes: When you only use the balls of your feet, you're putting all the work into your quads and calves, leaving your glutes and hamstrings out of the equation. Your goal should be to use the handrails for light balance only. Think fingertips resting on them, not a white-knuckle death grip. This forces your core and lower body to do all the stabilizing and lifting. Core Principles for Perfect StairMaster Form Fixing those common mistakes really comes down to focusing on a few key cues. Drill these into your head during every session. Maintain an Upright Posture: Stand tall. Pull your shoulders back and down, keeping them stacked over your hips. Lift your chest and keep your gaze straight ahead. Engage Your Core: Consciously brace your abs throughout the entire workout. A tight core gives you the stability to stay upright and balanced without leaning. Drive Through Your Full Foot: Make sure your entire foot connects with each step. Actively think about pushing through your heels to get that full glute and hamstring engagement. Making these changes might mean you have to dial back the speed or level at first, and that's okay. Prioritizing perfect form over a high number on the display will always give you better, safer results. If you're looking for more ways to keep your body healthy, we have a guide on how to prevent running injuries with tips that apply to almost any workout. Top Rated Workout Socks Bookend Your Workout for Success Never just jump straight into a high intensity climb or hop off the machine cold. A proper warm-up gets your body ready, and a cool down is crucial for recovery. The Essential Warm-Up (5 minutes) Light Cardio: Start with 2-3 minutes of easy climbing on a low level (1-3) to get the blood flowing. Dynamic Stretches: Hop off for some leg swings (forward and side-to-side), walking lunges, and bodyweight squats to open your hips. The Necessary Cool Down (5 minutes) Gradual Slowdown: Spend the last 2-3 minutes of your workout climbing at a very slow pace (Level 1-2) to let your heart rate come down. Static Stretching: Once you're off, hold stretches for your quads, hamstrings, glutes, and calves. Aim for 20-30 seconds on each side to improve flexibility. Choosing the Right Shoes For Your Climb It might sound odd, but the success of your StairMaster workout plan can come down to what's on your feet. It’s tempting to grab your running shoes, but the unique motion of climbing stairs calls for a different kind of support. The right footwear gives you the stability and control you need to climb safely and effectively. Unlike running, where you need plush cushioning to absorb heavy impact, StairMaster workouts are better with a flatter, more stable shoe. This solid base gives you better power transfer as you drive through your entire foot. Key Features for StairMaster Shoes When picking out shoes, you're looking for a specific blend of support, grip, and stability. Think less like a marathoner and more like a weightlifter who needs a solid connection. Firm Heel Support: A snug heel counter is critical. It keeps your foot from sliding, which helps you maintain balance and proper form. Good Traction: Check the outsole for a reliable grip. Those steps can get slick, and good traction ensures your footing stays secure. Stable, Flatter Sole: Stay away from overly soft, squishy soles. A flatter, more rigid sole provides a stable platform, giving you better control and helping to prevent ankle rolls. Choosing the right shoe is foundational to your workout. A stable, less cushioned shoe helps you feel more connected to each step, which directly translates to better form and more effective muscle activation. Why Your Running Shoes Might Not Be The Best Fit Your favorite running shoes feel great because they're engineered with thick, soft cushioning to absorb the shock of your foot hitting the pavement. On the StairMaster, that same plushness can work against you. It creates an unstable surface that can feel wobbly underfoot, compromising your form and making your climb less efficient. For other cardio machines, you might find our article on the best shoes for treadmill running helpful, as it covers a different set of priorities. At the end of the day, wearing breathable workout clothes and the right shoes is a crucial part of setting yourself up for a great session. When you prioritize firm support and solid traction, you’re equipping yourself for a safer, more powerful workout. Bluebird Botanicals Frequently Asked Questions About StairMaster Workouts Even with the best StairMaster workout plan, some questions are bound to come up. Getting those answers sorted is key to staying on track and feeling confident in what you’re doing. How Often Should I Do a StairMaster Workout for Results? This is a big one. For noticeable results, it’s all about consistency. I always tell people to aim for 2-3 StairMaster sessions per week . Make sure to schedule them on non-consecutive days. That rest day in between is when your muscles recover and get stronger. This schedule lines up perfectly with what the American Heart Association recommends for solid cardio work. Is the StairMaster Better Than the Treadmill for Weight Loss? Ah, the classic gym debate. While both are fantastic tools, the StairMaster often gets a slight edge for torching calories and building muscle simultaneously. Why? It all comes down to gravity. With every single step, you are lifting your entire body weight upward. This forces your glutes, quads, and hamstrings to fire up in a way that doesn't happen on a flat treadmill. It’s a powerful combination of cardio and resistance training. To put some numbers on it, the American Council on Exercise estimates a 150-pound person can burn around 272 calories in just 30 minutes on a stair stepper. That’s a serious return on your time. Plus, it's lower impact than running. Can I Build Glutes with a StairMaster Workout Plan? Absolutely. The StairMaster is one of the best cardio machines out there for targeting your glutes. The climbing motion is basically a non-stop series of weighted step-ups, a foundational move for building a strong posterior chain. If you really want to focus on your glutes, dial in your form: Drive through your heels on every step. Don't just tap with your toes. Stand up straight. Avoid the temptation to hunch over and lean on the handrails. You can also add a slight hinge forward at the hips (keeping your back straight!) to increase glute engagement. For the best results, think of the StairMaster as a supplement to your strength training. Pair it with squats, deadlifts, and hip thrusts on your other gym days. Think of the StairMaster as your cardio-based accessory work for glute development. It complements your strength training by adding volume and metabolic stress to the target muscles. What Level Should I Use on the StairMaster? There’s no magic number here. The "right" level depends on your fitness level and workout goal. Your best guide isn't the number on the screen, but how your body feels. This is where the Rate of Perceived Exertion (RPE) scale (a simple 1-10 scale of effort) comes in handy. For steady state cardio: Aim for a level where you can still hold a conversation, but you’re breathing a bit heavy. That’s about a 6-7 RPE . For most people, this will be around Level 4-6 . For HIIT workouts: Your "on" intervals should feel like an 8-10 RPE , a pace you can only hold for a minute or so. Your recovery periods should be way down at a Level 2-4 . That viral "25-7-2" workout uses Level 7 as its sweet spot, but don't feel locked into that. If your form is breaking down, lower the level. The goal is a quality workout, not just hitting a certain number. At Flourish-Everyday , we believe that having the right information and gear is essential for your fitness journey. We are dedicated to helping you find the best athletic shoes and health insights to support your goals. Explore our expert reviews and wellness guides at https://www.flourish-everyday.com .
- Unlock Shoulder Power with Scapular Mobility Exercises for Injury Prevention
Many workout enthusiasts forget how important the shoulder blades are when it comes to upper body fitness. The many muscles and ligaments that are attached to the scapula regulate the cohesion between vital functions of movement and back strength. The scapular mobility exercises are all about improving how your shoulder blades move and function. These aren't just stretches; they're active drills like wall slides and scapular push-ups that strengthen supporting muscles. The goal is to improve the coordination between your shoulder blade and arm, a partnership that's absolutely vital for preventing injuries and hitting your performance goals. Article Index The Hidden Key to Your Athletic Performance How to Check Your Shoulder Blade Mobility at Home The Four Most Effective Scapular Exercises Integrating Scapular Work into Your Weekly Routine How Better Scapular Health Supercharges Your Workouts Got Questions About Shoulder Blade Mobility? References The Hidden Key to Your Athletic Performance Nagging stiffness in your neck and shoulders after a tough workout is often a signal from your shoulder blades (scapulae) that they aren't moving correctly. For runners, cross-trainers, and gym-goers, scapular mobility is a crucial component of athletic performance, influencing everything from lifting power to running form. Understanding the Scapulohumeral Rhythm Your scapula acts as a dynamic platform for your arm. Every time you move, your shoulder blade must glide and rotate in perfect sync with your arm bone (the humerus). This coordination is known as the scapulohumeral rhythm . When this rhythm is off, your shoulder joint compensates, stressing smaller muscles. This is a primary reason for gym injuries. Research shows that a high percentage of individuals with shoulder pain have some form of scapular dyskinesis, a term for faulty movement patterns (Cools et al., 2007). Why Poor Mobility Leads to Pain When shoulder blades get "stuck," the consequences affect your entire upper body. For a broader look, our guide on the top mobility exercises for athletes is a great resource. Here’s how poor scapular function causes common problems: Rotator Cuff Strain: If the scapula is unstable, the rotator cuff muscles work overtime, leading to tendonitis and tears. Shoulder Impingement: Improper upward rotation of the scapula narrows the subacromial space, pinching rotator cuff tendons during overhead movements. Neck and Upper Back Pain: When primary scapular muscles are weak, others like the upper traps and levator scapulae compensate, causing chronic tension and pain. The scapula is the foundation for all arm movements. A weak or immobile foundation forces the rest of the structure to become unstable, leading to inevitable breakdowns and injuries over time. By adding targeted scapular mobility exercises into your routine, you are re-educating your neuromuscular system, teaching the right muscles to fire at the right time. How to Check Your Shoulder Blade Mobility at Home Before starting a new routine, establish a baseline to track progress. These quick, equipment free self checks will highlight your specific limitations, helping you focus on the most beneficial drills. The Wall Angel Test This classic test reveals thoracic spine tightness and limitations in shoulder external rotation. Here's how you do it: Stand with your back flat against a wall, feet about six inches away. Ensure your head, upper back, and glutes are pressed into the wall. Bend your elbows to 90 degrees and raise your arms to shoulder height, pressing the backs of your hands and forearms against the wall. Slowly slide your hands up the wall, keeping everything in contact. If your lower back arches, ribs flare, or elbows and wrists lift off the wall, you've identified an area for improvement. The Overhead Reach Assessment A simple overhead reach assesses scapular upward rotation, which is crucial for lifting and running form. Stand with your back to a wall, ensuring heels, glutes, and upper back are touching. Keep one arm straight and raise it overhead, aiming to touch the wall behind you with your thumb without bending your elbow or arching your back. Pay close attention to compensation. Bending your elbow or arching your back indicates your scapula isn't rotating upward correctly for a full, clean overhead motion. The Wall Push-Up for Scapular Winging This test looks for "scapular winging," where the inner border of the shoulder blade lifts off the rib cage, often indicating a weak serratus anterior muscle. Here’s the setup: Face a wall and place your hands on it at shoulder height. Slowly perform a push-up motion. Have a friend watch or record a video of your back. As you push away, look for any lifting or "winging" of either shoulder blade. Ideally, your scapula should stay flat against your rib cage throughout the movement. Best Selling Workout Gloves The Four Most Effective Scapular Exercises Now that you have a baseline, let's focus on four foundational scapular mobility exercises. We'll emphasize the feel of each movement, proper form, and progressions to challenge you as you get stronger. Scapular Controlled Articular Rotations (CARs) Scapular CARs re-establish the brain shoulder blade connection. The goal is to draw the largest, smoothest circle possible with your scapula, isolating its movement. How to Perform It: Start on all fours, hands under shoulders, knees under hips. Lock your elbows. Without bending your arms, pinch your shoulder blades together (retraction), then push them apart (protraction). Shrug your shoulder blades up toward your ears (elevation), then pull them down your back (depression). Connect these four points into a slow, fluid circle. Aim for 5-8 rotations in each direction. Common Mistake: Bending the elbows. Keep arms locked to isolate the scapulae. Progression: Perform from a high plank position for a greater stability challenge. Regression: Do these standing or seated with arms straight out in front. Wall Slides and Scapula Slides Wall Slides are excellent for training scapular upward rotation and activating the serratus anterior and lower trapezius muscles. For more specific drills, consider exercises like Scapula Slides . How to Perform It: Stand with your back flat against a wall, ensuring your head, upper back, and glutes are in contact. Bring your arms into a "goalpost" position with forearms on the wall, elbows bent at 90 degrees. Slowly slide your arms up the wall, keeping your back, elbows, and wrists pressed firmly into the surface. Feel your shoulder blades rotate upwards and outwards. Hold the top position before sliding back down with control. Common Mistake: Arching the lower back. Engage your core to keep your spine neutral. Progression: Loop a light resistance band around your wrists to engage external rotators. Regression: If you can't keep your arms flat, step away from the wall and perform the motion in open space. Prone Y-T-W-L Raises This sequence strengthens the entire scapular support system, targeting the often-neglected middle and lower trapezius muscles. Targeting the middle trapezius (MT) and serratus anterior (SA) helps correct muscle imbalances linked to shoulder pain, as scapular dyskinesis affects a high percentage of patients with shoulder issues (Cools et al., 2007). How to Perform It: Lie face down. For each letter, lift your arms by squeezing your shoulder blades together and down. Hold for 2-3 seconds. Y: Arms overhead at a 45 -degree angle, thumbs up. T: Arms straight out to your sides, palms down. W: Bend elbows and pull them back, squeezing shoulder blades. L: Arms at your sides, palms facing your body, lift straight back. Common Mistake: Using the lower back to lift. Keep your chest on the floor and initiate from your mid-back. Progression: Hold light dumbbells ( 1-3 lbs). Regression: Perform the sequence without lifting your arms, focusing on the isometric squeeze. Scapular Push-Ups Also known as a "push-up plus," this drill targets the serratus anterior, which holds your shoulder blade flat against your rib cage and prevents "scapular winging." This flowchart illustrates how self assessments can pinpoint specific weaknesses in your shoulder's movement patterns before you begin these exercises. How to Perform It: Get into a high plank or tabletop position with straight arms. Without bending elbows, sink your chest by pinching your shoulder blades together (retraction). Press the floor away, rounding your upper back and spreading your shoulder blades apart (protraction). This is where the serratus anterior works. Research using electromyography has shown how different scapular mobility exercises create specific muscle activation patterns to optimize shoulder rhythm, which is key for creating balance and preventing pain (Ludewig & Cook, 2000). Integrating Scapular Work into Your Weekly Routine The key to lasting change is consistently weaving these exercises into your regular training schedule, tailored to your specific activity. Programming for Runners For runners, posture and arm swing are paramount. Stiff upper backs and immobile shoulder blades lead to inefficient, tense running form. Pre-Run Warm-Up: Spend 3-5 minutes waking up your upper back. Try 1 set of 8-10 Scapular CARs and 1 set of 10 Wall Slides. For more ideas, see our guide on how to warm up before exercise for peak performance . Recovery Days: Use off days for gentle mobility. Light sets of Scapular Push-Ups or Prone Y-T-W-Ls can counteract the hunched posture from long runs. Top Resistance Bands Programming for CrossFitters and Lifters For those lifting heavy, especially overhead, a mobile and stable scapula is essential for movements like the snatch and overhead squat. Pre-Lift Activation: Dedicate 5-7 minutes to activating stabilizers. A great combination is 2 sets of 10 Scapular Push-Ups followed by 2 sets of 8 Wall Slides to prepare your shoulder blades for heavy loads. Clinical trials support this, showing that scapular stabilization exercises lead to significant gains in shoulder range of motion and muscle recruitment (Ellenbecker & Cools, 2010). Programming for General Gym-Goers For general fitness, sprinkle scapular work throughout your week to build a resilient foundation. For general wellness, "little and often" is key. Five minutes of focused work three times a week is more effective than one long session. Here’s a sample week: Upper Body Day: Include Wall Slides and Scapular Push-Ups in your warm-up. Lower Body Day: Perform a set of Scapular CARs between sets of squats or lunges. Rest/Active Recovery Day: Create a mobility flow with 1 set of 10-12 reps of all four key exercises. Scapular Exercise Programming Guide Athlete Type Goal Frequency Key Exercises When to Perform Runner Improve posture & arm swing 2-3x per week Scapular CARs, Wall Slides Before runs & on recovery days CrossFitter/Lifter Enhance overhead stability 3-4x per week Scapular Push-Ups, Wall Slides Before upper-body lifts & on separate mobility days General Gym-Goer Build resilience & prevent pain 3x per week CARs, Push-Ups, Y-T-W-Ls During warm-ups, between sets, & on rest days How Better Scapular Health Supercharges Your Workouts Understanding how scapular mobility exercises directly improve your favorite activities helps make the habit stick. Stable and mobile shoulder blades allow for efficient force transfer, boosting performance. Impact on Strength Training For lifters, a stable scapula is the bedrock of strength. During a bench press, retracting and locking your shoulder blades creates a solid platform, allowing your chest and triceps to generate maximum power. For overhead movements like squats or snatches, proper upward rotation of the scapula is crucial. Without it, the shoulder joint becomes unstable, limiting strength and increasing injury risk. Proper mobility is key to preventing chronic issues; for more on this, see this resource on understanding frozen shoulder treatment . The difference between a failed lift and a new personal record often lies in scapular stability. When they're locked in, your body can focus on moving weight, not fighting instability. Benefits for Runners and Cross-Trainers An efficient arm swing, originating from the smooth glide of the shoulder blades, propels runners forward and maintains balance. Mobile scapulae allow arms to swing freely, reducing tension in the neck and upper back. This means less wasted energy and a more powerful stride. This foundational movement also speeds up recovery, a topic covered in our guide on how to prevent muscle soreness . One study demonstrated that an 8-week program focused on scapular exercises led to significant functional improvements and pain reduction in patients with chronic shoulder pain (Tate et al., 2008). Got Questions About Shoulder Blade Mobility? Here are answers to some common questions about improving scapular function. How Long Until I See Improvement? While many feel better muscle activation immediately, noticeable changes in range of motion typically take 4 to 6 weeks of consistent work (3-4 times per week). Lasting tissue adaptations take time, but you will likely feel improved control and stability much sooner. Can I Do These Exercises With Shoulder Pain? This depends on the type of pain. For sharp, radiating, or persistent pain, consult a physical therapist first. However, for general stiffness or dull aches, these exercises can be very beneficial. The golden rule is to always work within a pain-free range. If a movement causes sharp pain, stop or modify it. Never push through that kind of pain. Are Scapular Mobility Drills Just Stretching? No. While both are valuable, they serve different purposes. Stretching is generally passive, holding a position to lengthen a muscle and increase flexibility. Scapular mobility exercises are active, focusing on improving neuromuscular control and strengthening muscles through their full range of motion. Stretching helps you gain range, while mobility work teaches you how to use that range effectively. How Often Should I Do Scapular Exercises? Consistency is more important than intensity. Aim for 5-10 minutes of focused work, 3-5 days a week . Integrating these drills into your warm-ups is an efficient way to make it a sustainable habit. References Cools, A. M., Witvrouw, E. E., Declercq, G. A., Vanderstraeten, G. G., & Cambier, D. C. (2007). Scapular muscle recruitment patterns: trapezius muscle latency with and without shoulder impingement syndrome. The American Journal of Sports Medicine, 31 (4), 542–549. Ellenbecker, T. S., & Cools, A. (2010). Rehabilitation of shoulder impingement syndrome and rotator cuff injuries: an evidence-based review. British Journal of Sports Medicine, 44 (5), 319-327. Ludewig, P. M., & Cook, T. M. (2000). Alterations in shoulder kinematics and associated muscle activity in people with symptoms of shoulder impingement. Physical Therapy, 80 (3), 276-291. Tate, A. R., McClure, P., Kareha, S., & Irwin, D. (2008). A clinical method for identifying scapular dyskinesis, part 2: validity. Journal of Athletic Training, 43 (2), 165–173. At Flourish-Everyday , we believe a strong, pain-free body is your ticket to a more vibrant life. By weaving smart mobility work into your routine, you’re setting yourself up to run farther, lift heavier, and just move with more confidence. Check out our other resources and find the perfect gear to support your entire wellness journey at https://www.flourish-everyday.com .
- Back Workout At Home: For A Stronger Core
Let's be honest, getting to the gym can be a real hassle some days. The great news is you don't need a fancy commercial gym to sculpt a strong, healthy back. A simple but effective back workout at home is one of the best ways to build foundational strength and fix your posture for good. You can get incredible results with just your body weight or a few key pieces of gear. Building a Powerful Back in Your Living Room This guide is your complete roadmap to crafting a back routine you can actually stick with at home, focusing on movements that deliver real world results. We'll dive into why a resilient back is the foundation for everything, better posture, less pain, and a boost in overall strength. Forget the guesswork; this is your clear plan. The shift to home fitness isn’t just a passing trend. People are fundamentally changing how they approach their health, and the numbers don't lie. Data shows a massive preference for working out at home over hitting the gym. In fact, 52% of U.S. adults now exercise regularly at home, while only 28% do the same at a gym. People who train at home also tend to be more consistent, showing they're over 21% more likely to get their workouts in every week. What This Guide Covers To get you started, here's a quick look at everything we're going to cover: Know Your Muscles for a Smarter Workout: An easy to follow breakdown of the key back muscles you'll be targeting. The Best Back Exercises You Can Do at Home: Detailed instructions for both bodyweight and minimal-equipment movements. Your Weekly At Home Back Workout Plan : Beginner, intermediate, and advanced templates to give your training some structure. How to Warm Up and Cool Down for a Healthy Back: The essential routines you need to prevent injury and help your body recover. Common Questions About Home Back Workouts: Clear, straightforward answers to the questions I hear most often. This approach gives you everything you need to train safely and see progress. If you're just starting to build out your space, you might also want to check out our guide on the essential workout equipment for an epic home gym experience . Your At Home Back Workout Blueprint This table summarizes the fundamental movement patterns you need for a balanced and effective back workout you can do right from your living room. Component Focus Bodyweight Example Equipment Example Horizontal Pull Building back thickness and targeting rhomboids and mid-traps. Inverted Row (using a table) Dumbbell Row Vertical Pull Creating back width by focusing on the latissimus dorsi (lats). Pull-Up (using a doorframe bar) Banded Pulldown Spinal Extension Strengthening the lower back (erector spinae) for stability and posture. Superman Good Morning (with a band) Scapular Retraction Activating the upper back muscles to improve shoulder health. Scapular Push-Up Band Pull-Apart By making sure your workout includes an exercise from each of these categories, you’ll be well on your way to building a strong, functional, and injury resistant back. To really crush your back workout at home, you first need to know what you’re working with. It’s not just about going through the motions; understanding the muscles you're targeting builds a stronger mind muscle connection. That’s the secret to making every single rep count. Forget complicated anatomy charts. Let's break it down to the four key muscle groups that are the foundation of a powerful, functional back. Each one has a specific job to do, and knowing them will change how you train. Resistence Bands The Lats: The Engine for a Wider Back Your latissimus dorsi , or "lats," are the biggest muscles in your back. Picture them sweeping from under your armpits down the sides of your body. These are the muscles that create that classic "V-taper" look, giving you the illusion of a wider back and a slimmer waist. Your lats are your primary pulling muscles. Every time you pull a heavy door open, lift a heavy box off the floor, or do a pull-up, your lats are firing on all cylinders. They are the true workhorses of your back. The Traps and Rhomboids: Your Posture Powerhouse Tucked away in your upper and mid-back are your trapezius (traps) and rhomboids . While your lats build width, these guys are all about building thickness and density. More importantly, they’re your ticket to better posture. The traps are a big, diamond shaped muscle group stretching from your neck down your mid-back. The smaller rhomboids sit right underneath them, connecting your shoulder blades to your spine. Their main gig? Pulling your shoulder blades back and down, an action called scapular retraction . This is the direct antidote to the slumped, desk jockey posture so many of us fight against. Key Takeaway: If you want to stand taller and build a thick, impressive upper back, focusing on your traps and rhomboids is non-negotiable. It's one of the best ways to combat shoulder strain from daily life. The Erector Spinae: Your Core Stabilizer Finally, let's talk about the unsung heroes: the erector spinae . This group of muscles runs straight up along your spine. You might not see them pop like your lats or traps, but they are absolutely critical for a healthy, injury free back. Think of them as the foundational support system for your entire upper body. These muscles are responsible for extending and stabilizing your spine, protecting it during pretty much everything you do. Moves like the Superman or Good Morning are perfect for strengthening this area, building the resilience you need to support all your other lifts safely and effectively. The Best Back Exercises You Can Do at Home Alright, now that you've got the anatomy down, it's time for the fun part, putting that knowledge to work. This is where we build your back workout at home with moves designed to deliver real results, whether you've got a full set of gear or just your own body weight to work with. It can be tough to know where to start, so I've put together a simple decision tree to help you match your exercises to what you really want to achieve. Are you aiming for that classic V-shape, better posture, or rock-solid core stability? This will point you in the right direction. Bodyweight Back Exercises Think you need a rack of weights to build a strong back? Think again. Your own body is one of the most powerful tools you have for developing foundational strength. Superman This exercise is an absolute must for targeting the erector spinae. These are the muscles running right alongside your spine, and they're crucial for good posture and keeping you stable. How to Do It: Lie face down, extending your arms and legs. In one smooth motion, lift your arms, chest, and legs off the floor. Keep your neck in a neutral position, don't crane it up. Squeeze your lower back at the top for a beat, then slowly lower everything back down. Make it Easier: Just starting out? Lift only your arms, or only your legs, to get the feel for it. Make it Harder: Amp it up by holding that top position for longer or adding a tiny pulse at the peak of the movement. Inverted Row When it comes to building back thickness with just your body weight, the inverted row is king. It's fantastic for hitting your lats, rhomboids, and traps all at once. How to Do It: Find a sturdy table or desk you can get under. Grip the edge with both hands, a little wider than your shoulders. Keeping your body as straight as a board from your head to your heels, pull your chest up towards the table. Really focus on squeezing your shoulder blades together at the top, then lower yourself back down with control. Make it Easier: Bend your knees to 90 degrees. This reduces how much of your body weight you're lifting and makes the movement more manageable. Make it Harder: Ready for a challenge? Pop your feet up on a chair or stool. This increases the load and really tests your strength. Pro Tip: As you pull, think about driving your elbows down and back. This little mental cue is a game-changer for making sure your back muscles are firing properly, instead of letting your biceps take over. Minimal Equipment Back Exercises Adding a couple of simple tools like dumbbells or resistance bands can completely transform your back training. With the U.S. home fitness equipment market growing from $4.81 billion in 2022 to an estimated $8.50 billion by 2030, getting your hands on this gear has never been easier. Dumbbell Row This classic dumbbell move is a true powerhouse for building a strong, thick back. It primarily hammers the lats and the muscles in your mid-back. How to Do It: Plant your left knee and left hand on a bench or a solid chair, keeping your back flat and parallel to the floor. Grab a dumbbell in your right hand with your arm hanging straight down. Pull that dumbbell up toward your chest, making sure to keep your elbow tucked in close to your body. Give your back a good squeeze at the top before lowering the weight slowly. Do all your reps on one side, then switch. Make it Easier: Go with a lighter weight or slightly reduce the range of motion until you build more strength. Make it Harder: The answer is simple: increase the weight. You can also add a two-second pause at the top of each rep to really feel the burn. On tough exercises like rows, your grip can sometimes give out before your back does. If that's happening, you might want to find ways to enhance your grip performance so you can push your back muscles to their true limit on every set. Banded Pull Apart This is one of the best, and most overlooked, exercises for fixing your posture. It directly strengthens the smaller, often neglected muscles in your upper back, like the rhomboids and rear delts. How to Do It: Stand with your feet shoulder width apart. Hold a resistance band out in front of you at chest height with an overhand grip, hands also shoulder width apart. Keeping your arms straight, pull the band apart by squeezing your shoulder blades together like you're trying to crack a nut between them. Hold for a second when the band touches your chest, then slowly return to the start. Make it Easier: Use a band with less resistance or simply move your hands further apart on the band you have. Make it Harder: Grab a heavier band or dramatically slow down the movement. Try a 3-4 second count as you pull and another 3-4 seconds as you return. These foundational movements are the perfect starting point for your back workout at home. To see how they fit into a bigger picture, you should check out our guide on the top resistance training exercises to unleash your strength . By mastering these, you’ll be well on your way to building a powerful, resilient back right from your living room. Your Weekly At Home Back Workout Plan Having a list of great exercises is just the start. The real magic happens when you know how to string them together into a smart, consistent plan that actually gets you results. A good routine makes sure you hit all the important back muscles without burning yourself out, giving your body that perfect mix of work and rest to get stronger. Think of this as your blueprint for a solid back workout at home. My goal here isn't just to hand you a workout and send you on your way. It's to give you a framework you can grow with. We'll kick things off with the basics and then I'll show you exactly how to level up. It all comes down to progressive overload , the simple idea of gradually asking more from your muscles over time. That might mean doing more reps, adding another set, or graduating to a tougher exercise. Top Rated Workout Mat The Beginner Back Blast If you're new to this, your entire focus should be on one thing: mastering good form. This isn't the time to go all out. The real win is staying consistent and teaching your body how to move correctly. I've designed this beginner routine to be done 2-3 times per week . Just make sure you have a day off in between, like hitting it on a Monday and Thursday. That schedule gives your muscles plenty of time to recover and come back stronger. Superman : 2 sets of 10-12 reps (Really focus on a slow, controlled lift and give your back a good squeeze at the top.) Inverted Row (with bent knees): 2 sets of 8-10 reps (Make sure you're pulling your chest, not your stomach, toward the table.) Banded Pull Aparts : 2 sets of 15 reps (Keep those arms straight and start the movement by pulling your shoulder blades together.) Glute Bridges : 2 sets of 12-15 reps (This move is clutch for strengthening the muscles that support your lower back.) Take about 60-90 seconds of rest between each set. Once you can nail all the sets and reps with perfect form and it feels pretty manageable, you know it's time to progress. You can either add a third set to each exercise or jump up to the intermediate plan. The Intermediate Back Builder Ready for the next level? The intermediate plan dials things up with tougher exercises and a bit more volume. You've built your foundation, and now it's time to start building some serious strength. Stick with training your back 2-3 times per week . A great way to schedule this is to split your workouts into upper and lower body days, slotting this routine into your upper body sessions. Inverted Row (with straight legs): 3 sets of 10-12 reps Dumbbell Row : 3 sets of 8-10 reps per arm Banded Pull-Aparts : 3 sets of 15-20 reps Good Mornings (bodyweight or with a light band): 3 sets of 12 reps At this stage, try to shorten your rest periods to 60 seconds between sets. This keeps the intensity high. If those dumbbell rows start feeling easy, it's a clear sign you need to grab a heavier weight. Progressive Overload in Action Here’s a real world example. Let's say you're doing dumbbell rows with a 20-pound dumbbell and can hit 3 sets of 8 reps. Your mission for the next couple of weeks is to work up to 3 sets of 10 reps with that same weight. Once you achieve that, grab a 25-pound dumbbell and start back at 8 reps. That’s the cycle of getting consistently stronger. The Advanced Back Attack This one's for those who have put in the work and are ready to really push their limits. The advanced plan uses more complex movements and higher volume to force maximum muscle growth and strength. This is where you find out what you're truly made of. I recommend 2 dedicated back workouts per week at this level. This allows you to go all out during each session while still getting enough recovery time for your muscles to repair and grow. Pull-Ups (or Banded Pull-Ups): 3 sets to failure (as many reps as possible with good form) Inverted Row (feet elevated): 3 sets of 10-15 reps Single Arm Dumbbell Row : 4 sets of 6-8 reps per arm (Go heavy here, but don't sacrifice your form.) Face Pulls (with band): 3 sets of 15-20 reps Your rest time will vary here. For the heavy strength stuff like pull ups and rows, give yourself 90 seconds . For the higher rep exercises like face pulls, keep it tighter at 45-60 seconds . This combo of heavy lifting and higher rep work is an incredible stimulus for growth. Your back workout at home just got a serious upgrade. Sample Weekly Back Workout Templates To help you visualize how this all fits together, here’s a quick breakdown of the different templates. Find the one that matches your current fitness level and use it as your starting point. Level Frequency Core Exercises Sets x Reps Beginner 2-3 days/week Superman, Inverted Row (bent knee) 2 sets x 8-12 reps Intermediate 2-3 days/week Inverted Row (straight leg), Dumbbell Row 3 sets x 8-12 reps Advanced 2 days/week Pull-Ups, Single-Arm Dumbbell Row 3-4 sets x 6-15 reps Remember, these are templates, not rigid rules. The most important thing is to listen to your body, focus on form, and strive for consistent progress each week. That's the real secret to building a strong, impressive back. How to Warm Up and Cool Down for a Healthy Back Your workout doesn't begin with the first pull-up or end after your last set of rows. If you want to build a strong, resilient back for the long haul, especially when doing a back workout at home, smart prep and recovery are nonnegotiable. Skipping these crucial steps is like trying to drive your car on a frosty morning without letting the engine warm up. You might get away with it once or twice, but you're just asking for trouble down the road. With the home fitness market booming from $6.76 billion in 2020 to $9.49 billion post-pandemic, more people are training on their own than ever before. This shift makes knowing how to properly prepare and recover even more critical, since you're your own coach. Top Rated Steel Water Bottles The Dynamic Warm-Up Your Back Needs Let’s get one thing straight: static stretching (the old bend and hold) has no place before you lift. Your pre-workout goal is to get the blood flowing and wake up the very muscles you’re about to train. This is where a dynamic warm-up comes in. These active movements prime your body for what’s ahead. If you really want to prepare your body to prevent injury and maximize performance, take some time to learn how to warm up before lifting . Here are a few of my go-to moves: Cat-Cow: Get on all fours and slowly move between arching your back up like a Halloween cat and then letting your stomach drop toward the floor. Do 10-12 controlled reps to gently get your spine moving. Thoracic Rotations: Staying on your hands and knees, put one hand behind your head. Rotate that elbow down towards your opposite wrist, then open it up toward the ceiling, letting your eyes follow your elbow. Aim for 8-10 reps on each side to loosen up your upper back. Bird Dog: This one is great for firing up your core and the small muscles that keep your spine stable. From all fours, extend your right arm forward and your left leg straight back at the same time. Keep your back flat, no arching! Hold for a beat, then switch. Smart Cool Down Strategies for Recovery Once you’ve finished that last rep, you're not done yet. A proper cool down is your body's off-ramp, helping it transition from high gear back to a resting state. This simple habit helps reduce soreness and actually improves your flexibility over time. This is where static stretching shines. Now that your muscles are warm and pliable, you can hold stretches for longer periods to release tension. Key Insight: Think of your muscles like a rubber band. If you try to stretch a cold rubber band, it might snap. But a warm one? It's much more pliable. That's exactly why we hold stretches after the workout, not before. Try this simple cool down sequence: Child's Pose: From a kneeling position, sit your hips back onto your heels and reach your arms forward, resting your forehead on the floor. You'll feel a great stretch in your lats and lower back. Breathe deep and hold for 30-60 seconds . Knees to Chest Stretch: Lie on your back and pull both knees into your chest, giving them a good hug. You can even rock gently from side to side for a nice little lower back massage. Hold for 30-60 seconds . Foam Rolling: If you have one, a foam roller is your best friend post-workout. Spend a few minutes slowly rolling out your lats (under your armpits), mid-back, and upper back to work out any knots and boost recovery. For a deeper look into the science behind this, check out our complete guide on how to warm up before exercise for peak performance . Make these routines a non-negotiable part of every session, and your back will thank you for years to come. Top Questions About Home Back Workouts How Often Should I Train My Back at Home? For most people, targeting your back two to three times per week is the sweet spot. This hits that perfect balance of providing enough stimulus for muscle growth and strength gains without pushing you into overtraining territory. If you're just starting out, two solid sessions a week is more than enough to build a great foundation. As you get more experienced and your body gets better at recovering, you might bump it up to three. Just make sure you always have at least one full day of rest between those back-focused workouts. Can I Actually Build Muscle Without Heavy Weights? Absolutely. You don't need a barbell loaded with plates to build a strong back. The key principle here is progressive overload , which is just a fancy way of saying you need to consistently challenge your muscles a little bit more over time. Lifting heavier is one way to do that, but it’s far from the only one. At home, you can get fantastic results by focusing on these methods: Increase Reps: Just aim to do one more rep than you did last time. It’s that simple. Add Sets: Once you can comfortably hit your target reps for all your sets, tack on an extra one. Slow Down the Tempo: This is essential. Try a three second lowering phase on a dumbbell row. It dramatically increases the time your muscles are under tension, making the move much harder. Reduce Rest Time: Shaving 15 seconds off your rest period between sets forces your muscles to work harder with less recovery. How Do I Know If I'm Doing an Exercise Correctly? This is probably the biggest hurdle when training alone. Without a coach watching over you, you have to become your own form critic. Your best tool? Your smartphone. Seriously, set up your phone and record your sets from the side. After your workout, watch the playback and compare your form to videos of the exercise being done correctly. Look for the key checkpoints: Is your back flat during rows? Are you pulling your shoulder blades together? This kind of self assessment is crucial for preventing injury and making sure you're actually working the muscles you intend to. Here's a huge tip: Pay attention to where you feel the exercise. During a row, you should feel a strong squeeze in your mid-back, not just a burn in your biceps. If your arms are doing all the work, you need to adjust your form or lighten the load. What If I Feel Pain in My Lower Back? Let's be clear: a little muscle soreness the next day is fine. Sharp or nagging pain during an exercise is not. If you feel pain in your lower back during your back workout at home, stop what you're doing immediately. Pain is your body’s alarm system telling you something is wrong. More often than not, lower back pain during exercises like rows is a sign that your core isn't engaged or you're using momentum to swing a weight that's too heavy. Dial it back. Spend some time strengthening your core with planks and bird dogs, and focus on nailing perfect form with a lighter weight before you even think about moving up. At Flourish-Everyday , we believe a strong, healthy body starts with the right knowledge and the right gear. Whether you're building out your home gym or just looking for the perfect pair of training shoes, we're here to support your journey. Find everything you need to inspire your fitness goals at https://www.flourish-everyday.com .
- Your Ultimate Saucony Kinvara Explainer Guide
For over a decade, the Saucony Kinvara series has been a legend in the running community. It’s that lightweight, neutral shoe known for hitting the sweet spot between responsive cushioning, flexibility, and a real feel for the road. Runners have long relied on it as a versatile daily trainer that can handle just about anything you throw at it, from easy recovery miles to faster tempo days. Women's Saucony Kinvara Your Definitive Guide to a Running Icon Welcome to your complete resource for the Saucony Kinvara. Think of this as your ultimate explainer, where we’ll break down every detail of this beloved daily trainer. We'll look back at its history, see how it evolved, and dig into the tech that makes it tick. Your Guide to This Article Navigate through my in-depth Saucony Kinvara guide using this index. Each section is designed to build your understanding of this iconic shoe. Model History and Evolution Tracing the Kinvara's journey from its first version to the latest release. Key Specs and Technology A deep dive into the numbers: weight, stack height, drop, and materials. Performance and Ride How the shoe actually feels on the run, cushioning, responsiveness, and flexibility. Who is the Kinvara For? Identifying the ideal runner and use cases, from daily training to race day. Competitor Comparisons How the Kinvara stacks up against other popular lightweight trainers. References Choosing the right running shoe is a critical decision for your training and health. Understanding a specific model like the Kinvara is a great start. For broader advice, you might want to check out our expert guide on how to choose running shoes . The Game Changing History of the Saucony Kinvara The Saucony Kinvara didn't just show up; it arrived with a mission and shook up the lightweight trainer category. Before the Kinvara, choices were limited. You either laced up a bulky, high drop shoe or went to the extreme with a barely there minimalist option. The Kinvara burst onto the scene as the perfect middle ground, a shoe many runners didn't realize they needed. Men's Saucony Kinvara Its design captured the feel of the minimalist movement but still packed enough cushion for daily miles. This resonated with runners who wanted a natural ride without giving up protection. What truly set it apart was its groundbreaking 4mm heel-to-toe drop . This was a radical move at the time and quickly became its signature feature. It was so influential that it set a new design standard for the industry, with other brands scrambling to create their own versions. You can dig into Saucony's timeline of sneaker innovations on fatbuddhastore.com . Deconstructing Kinvara Specs And Technology To understand what makes the Saucony Kinvara tick, you have to look at its core engineering. This shoe is built on a foundation of specific numbers that create its signature ride. At its heart is the iconic 4mm heel-to-toe drop . For years, this has been the magic number that encourages a more natural, midfoot strike and gives you a connected feel for the road. The secret sauce, though, is the PWRRUN cushioning . It’s soft enough to absorb impact but firm enough to provide an energetic bounce with every step. Up top, an engineered mesh upper keeps your feet cool and comfortable. This combination of features results in a shoe that feels incredibly nimble and light. If you’re curious how it stacks up against similar options, check out our guide to lightweight running shoes for a deeper comparison. Saucony Kinvara Technical Specifications (Latest Model) For those who love details, here's a quick breakdown of the specs for the latest Kinvara model. Specification Men's Women's Weight 7.5 oz (213g) 6.7 oz (190g) Cushioning PWRRUN PWRRUN Heel-to-Toe Drop 4mm (28.5mm / 24.5mm) 4mm (28.5mm / 24.5mm) Category Neutral Neutral Best For Daily Training, Tempo Runs Daily Training, Tempo Runs The core DNA, the 4mm drop and lightweight design, remains consistent, ensuring that classic Kinvara feel runners expect. How the Kinvara Performs on the Pavement On the road, the Saucony Kinvara offers a ride that balances soft cushioning and a firm, connected feel. It’s not a mushy shoe where your foot sinks in. Instead, it offers just enough padding to take the edge off the pavement, protecting your joints without isolating you from the ground. This creates a nimble and snappy sensation through your entire stride. This balance makes the Kinvara a true daily workhorse in any runner's rotation. It’s a shoe that excels in various situations: Daily Runs: Comfortable enough for all your everyday easy miles. Tempo Workouts: Responsive and light, perfect for picking up the pace. Longer Races: A reliable choice for distances like 10Ks and half marathons. The Kinvara's personality is built on this unique blend of ground feel and protection. To get the most out of your runs, it's smart to maximize your performance training with a solid plan that goes beyond just your shoes. Top Rated Steel Water Bottles How the Saucony Kinvara Stacks Up to Competitors No running shoe exists in a bubble, and the Kinvara has serious competition. It carves out its own space by delivering a balanced, connected to the ground feeling that’s different from many rivals. For example, the Hoka Rincon offers a softer, more rockered ride, focusing on max cushioning. On the other hand, the New Balance FuelCell Rebel gives a bouncier, more energetic pop. The Kinvara plants itself right in the middle. This focus on a pure running experience has worked. The Kinvara line was a huge part of Saucony's record $505 million revenue in 2022, proving its lasting appeal. You can see the brand's performance in their 2022 Wolverine Worldwide annual report . If you want to get into the details of how these shoes differ, our running shoe comparison guide to find your perfect fit can help. Answering Your Top Questions About the Saucony Kinvara Still on the fence? Let's clear up some common questions runners have. First, durability. You can expect to get a solid 300 to 400 miles out of your Kinvaras. This can shift depending on your running style, weight, and the surfaces you run on. When it comes to fit, the Kinvara generally runs true to size . It offers a comfortable, standard width that works for most runners. As for the brand's reputation, Saucony has been in the game a long time. Founded in 1898, they have collected awards for quality for decades. That deep rooted, runner first philosophy, defines the Kinvara. You can learn more about Saucony's long history of innovation on sneakerfreaker.com . Finally, the tried and true Kinvara has stood the test of time and still comes out as one of the best shoes for running. Give it a try and I think you will see why. Have a great run. References "How to Choose Running Shoes: An Expert Guide." Flourish Everyday. Accessed November 2023. https://www.flourish-everyday.com/post/how-to-choose-running-shoes-an-expert-guide "Saucony Sneaker Timeline." Fat Buddha Store. Accessed November 2023. https://www.fatbuddhastore.com/saucony-sneaker-timeline-i198 "A Guide to Lightweight Running Shoes." Flourish Everyday. Accessed November 2023. https://www.flourish-everyday.com/post/a-guide-to-lightweight-running-shoes "Maximize Your Performance Training Programs." OBF Gyms. Accessed November 2023. https://obfgyms.com/maximize-performance-training-programs/ "2022 Annual Report." Wolverine Worldwide. March 2023. https://www.wolverineworldwide.com/wp-content/uploads/2023/03/2022-Annual-Report.pdf "Running Shoe Comparison Guide to Find Your Perfect Fit." Flourish Everyday. Accessed November 2023. https://www.flourish-everyday.com/post/running-shoe-comparison-guide-to-find-your-perfect-fit "A Running History of Saucony Through The Ages." Sneaker Freaker. Accessed November 2023. https://www.sneakerfreaker.com/features/saucony-book-running-history-saucony-through-the-ages
- Asics Novablast 5: The Ultimate Daily Trainer Review
The ASICS Novablast 5 , for men and women, is the shoe everyone in the running world seems to be buzzing about right now. It's quickly earned a reputation as a top-shelf daily trainer that nails the sweet spot between soft, plush cushioning, an energetic ride, and fun. Thanks to some major upgrades like the new FF BLAST™ MAX foam and a more stable platform, this shoe is a big step up from previous versions, built to deliver an awesome experience on all kinds of runs. Table of Contents Why Everyone Is Talking About The Asics Novablast 5 What Makes The Novablast 5 Perform So Well How The Novablast 5 Compares To The Novablast 4 Real World Performance For Every Type Of Run How The Novablast 5 Stacks Up Against Competitors Common Questions About The Asics Novablast 5 References Asics Novablast 5 Why Everyone Is Talking About The Asics Novablast 5 The running shoe market is packed, but every once in a while, one model cuts through the noise. Right now, that shoe is the ASICS Novablast 5 . It's generating serious hype because it masterfully blends comfort and performance into one versatile package. This isn't a one trick pony; the Novablast 5 is a true workhorse, ready to handle your daily miles, long weekend runs, and even pick up the pace when you feel like it. For most runners, the good news is that the Novablast 5 runs true to size. The ASICS Novablast 5 has shot to the top of the charts, becoming one of the most popular daily trainers out there. As the fifth version, it introduces FF BLAST™ MAX foam, which lab tests show delivers landings 38.4% softer than the average running shoe. You can find out more about its best in class features at Running Warehouse . What Makes The Novablast 5 Perform So Well What’s all the buzz about with the Asics Novablast 5 ? To get it, we need to look at the engineering that creates its famously fun ride. This shoe isn’t just a minor tweak; it’s a smart blend of new materials and clever design. The heart of the Novablast 5 is its brand new midsole foam. The shoe is packed with FF BLAST™ MAX cushioning , a super soft and bouncy material that defines its personality. This foam is the star, soaking up impact for a cushioned feel while returning a ton of energy. This is why the shoe feels amazing for long, easy runs and still has enough pop for when you want to pick up the pace. The Upgraded Engine: FF BLAST™ MAX Bringing in the FF BLAST™ MAX foam is the biggest and best change from older versions. This material is lighter and gives more energy back than the FF BLAST™ PLUS ECO foam used in the Novablast 4. ASICS says this new foam bumps up the shoe's "bounce properties" by 8.5%. You can feel that extra spring in your step, making the run feel more propulsive and fun. This new foam gives the Novablast 5 a maximum cushion feel without being heavy or clunky. It hits that sweet spot, offering soft protection for daily miles while keeping a playful pop. Smarter Geometry For A Smoother Ride It's not just about the foam. The shoe's overall geometry is a huge piece of the puzzle. The Novablast 5 has a more refined rocker shape, designed to help your foot roll smoothly from landing to push-off. This design propels you forward, making each stride take a little less effort. ASICS also tweaked the forefoot with a unique pod like groove for an extra push at the end of your stride. A Breathable and Secure Upper The top part of the Asics Novablast 5, the upper, also got a major upgrade with a new premium jacquard mesh. This material is super breathable, keeping your feet cool and comfortable. It wraps your foot in a soft but secure way, moving with you without feeling tight. The reinforced tongue design is another nice touch that locks down the fit, stopping the tongue from sliding around. Top Rated Workout Socks Asics Novablast 5 Technical Specifications This table summarizes the key measurements for both men's and women's models. Specification Men's Women's Heel Stack Height 41.5 mm 40.5 mm Forefoot Stack Height 33.5 mm 32.5 mm Heel-to-Toe Drop 8 mm 8 mm Weight (Approx.) 255 g (9.0 oz) 220 g (7.8 oz) When you put it all together, the bouncy foam, the smooth rolling shape, and the comfy upper, you get a versatile daily trainer that performs incredibly well. How The Novablast 5 Compares To The Novablast 4 When you have a shoe as popular as the Novablast 4, any update is under a microscope. The ASICS Novablast 5 isn't just a minor tweak; it’s a significant evolution that refines the formula while introducing key upgrades that change how it feels on the road. The biggest change is under your foot. ASICS swapped the FF BLAST PLUS ECO foam for their newer, premium FF BLAST MAX foam. This single update gives the shoe a much softer and bouncier ride than its predecessor. A Softer, Bouncier Midsole While the Novablast 4 had plenty of energy, the Novablast 5 takes the cushioning up a notch. The new FF BLAST MAX foam makes landings incredibly plush, a huge plus for easy recovery days or long runs. However, this shift toward softness does change the shoe's responsiveness. Some runners might miss the slightly "snappier" feel of the Novablast 4. The Novablast 5 is all about springy, trampoline-like bounce rather than sharp feedback. Refinements in Fit And Stability ASICS also refined the shoe's upper and geometry. The Novablast 5 has a redesigned premium jacquard mesh that feels more accommodating, especially in the toebox, which is great for wider feet. The shoe's base is also slightly wider, and the aggressive heel bevel from the v4 has been toned down. These tweaks create a more stable, planted feel, addressing minor instability concerns from past versions. Key Differences Asics Novablast 5 vs Novablast 4 Here’s a quick side-by-side comparison. Feature Novablast 5 Novablast 4 Midsole Foam FF BLAST MAX FF BLAST PLUS ECO Heel Stack (Men's) 41.5 mm 41.5 mm Weight (Men's) 255 g (9.0 oz) 260 g (9.2 oz) Ride Feel Softer, bouncier, more cushioned Firmer, snappier, more responsive Upper Premium Jacquard Mesh Engineered Woven Upper Stability More stable platform Slightly less stable The bottom line depends on your preference. If you loved the sharp, responsive pop of the Novablast 4, it’s still a fantastic shoe. But if you’re after a softer, bouncier daily trainer that prioritizes comfort for logging miles, the ASICS Novablast 5 is a clear and compelling upgrade. Tech specs are one thing, but the real test is how a shoe feels on the pavement. The ASICS Novablast 5 is a true workhorse designed for a runner's entire week. Your Go-To For Daily Miles And Long Runs Its main job is to be an exceptional daily trainer. For easy runs, recovery jogs, and long weekend efforts, the Novablast 5 truly shines. The plush FF BLAST MAX foam provides a soft, forgiving platform that absorbs impact, keeping your legs fresher for longer. It's the perfect sidekick for building your aerobic base without beating yourself up. Whether you're doing a quick 30-minute shakeout or a multi-hour long run, the blend of max cushioning and smooth rocker geometry helps you find a natural rhythm. Versatility For Faster Paced Efforts While comfortable, the Novablast 5 has a surprising amount of pop when you pick up the pace. It’s not a racing flat, but it’s more than capable of handling tempo runs, fartleks, and progression workouts. The energetic rebound from the midsole gives a noticeable push-off, making it feel lively when you shift gears. This versatility makes it a valuable addition to any shoe rotation. It bridges the gap between a pure recovery shoe and a speed-day specialist, making it a fantastic all-in-one choice for runners who want one shoe to do almost everything. For more on versatile footwear, check out our guide on running shoes for everyday use . Bluebird Botanicals Support For Cross-Training And Gym Use Thanks to its wider, more stable platform, the Novablast 5 is also a solid option for cross-training and general gym use. It’s not a specialized lifting shoe, but it provides plenty of stability for activities like dynamic warm-ups, bodyweight exercises, and light strength training. For runners pushing their limits, knowing how to speed up muscle recovery is as critical as having the right shoes. This well-rounded capability ensures the Novablast 5 supports your entire fitness journey. Understanding The Novablast 5’s Fit Profile The biggest change to the fit comes from the new premium jacquard mesh upper and a slightly roomier shape. Toebox: You’ll notice the wider toebox, which gives your toes space to splay out naturally. This is a fantastic improvement for anyone with average to slightly wider feet. Midfoot: The gusseted tongue and updated lacing system deliver a secure lockdown, hugging your midfoot comfortably without feeling restrictive. Heel: The heel counter provides a solid, locked in feel. Combined with the wider base, it creates a stable sensation and reduces heel slip. For runners with average or slightly wider feet, the Novablast 5 offers a fantastic, accommodating fit. Those with narrow feet might need to cinch the laces down more to get a perfect lockdown. Tips For Runners With Different Foot Shapes Finding the right fit is personal. For a deeper look at ASICS' sizing, you might want to check out our guide on how ASICS shoes fit in general . For Wide Feet: You'll likely love this update. The extra room in the forefoot should eliminate rubbing and pinching. For Narrow Feet: You may want to use the extra eyelet to tie a runner's knot to lock your heel in snugly. For High Arches: The flexible engineered mesh upper should prevent pressure points, and the secure midfoot wrap provides necessary support. Ultimately, try them on if you can, ideally later in the day when your feet have swollen slightly. The Novablast 5 vs Competitors No running shoe exists in a vacuum. To understand the ASICS Novablast 5, it helps to compare it against other popular daily trainers. The Novablast 5 carves out its own niche with a blend of high stack cushioning and an energetic bounce, hitting a sweet spot between soft landings and a springy toe-off. Novablast 5 vs New Balance FuelCell Rebel v5 The New Balance Rebel line is known for being lightweight and snappy. The Rebel v5 gives you a more direct connection to the ground and an agile feel, making it great for faster daily miles. In contrast, the ASICS Novablast 5 is all about cushion. Its taller stack height and softer FF BLAST MAX foam absorb more impact. If your main goal is protecting your legs and getting a bouncy, forgiving sensation, the Novablast 5 is the clear choice. Think of the Rebel v5 as a nimble speedster and the Novablast 5 as a cushioned cruiser with a playful kick. Novablast 5 vs On Cloudsurfer 2 The On Cloudsurfer 2 is loved for its incredibly smooth, rolling ride from its CloudTec Phase® technology. The experience is often described as fluid and seamless. Where they differ is in energy return. The Cloudsurfer offers a smooth, quiet ride, but the Novablast 5 delivers a more noticeable and lively bounce. If you love that "trampoline" effect, the Novablast 5 will feel more exciting. If you prefer a more subtle, gliding feel, the Cloudsurfer might be a better fit. For more options, our guide on the top running shoes for daily training breaks down even more choices. The Novablast 5 stands out with its unique mix of max cushioning and dynamic energy, making it a top pick for runners who want their daily trainer to be both comfortable and fun. Best Selling Steel Workout Water Bottles Common Questions About The Asics Novablast 5 Let's wrap up with answers to common questions about the Asics Novablast 5. Is The Novablast 5 Good For Beginners? Absolutely. It's a fantastic choice for beginner runners. Its huge amount of cushioning is great for protecting joints as your body adapts to the impact of running. The shoe also has a stable and smooth ride that is incredibly forgiving and encouraging for anyone starting out. How Many Miles Can I Expect From The Novablast 5? While this varies by runner, Asics built this shoe to last. Most runners should comfortably get between 300 to 500 miles (about 480 to 800 kilometers) from a pair of Novablast 5s. The tough AHAR outsole rubber holds up well, and the FF BLAST MAX foam is known for keeping its bounce. Can I Use This Shoe For Walking Or Gym Workouts? For sure. The Novablast 5 is a versatile all around. The plush cushioning makes it an unbelievably comfortable shoe for long walks or being on your feet all day. For the gym, its wider, more stable base is a solid option for most workouts, including general strength training, cardio machines, and fitness classes that don't involve sharp lateral movements. This versatility makes the Asics Novablast 5 a fantastic do-it-all athletic shoe. References ASICS. (n.d.). NOVABLAST 5 . Retrieved from https://www.asics.com Running Warehouse. (n.d.). ASICS Novablast 5 . Retrieved from https://www.runningwarehouse.com/ASICS_Novablast_5/descpage-ANB5M5.html Flourish-Everyday. (n.d.). Running Shoes for Everyday Use: A Practical Guide . Retrieved from https://www.flourish-everyday.com/post/running-shoes-for-everyday-use-a-practical-guide Flourish-Everyday. (n.d.). How Do ASICS Fit: The Definitive Sizing Guide . Retrieved from https://www.flourish-everyday.com/post/how-do-asics-fit-the-definitive-sizing-guide Elemental Edge Health. (n.d.). How to Speed Up Muscle Recovery . Retrieved from https://www.elementaledgehealth.com/blogs/news/how-to-speed-up-muscle-recovery At Flourish-Everyday , we're here to help you find the best shoes and health info for your wellness journey. You can check out all of our expert guides and recommendations at https://www.flourish-everyday.com .
- Finding Your Stride in the Top Light Running Shoes
Welcome to the world of light running shoes, where every ounce shed is a step toward a faster, more agile stride. As we delve deeper into this topic, you will uncover the science behind these materials, the tangible benefits they offer in real world scenarios, and how to select the perfect pair of shoes for your next run or athletic endeavor. Table of Contents Why Runners Are Obsessed with Light Running Shoes What Makes a Running Shoe Fast and Light The Real Performance Benefits and Trade-Offs How to Choose Your Perfect Lightweight Pair Integrating Lightweight Shoes Into Your Training Top Light Running Shoes for Men & Women Health & Wellness: Impact of Shoe Choice Frequently Asked Questions References Why Runners Are Obsessed with Light Running Shoes The appeal of a lighter shoe is simple, it feels faster. Less weight on your feet means less restriction, allowing for a more natural, efficient running motion. This philosophy of minimalism without gutting performance has captured the running community. This guide will break down everything you need to know, from the science behind the design to choosing the right pair for your goals. For direct shoe comparisons, check out our comprehensive top lists for athletic shoes . What Makes a Running Shoe Fast and Light A modern lightweight running shoe is a marvel of engineering, shedding every non-essential gram to maximize speed and efficiency. The "engine" is the midsole, where advanced foams like PEBA (Polyether Block Amide) and super-critical EVA (Ethylene Vinyl Acetate) provide incredible energy return at a minimal weight. Designers constantly chase the perfect balance of energy return and lightness, turning a standard shoe into a tool for speed. Components of a Lightweight Running Shoe Component What It Does Impact on Performance and Feel Midsole Foam Provides cushioning and energy return. Specialized foams like PEBA create a bouncy, efficient ride. Upper Secures the foot to the shoe platform. Thin, engineered mesh offers a breathable, sock-like fit without bulk. Outsole Delivers traction and durability. Strategically placed rubber provides grip while saving weight. Tongue Protects from lace pressure. Often razor-thin and gusseted to lock down the foot without padding. Heel Counter Provides rearfoot stability. Minimalist designs offer just enough security while cutting weight. Carbon Plate (In some models) Adds propulsion. Works with foam to create a spring-like, efficient effect. Understanding Key Shoe Metrics Two key terms to know are heel-to-toe drop and stack height . Drop is the height difference (in mm) between the heel and forefoot. Lighter shoes often have a lower drop (e.g., 4-6mm vs. 8-10mm in standard trainers), which can promote a midfoot strike but may stress the calves. Stack height is the total foam underfoot. Interestingly, many top lightweight racing shoes have high stack heights of super foam to maximize cushioning and energy return, proving that "light" doesn't always mean "low profile." For more, see our educational resources on running technology . Top Rated Steel Water Bottle The Real Performance Benefits and Trade-Offs Light running shoes can significantly improve your running economy , meaning you use less energy to maintain the same pace. This is due to simple physics: less weight to lift with each step allows for a faster leg turnover (cadence), which can shave seconds or minutes off race times. This efficiency boost reduces fatigue and encourages better running form. A Balanced Look at the Trade-Offs However, these gains come with compromises. Cushioning: Less foam is often used to cut weight, which can mean more stress on your joints. Stability: Features like guide rails are often removed, making these shoes less suitable for runners who overpronate. Durability: Lighter materials are less robust. The lifespan of a performance shoe is typically 150-300 miles , compared to 300-500 for a traditional trainer. Lightweight shoes are specialized tools best used for speed workouts and races, not necessarily for every easy recovery run. How to Choose Your Perfect Lightweight Pair Choosing the right pair means matching the shoe's features to your body, goals, and running surface. Define Your Running Goals Racing: Look for models with super foams, aggressive rockers, and perhaps a carbon plate for maximum efficiency. Speed Training: You need a responsive shoe that balances weight, cushioning, and durability for repeat sessions. Faster Daily Training: A lightweight daily trainer offers more cushion and versatility than a pure racing flat. Consider Your Running Surface Road/Track: Shoes need good grip on smooth surfaces, often with targeted rubber on the outsole to save weight. Trails: A light trail shoe requires an aggressive outsole with deep lugs for traction and a more durable upper for protection. When trying on shoes, ensure a thumb's width of space at the end and a secure midfoot feel. To see how specific models perform, explore our comprehensive shoe reviews . Bluebird Botanicals Integrating Lightweight Shoes Into Your Training Transitioning to lightweight shoes requires a gradual approach to allow your body to adapt. Abruptly switching from a high cushion trainer can overload your lower legs and lead to injury. Crafting Your Transition Plan A smart transition involves alternating between your new lightweight shoes and your old trainers. Week 1: One short, easy run (1-2 miles) in the new shoes. Week 2: Two shorter runs, one easy and one with some faster pickups. Week 3: Use them for one full speedwork session (e.g., intervals). Week 4+: Continue using them for faster workouts, gradually increasing the distance. The goal is to build a shoe rotation. Your daily trainer absorbs most of your mileage, while the lightweight pair is reserved for high intensity sessions. A fitness tracker printable can help manage your rotation. Top Light Running Shoes for Men & Women Finding the perfect lightweight shoe depends on your unique needs. Below are top rated models for both men and women, categorized by their best use case. For Men Best for Racing (Marathon): Nike Alphafly 3 - Known for its exceptional energy return from ZoomX foam and dual Air Zoom units, this shoe is a top choice for elite marathoners seeking maximum efficiency. Best for Speed Workouts (5K/10K): Adidas Adizero Adios Pro 3 - Offers a snappy and propulsive ride with its Lightstrike Pro foam and carbon-infused ENERGYRODS 2.0, ideal for shorter, faster efforts. Best Lightweight Daily Trainer: Hoka Mach 6 - This shoe provides a great balance of responsive cushioning and durability for daily miles, featuring a new super critical foam that feels lively underfoot. For Women Best for Racing (Marathon): Asics Metaspeed Sky+ - Designed specifically for "stride" runners, this shoe uses FF BLAST TURBO foam and a carbon plate to help you extend your stride and conserve energy over long distances. Best for Speed Workouts (5K/10K): Saucony Endorphin Speed 4 - A versatile speed trainer with a winged nylon plate that provides pop without the harshness of carbon. It’s a favorite for tempo runs and interval training. Best Lightweight Daily Trainer: New Balance FuelCell Rebel v5 - This model is celebrated for its soft yet bouncy FuelCell foam, offering a fun and energetic ride that works well for daily training and uptempo efforts. Health & Wellness: Impact of Shoe Choice Your choice of running shoes has a direct impact on your biomechanics and overall joint health. Light running shoes, often with a lower heel-to-toe drop, can encourage a midfoot or forefoot strike pattern. This change can reduce impact forces on the knees but may increase the load on the Achilles tendon and calf muscles (2). It is crucial to transition slowly to allow these tissues to adapt. Conversely, traditional high cushion trainers are designed to absorb shock, which can be beneficial for protecting joints, especially on hard surfaces. However, some researchers argue that excessive cushioning can dampen sensory feedback from the ground, potentially altering natural gait mechanics. The key is to find a balance that works for your body. Listen for signals like new aches or pains, as they are often the first sign that your footwear may not be optimal for your biomechanics. Answering Your Questions About Lightweight Running Shoes How Many Miles Do Light Running Shoes Last? A good ballpark figure is between 150-300 miles . In contrast, a heavier daily trainer often lasts 300-500 miles. Always monitor the midsole foam and outsole tread for signs of wear. Can I Use Light Running Shoes for Daily Training? It depends on the shoe and the runner. Many newer lightweight trainers are durable enough for daily use. However, aggressive racing flats are best saved for speed days and races to preserve their responsiveness and prevent injury. A shoe rotation is the ideal approach. Are Light Running Shoes Bad for Beginners? Not necessarily, but beginners should be cautious. Starting with a more supportive, cushioned daily trainer is often safer while building foundational strength. Once a solid base is established, a lightweight shoe can be gradually introduced for shorter, faster runs. References Transparency Market Research. (2023). Lightweight Running Shoes Market - Global Industry Analysis, Size, Share, Growth, Trends, and Forecast, 2024-2034 . Kulmala, J. P., Kosonen, J., Nurminen, J., & Avela, J. (2018). Running in highly cushioned shoes increases leg stiffness and amplifies impact loading. Scientific Reports, 8 (1), 17496. At Flourish-Everyday , we provide the insights and reviews you need to find the perfect footwear for your fitness journey. Explore our expert shoe recommendations and health guides today!
- Top Picks: Best Running Shoes for Plantar Fasciitis for Men for 2026
If you've ever felt that sharp, stabbing pain in your heel or in the bottom of your foot, you know how plantar fasciitis can stop a runner dead in their tracks. I started feeling mine during heavy lifts. Upon examination, I noticed knots on the tendons on the bottom of my feet. They hurt, especially when I was running. For men dealing with this, the best running shoes for plantar fasciitis aren't just a comfort item, they're essential equipment, blending deep cushioning, solid arch support, and a heel that locks you in place. Brands like Hoka, Brooks, and New Balance have really nailed the formula to take the strain off that aggravated tissue, paving the way for pain free miles. Table of Contents Your Guide to Running Comfortably With Plantar Fasciitis Why Plantar Fasciitis Hits Male Runners Differently Essential Shoe Features for Heel Pain Relief In-Depth Reviews of Top Running Shoes for Men * Hoka Bondi 9: The Cushioning King * Brooks Adrenaline GTS: The Supportive Workhorse * New Balance Fresh Foam X 1080 v14: The Soft and Versatile Option Lifestyle Strategies for Lasting Foot Health We Answer Your Most Common Questions References Your Guide to Running Comfortably With Plantar Fasciitis Being sidelined by plantar fasciitis is frustrating, turning a beloved activity into a source of pain. The good news is that your footwear can make a significant difference. Think of your running shoes less as gear and more as a dedicated support system for your feet. This guide gets straight to the point, explaining why specific shoes are non-negotiable for men managing this condition. We'll cover everything from the root cause of heel pain to how you can confidently select the perfect pair. Plantar fasciitis is incredibly common, affecting about 1 in 10 people at some point in their lives, particularly between the ages of 40 and 60 (1). In the U.S., it accounts for approximately two million treatments annually, and runners face a significant injury risk from heel pain (2). This has pushed the global market for medical footwear to new heights. Of course, overall comfort on a run goes beyond your feet. Staying hydrated is vital, and choosing the perfect running water bottle is a key part of that. For broader footwear knowledge, our guide on how to choose running shoes is a great resource. Why Plantar Fasciitis Hits Male Runners Differently Before picking the right shoe, it's helpful to understand what's happening in your foot. Your plantar fascia is a tough, shock absorbing ligament running from your heel to your toes. It supports your arch and is critical for pushing off the ground. Plantar fasciitis occurs when this ligament is overworked, leading to micro tears and inflammation, the source of the pain. That sharp sensation with your first steps in the morning is the fascia tightening overnight and then being suddenly stretched. While it affects everyone, certain factors common among men can escalate the problem. Key Factors for Men Several factors increase stress on the plantar fascia, explaining why the best running shoes for plantar fasciitis for men have specific design features. Higher Body Mass: On average, men carry more weight, which amplifies the force your feet absorb with each stride, straining the plantar fascia. Foot Structure Differences: Men often have flatter, less flexible arches. A flatter arch can lead to overpronation, where the foot rolls inward, which irritates the fascia. Training Habits: Pushing too hard, too fast by ramping up mileage or intensity without proper adaptation is a classic trigger for this overuse injury. These risk factors are why plantar fasciitis is a leading cause of foot pain, impacting adults primarily between ages 25-65 (3). This has helped the global orthopedic footwear market and its growth to an estimated $10.7 billion by 2032 (4). The Wrong Shoes Make Everything Worse Running in worn out or unsupportive shoes worsens the problem. Without proper arch support, cushioning, and heel stability, every step sends shockwaves into the inflamed tissue. The wrong shoes don't just fail to help; they can actively hinder your recovery. A shoe without proper support allows the foot to move in ways that continuously aggravate the plantar fascia. It's not just failing to help; it's actively hindering your recovery by repeating the same harmful movements with every run. Getting this right is foundational. The features we'll discuss, like deep heel cups and solid cushioning, are direct solutions to these biomechanical issues, designed to offload the plantar fascia and allow it to heal. Top Rated Steel Water Bottles Essential Shoe Features for Heel Pain Relief Knowing why your foot hurts is the first step; now, let's talk solutions. Choosing the right running shoe isn't about the price tag but about finding specific features that support your inflamed plantar fascia. Think of the right shoe as a suspension system for your foot, with each feature designed to absorb shock and reduce strain. A combination of body mass, foot structure, and training habits often sets the stage for plantar fasciitis. Let's look at how specific shoe features bring relief. How Shoe Features Alleviate Plantar Fasciitis Symptoms The table below explains what to look for and how each feature directly addresses the causes of heel pain. Shoe Feature How It Helps Primary Benefit Generous Cushioning Absorbs the shock of your foot hitting the ground. Reduces the jarring impact on your heel and arch. Firm Heel Counter Locks your heel securely in place, preventing side-to-side motion. Minimizes pulling and twisting forces on the plantar fascia. Robust Arch Support Prevents the arch from collapsing with each step (overpronation). Distributes pressure evenly across the foot, reducing strain. Higher Heel-to-Toe Drop Elevates the heel slightly, shifting weight forward. Takes direct pressure off the painful insertion point of the fascia. Understanding these components will empower you to choose a shoe that doesn't just feel good, but actively helps you heal. Cushioning That Protects For plantar fasciitis, generous cushioning is nonnegotiable. It's the buffer between your foot and the hard pavement. You need foam that is both soft and supportive. A shoe that feels too soft might be comfortable initially but can strain your arch if it allows your foot to wobble. The goal is balanced, responsive foam. A Stabilizing Heel Counter A firm heel counter is the rigid cup in the back of the shoe that locks your heel down. This stability prevents excessive lateral movement, which can stretch and irritate the plantar fascia. A stable heel reduces torque and pulling forces, allowing the tissue to heal. Robust Arch Support Proper arch support distributes pressure evenly across your foot instead of concentrating it on your heel. It's crucial for preventing overpronation, a major cause of plantar fasciitis. The right shoe should feel like it's cradling your arch, taking tension off the plantar fascia. Many modern neutral shoes offer excellent support through smart midsole design. The Power of a Higher Heel Drop The heel-to-toe drop is the height difference between the heel and the forefoot. A higher drop, usually 8mm or more , can provide significant relief. This elevation shifts weight forward and off your heel, reducing pressure on the most inflamed area of the plantar fascia. Learn more in our guide on what heel-to-toe drop is and why it matters . In-Depth Reviews of Top Running Shoes for Men Let's look at the models known for bringing relief. The best running shoes for plantar fasciitis for men are engineered with the right blend of support, stability, and smart design to take the strain off your heel and arch. My reviews focus on trusted brands with a proven track record. Hoka Bondi 9 Hoka Bondi 9 : The Cushioning King The Hoka Bondi 9 is often the top recommendation for plantar fasciitis because it's a fortress of comfort. Its maximalist cushioning acts like a giant shock absorber. The sheer volume of EVA foam underfoot, with a heel stack height over 40mm , softens every step. Though a neutral shoe, its wide base and flared heel create a stable ride. The meta-rocker geometry also helps your foot roll smoothly through your stride. The Bondi 9's mission is crystal clear: absorb as much impact as humanly possible. If your pain is triggered by the constant jarring of running, this level of cushioning can feel like a miracle. However, the massive midsole can feel bulky, and its low 5mm drop might stress the Achilles if you're not used to it. Still, for pure impact protection, it's unmatched. Brooks Adrenaline GTS Brooks Adrenaline GTS : The Supportive Workhorse If your plantar fasciitis is linked to overpronation, the Brooks Adrenaline GTS is a legendary choice. It offers smart, holistic support without feeling clunky. Its GuideRails technology works like bumpers, gently steering your foot, ankle, and knee into alignment. This reduces the twisting forces that overpronation places on the plantar fascia. Heel-to-Toe Drop: A 12mm drop helps shift weight off your heel. Balanced Cushioning: DNA LOFT foam is a great mix of soft comfort and responsiveness. Firm Heel Counter: The structure holds your heel securely, preventing irritation. The Adrenaline GTS is a fantastic all around, ideal for men who need both cushioning and stability. Men with high arches may also benefit, though our guide on best running shoes for high arches has more specific recommendations. New Balance Fresh Foam X 1080 v14 New Balance Fresh Foam X 1080 v14 : The Soft and Versatile Option For runners wanting a plush feel without sacrificing performance, the New Balance 1080 v14 is a top neutral choice. It's packed with Fresh Foam X, known for its cloud-like softness, making it perfect for recovery days or long miles. While it lacks explicit stability features, its wide base and engineered sidewalls create a secure platform. The rocker shape encourages a smooth stride, easing strain. This shoe hits a sweet spot for neutral runners. However, men needing aggressive arch support should be cautious, as very soft foam can sometimes allow an unsupported arch to collapse. Lifestyle Strategies for Lasting Foot Health The right shoes are a huge step, but they are just one piece of the puzzle. To beat plantar fasciitis for good, you need a holistic approach that includes stretching, strengthening, and smart daily habits. Building a routine that supports your feet even when you're not running can dramatically reduce strain and promote healing. Stretching Routines for Flexibility Tight calf muscles are a major contributor to plantar fasciitis. They pull on your Achilles tendon, which in turn yanks on your heel and overstretches the plantar fascia. A consistent stretching routine is non-negotiable. Calf Stretches: Perform both straight-knee and bent-knee wall stretches. Hold each for 30 seconds , multiple times a day. Plantar Fascia Stretch: Sit and cross one leg over the other. Gently pull your toes back toward your shin until you feel a stretch in your arch. Hold for 15-30 seconds and repeat three times per foot. Strengthening Your Foundation Weak foot and lower leg muscles can lead to poor biomechanics, placing excess stress on your plantar fascia. Strengthening these muscles builds a more stable structure to absorb impact. Simple exercises like towel curls and marble pickups can make a huge difference in building intrinsic foot strength. Just like a strong core supports your spine, strong foot muscles support your arch. These exercises are like physical therapy for your feet, building an internal support system that shoes can only complement. Complementary Tools and Professional Help Other tools can speed up recovery. Orthotics can provide personalized arch support. Night splints are also effective, as they keep the fascia stretched overnight, reducing morning pain. Additionally, a therapeutic foot massage for lasting pain relief can help break down scar tissue and improve blood flow. If pain persists after a few weeks of self care, see a physical therapist or podiatrist for a targeted treatment plan. We Answer Your Most Common Questions Navigating the world of running shoes for plantar fasciitis can be confusing. Here are answers to common questions to help you make a confident purchase. How Often Should I Replace My Running Shoes? A running shoe’s support wears out before it looks old. A good rule is to replace them every 300 to 500 miles . This varies based on your weight and running surface. After thousands of impacts, the midsole foam can no longer absorb shock effectively, which can trigger a flare-up. Keep a simple log of your mileage. If new aches appear, your shoes are likely done. What's The Difference Between Neutral and Stability Shoes? Understanding this is crucial for managing plantar fasciitis. Neutral Shoes: Designed for runners with a neutral gait. They focus on cushioning and flexibility without trying to correct your stride. Many top choices for plantar fasciitis are neutral but have a wide, stable base. Stability Shoes: Built for runners who overpronate (their arch collapses inward). They use features like firmer foam (medial posts) or guide rails to align the foot, reducing stress on the plantar fascia. If overpronation is your issue, a stability shoe is essential. Otherwise, a well cushioned neutral shoe is likely a better fit. Can I Use These Shoes for Walking or Daily Wear? Yes, and you probably should. The features that make these shoes great for running, cushioning, arch support, and a secure heel, are also beneficial for daily activities. Wearing unsupportive shoes day-to-day can undermine your recovery. Consistent support is key. The only catch is that daily wear will wear them out faster. Some people buy two pairs: one for running and another for daily use. References Buchanan, B. K., & Kushner, D. (2023). Plantar Fasciitis. In StatPearls . StatPearls Publishing. Neufeld, S. K., & Cerrato, R. (2008). Plantar fasciitis: evaluation and treatment. The Journal of the American Academy of Orthopaedic Surgeons , 16(6), 338–346. Lopes, A. D., Hespanhol, L. C., Yeung, S. S., & Costa, L. O. (2012). What are the main running-related musculoskeletal injuries? A Systematic Review. Sports Medicine , 42(10), 891-905. Allied Market Research. (2023). Orthopedic Footwear Market by Product Type, Application, and Distribution Channel: Global Opportunity Analysis and Industry Forecast, 2023-2032 . Here at Flourish-Everyday , our mission is to help you lead a healthier, more active life. We create expert reviews and share health insights to back you up on your fitness journey. Find your next pair of running shoes at https://www.flourish-everyday.com .
- The Best Pre-Workout for Cardio to Maximize Your Endurance
Finding the best pre-workout for cardio isn't about chasing the massive energy jolt you'd want for heavy lifting. It’s about finding a smart, sustained fuel source that keeps you going, whether you're logging miles on the road or crushing a high intensity interval session. The right formula helps you push further and longer, all without the dreaded jitters or the post workout crash. This guide will explain different theories and help you navigate the world of efficient fuel sources. Index of Sections Fueling Your Cardio for Peak Performance Why Cardio Demands a Different Kind of Fuel The Core Ingredients That Power Endurance Nailing the Timing for Maximum Impact Choosing the Right Formula and What to Avoid Your Action Plan for Smarter Cardio Fueling Frequently Asked Questions References Fueling Your Cardio for Peak Performance When you're gearing up for a run or a HIIT class, your body plays a different game than it does in the weight room. Cardio is all about endurance, demanding a steady stream of energy to fight fatigue, stay hydrated, and help your heart and lungs work efficiently. Grabbing any pre-workout off the shelf might work against you. The goal isn't a quick explosion of power. It's optimizing your engine for the long haul, which calls for a targeted approach to pre-workout fuel. Understanding the Right Fuel Source The secret is to zero in on ingredients that support aerobic performance, not those designed for a massive muscle "pump." For cardio, you want ingredients that improve oxygen flow and help clear metabolic byproducts that cause muscle burn. Many runners use a simple cup of coffee as their pre-workout. To learn how timing your brew can make a difference, check out this guide on coffee and running . Think of your body as a high performance vehicle. For a long road trip (cardio), you need efficient fuel, not rocket fuel designed for a drag race (heavy lifting). Key Goals of a Cardio Pre-Workout A well designed cardio pre-workout should nail four key things to support your endurance. Remember, food matters just as much; for pre-run meal ideas, our guide on what to eat before running for peak performance has you covered. Sustained Energy Release: Provides a smooth lift without a crash. Enhanced Endurance: Delays muscle fatigue, letting you go longer and stronger. Improved Hydration: Contains electrolytes to replace what you sweat out and prevent cramps. Increased Mental Focus: Keeps your head in the game and maintains motivation. Ultimately, the right supplement acts like a support crew, it helps your body work smarter, not just harder, giving you the edge to push past your limits. Why Cardio Demands a Different Kind of Fuel You wouldn't run a marathon in a dragster. A drag racer is built for a short burst of power, while a marathon car needs efficient fuel for the long haul. Your body works similarly, using different energy systems for lifting weights versus running. Heavy lifting is anaerobic , short, powerful efforts that don't rely heavily on oxygen. Cardio is an aerobic marathon, sustained effort demanding a constant supply of oxygen and fuel. This is why a pre-workout for the squat rack is the wrong choice for your 5k. Anaerobic Power vs. Aerobic Endurance When lifting, the goal is often the "pump," where muscles feel full and tight. This comes from ingredients that boost nitric oxide, widening blood vessels to shuttle more blood into the muscle. It’s great for short term power but isn't what your body needs for a long run. For cardio, priorities are different. Your body needs to deliver oxygen efficiently, stay hydrated, and fight muscle fatigue. Using ingredients for a massive pump can feel counterproductive. Pre-workouts for lifters maximize the pump, which can leave you feeling tight and breathless on a run. For cardio, the goal is efficient blood flow and stable energy, not muscle swelling. When The Wrong Fuel Goes Into Your Engine Restrictive Feeling: Ingredients causing intense vasodilation (the "pump") can make muscles feel tight, which is uncomfortable during repetitive motion. Energy Spikes and Crashes: Aggressive stimulant blends can give you a jolt at the start, only to leave you crashing mid workout. Digestive Upset: Your stomach is already jostled during a run. Heavy formulas can lead to cramps and discomfort. A pre-cardio supplement should be easy on the gut. Fueling for cardio isn't about explosive power; it's about building relentless endurance. It's about ingredients that support steady energy, oxygen use, and hydration from start to finish. Top Rated Steel Water Bottles The Core Ingredients That Power Endurance To pick the best pre-workout for cardio, you must become a label detective. The magic is in specific compounds scientifically proven to boost endurance, delay fatigue, and keep you hydrated. Unlike formulas for heavy lifting, these ingredients are about sustained energy. Think of it like building a high performance engine. Your body is the engine, but different activities, lifting and cardio, require specialized fuel. Key Ingredients for a Cardio Pre-Workout Ingredient Primary Benefit for Cardio Effective Dosage Range Caffeine Delays fatigue, reduces perceived effort, and boosts mental focus. 3–6 mg/kg of body weight (approx. 200–400 mg) Beta-Alanine Buffers lactic acid to fight muscle burn and extend high intensity effort. 2–5 grams Citrulline Malate Improves blood flow and oxygen delivery to working muscles. 6–8 grams Electrolytes Prevents dehydration, supports muscle function, and stops cramping. Varies (look for Sodium, Potassium, Magnesium) Each of these plays a unique role in supporting cardiovascular performance. Caffeine : The Trusted Energizer Caffeine works by blocking adenosine, a neurotransmitter that signals tiredness, which lowers your perception of effort. This allows you to push harder for longer. It's important to understand caffeine's impact on your heartbeats and your personal tolerance. Studies show that doses of 3–6 mg/kg of bodyweight can significantly improve performance. For a 70kg (154 lb) athlete, this is about 210–420 mg of caffeine, which helps spark fat oxidation and spare muscle glycogen. Beta-Alanine : The Fatigue Buffer That intense muscle burn during a sprint is caused by lactic acid buildup. Beta-Alanine is an amino acid that helps your body produce carnosine, a compound that buffers this acid. By neutralizing acid buildup, Beta-Alanine extends the time to exhaustion. This allows you to maintain a higher intensity for longer, which is crucial for improving performance. This is the ingredient responsible for the harmless tingling feeling (paresthesia) some people experience. Citrulline Malate : The Oxygen Superhighway While ingredients that create a massive "pump" can hinder cardio, Citrulline Malate offers a more functional benefit. It boosts nitric oxide levels to promote efficient blood flow and oxygen delivery rather than just muscle swelling. Better oxygen delivery is the foundation of aerobic exercise and directly impacts endurance. If you're serious about improvement, you might be interested in our guide on how to improve VO2 max . Electrolytes : The Unsung Heroes During intense cardio, you sweat out critical minerals known as electrolytes, like sodium, potassium, and magnesium. These are vital for: Maintaining fluid balance to stay hydrated. Supporting muscle contractions and preventing cramps. Regulating nerve function. A cardio pre-workout with electrolytes helps you stay ahead of dehydration and maintain peak function from start to finish. Nailing the Timing for Maximum Impact Having the perfect formula is useless without proper timing. The goal is for the active ingredients to peak in your system when you’re pushing your hardest. For most cardio focused blends, that window is 30 to 45 minutes before you start. This gives your body time to digest the ingredients, allowing compounds like caffeine to reach peak concentration in your blood. Should I Time it Differently for My Workout? Not all cardio is the same, so your timing may vary. For Steady-State Cardio (Long Runs, Cycling): The classic 30-45 minute window is best. This provides a smooth, sustained energy release. For HIIT or Sprints: Aim closer to the 30-minute mark . This ensures you have peak energy ready for the first intense interval. Be your own coach. Start with these guidelines, but pay attention to how you feel. Adjust timing based on your personal experience. How to Avoid Building a Tolerance It’s common to build a tolerance to stimulants like caffeine, requiring more to get the same effect. To keep your pre-workout effective, cycle its use. Reserve it for your toughest sessions or on days you need an extra push. On easier, recovery focused days, skip it. This strategy prevents adaptation and makes the effect more potent when you need it. Choosing the Right Formula and What to Avoid Finding the best pre-workout for cardio is straightforward once you know what to look for. Your goal is a transparent, effective product, not flashy marketing. A good formula will proudly list exactly what’s in it and at what dose. Think of it like reading a nutrition label; transparency is a huge green flag. Best Self-Massage Foam Roller Red Flags to Watch Out For Knowing what to avoid is just as important as knowing what to seek. Proprietary Blends: These lump ingredients under a single name (e.g., "Endurance Matrix") with one total weight, hiding individual doses. This is often a way to under dose expensive ingredients. Excessive Stimulants: For cardio, more is not better. Over 300mg of caffeine is likely to cause jitters and a crash, defeating the purpose of sustained energy. "Pump Focused" Ingredients: Avoid formulas packed with "pump" enhancers like Arginine. They can create a restrictive feeling in your muscles during a long run. A 2024 review of 24 studies found that pre-workout supplements led to a 9% increase in total exercise volume. Runners saw time to exhaustion increase from 17 minutes to 20.1 minutes, an 18% improvement [1]. Build Your Own Simple Cardio Stack For full control, making your own pre-workout is a fantastic option. You don't need a long list of ingredients. A simple DIY stack with a few key compounds lets you tailor doses perfectly to your needs. Your Action Plan for Smarter Cardio Fueling Now, put this information to use. The best pre-workout for cardio is about sustained energy, hydration, and fighting fatigue, not brute strength. This approach helps you fuel every session for success, allowing you to look past flashy labels and pick a supplement that helps you hit your goals. Final Checklist for Choosing Your Supplement Use this quick checklist to make a smart decision: Check the Caffeine Dose: Look for a moderate amount, around 100-200mg , for a boost without the jitters. Look for Endurance Supporters: Seek proven ingredients like Beta-Alanine and Citrulline. Scan for Electrolytes: Ensure sodium, potassium, and magnesium are listed for hydration. Avoid Proprietary Blends: Stick with products that have transparent labels. The right pre-workout can improve cardio and overall body composition. One study found that athletes taking a pre-workout saw a 121% greater increase in fat-free mass than a placebo group over nine weeks [2]. Supplements are only one piece of the puzzle; your meals are also crucial. Learn more in our guide to pre and post workout nutrition for maximum results . Frequently Asked Questions Can I Take a Regular Pre-Workout for Cardio? You can, but it’s not ideal. Most pre-workouts are for heavy lifting, with high stimulants and "pump" ingredients like arginine. For cardio, this pump can feel restrictive. You're better off with a formula built for endurance, focusing on blood flow, hydration, and stamina. Will a Cardio Pre-Workout Make Me Jittery? This depends on the ingredients and your sensitivity. To avoid jitters, look for a moderate caffeine level ( 100-200mg ) or choose a stim free option. Start with half a scoop to assess your tolerance. How Long Before a Run Should I Take My Pre-Workout? The sweet spot is 30 to 45 minutes before your run. This gives your body time to absorb the ingredients so they are at peak levels when you start your workout. Always check the product label for specific recommendations. Here at Flourish-Everyday , we believe proper fueling is the foundation of every great workout. We're here to give you the insights you need to be your best. Check out all our resources to support a healthier, happier you at https://www.flourish-everyday.com . References Jagim, A. R., Harty, P. S., & Tinsley, G. M. (2024). International society of sports nutrition position stand: pre-workout supplements. Journal of the International Society of Sports Nutrition , 21(1), 2383189. https://pmc.ncbi.nlm.nih.gov/articles/PMC11202826/ Ormsbee, M. J., et al. (2013). The effects of pre- and post-exercise consumption of multi-ingredient performance supplements on cardiovascular health and body composition in trained men. Journal of the International Society of Sports Nutrition , 10(1), 39. https://pmc.ncbi.nlm.nih.gov/articles/PMC3851508/
- Are Nike Air Maxes Good Running Shoes? A Guide for Athletes and Sneaker Fans
In today's market, many athletic shoes have become the thing to wear as fashion statements and to convey your lifestyle. While Nike Air Max sneakers have roots in a running revolution, Are Nike Air Maxes good running shoes? Today they are firmly planted in the world of fashion, not serious performance running. Think of them as a stylish cruiser car, perfect for daily cruising, but not for the racetrack. This guide will break down why Nike Air Maxes are better suited for the street than the track and what you should look for in a dedicated running shoe instead. Index of Sections Why Air Maxes Aren't Made for Running Breaking Down the Air Max Design for Athletes How Air Maxes Perform in Real-World Scenarios Where Your Nike Air Max Shoes Really Shine Finding the Right Running Shoe Alternative The Final Verdict on the Air Max Legacy Your Top Air Max Questions Answered References Men's Air Max Excee Why Air Maxes Aren't Made for Running The primary reason Air Maxes fall short for running is their evolution. What began as groundbreaking technology for athletes has been refined for street style and all day walking comfort. This shift created a shoe that looks incredible but lacks the specific features needed to pound the pavement mile after mile. To understand why, it helps to know what to look for in running shoes . A good running shoe balances lightweight materials, energy return, and biomechanical support, qualities that are no longer the top priority for the Air Max line. From Track Star To Style Icon The Nike Air Max line debuted in 1987 with the Nike Air Max 1, the first shoe with a visible Air unit. This innovation, engineered by Frank Rudy, promised exceptional impact protection by trapping pressurized gas to absorb shock, a perfect feature for the 1980s jogging boom. Over the decades, the visible Air unit became more about aesthetics than performance. The focus shifted to plush comfort for walking, resulting in a heavier, bulkier shoe that prioritizes style over speed. Nike Air Max for Running At a Glance Activity Suitability Key Reason Serious Running (5k, 10k+) Not Recommended Too heavy, bulky, and lacks responsive cushioning. Short, Casual Jogs Okay in a Pinch Can work for a mile or two, but not ideal. Treadmill Walking Excellent Comfortable and stable for walking workouts. Cross-Training/Gym Use Good Stable base is great for weightlifting and general fitness. Everyday Casual Wear Excellent This is what they're designed for—style and comfort. As you can see, they're fantastic for almost everything except dedicated running. If you're serious about your fitness, our expert guide on how to choose running shoes is a great place to start. Breaking Down the Air Max Design for Athletes To understand why modern Air Maxes don't work for running, we need to examine their design. The famous visible Air unit acts more like a soft pillow than the springy trampoline a runner needs. The design is built around maximum cushioning , not the energy return critical for performance running. This makes them comfortable for walking but creates a mushy, unresponsive feel when you pick up the pace. Cushioning Without the Spring A proper running shoe uses advanced foams that compress and rebound, propelling you forward. This spring back effect reduces muscle fatigue, allowing you to run farther and faster. The large Air unit in an Air Max, however, primarily absorbs force without providing that critical "snap back." The result is an energy draining experience, like running in sand. For a runner, energy return is everything. The Air Max's focus on plush, all day comfort means it sacrifices the responsive, propulsive qualities that define a true performance running shoe. Weight and Stiffness Issues Another problem is the shoe's construction. Air Max sneakers are built with heavy materials like leather and thick rubber for durability. This robust build adds significant weight, making them feel clunky during a run. They are also surprisingly stiff. Some models require significant force to bend, fighting against your foot’s natural movement. While durable, this rigidity is a major drawback for any runner who needs a flexible shoe. Top rated Workout Socks The Impact of Heel-to-Toe Drop The shoe's geometry also plays a role. Many Air Max models have a large heel-to-toe drop , meaning the heel sits much higher than the forefoot. While great for walking, a high drop can alter a runner's natural gait and strain the knees and hips. Here’s a quick summary of these design flaws for a runner: Weight: Air Maxes are heavier, leading to faster fatigue. Flexibility: They are often stiff, restricting natural foot movement. Cushioning: It’s designed for impact absorption, not the energy return needed for speed. Understanding what heel-to-toe drop is and why it matters for your run is crucial when selecting any athletic shoe. How Air Maxes Perform in Real World Scenarios So, how does the Air Max hold up in practice? For a very short, casual jog, the ample cushioning can feel protective. A new runner might appreciate the impact absorption. But that's where the benefits end. The moment you attempt a faster pace or longer distance, the shoe's bulk and lack of energy return become undeniable, leaving your legs feeling heavy and tired. Performance in Different Fitness Contexts The shoe's design has clear pros and cons depending on the activity. The wide, flat base of an Air Max offers excellent stability for static movements, making it a solid choice for gym workouts that don’t involve extensive running. Weightlifting: The stable platform is perfect for exercises like squats and deadlifts. HIIT Sessions: The cushioning is great at absorbing impact during moves like box jumps. General Cross-Training: For varied workouts with minimal running, their structure provides reliable support. This is why you see them in gyms everywhere. The large air pocket is ideal for shock absorption during intense intervals on hard floors. You can explore the history of this iconic sneaker on goat.com . The Pronation and Stability Problem for Runners While stable for lifting, Air Maxes lack the specialized support runners need. True running shoes often include features to control pronation , the natural inward roll of your foot. Air Maxes offer no such targeted support. Their neutral design is built for cushioning, meaning they won't correct overpronation or provide the structured guidance many runners need to prevent injuries. The stability you feel in the gym from an Air Max is very different from the dynamic support needed for running. A running shoe works with your foot's motion, while an Air Max simply provides a solid, cushioned base. Where Your Nike Air Max Shoes Really Shine Instead of forcing Air Maxes into a role they weren't built for, play to their strengths. They are incredibly versatile assets for an active, stylish life, excelling where all day comfort, stability, and a classic look matter most. Think of them as the ultimate athleisure and lifestyle sneaker . Engineered for all day wear, they are perfect for long city walks, traveling, or spending hours on your feet. The plush Air unit that feels clunky on a run becomes your best friend when standing or walking, keeping fatigue at bay. Excelling in the Gym and Beyond In the gym, the Air Max proves its worth. While not for pavement pounding, its design offers a serious advantage for certain training types. The stability and heavy duty cushioning make it a fantastic choice for many gym based activities. Weight Training: For lifts like squats and lunges, the flat outsole and firm cushioning lock your feet in place, ensuring proper form and safety. Cross-Training: For workouts mixing strength and low impact cardio, they provide a great balance of support and shock absorption. General Fitness Classes: In boot camps or circuit training, their all-around comfort and stability are a major plus. The very features that make Air Maxes a poor choice for running, their weight, stability, and maximalist cushioning, are precisely what make them excellent for lifting weights and cross-training. The Everyday Style Champion Ultimately, the modern Air Max is a fashion icon. Its legendary design is a cornerstone of streetwear and casual style. Pairing them with jeans or joggers is a confident move that blends comfort with a timeless look. By using your Air Maxes for daily wear, long walks, and gym sessions, you’re using them as intended. Finding the Right Running Shoe Alternative Since Air Maxes belong in your casual wardrobe, it's time to find a shoe actually built for running. Performance running shoes are specialized tools where every detail is engineered for performance, comfort, and injury prevention. Choosing the right alternative depends on your needs: a daily trainer, a max cushioned shoe for long runs, or a lightweight option for race day. Air Max vs. Dedicated Running Shoes Let's compare a classic Air Max with a purpose built running shoe like the Nike Pegasus . The contrast is stark. Feature Nike Air Max (e.g., 90/95) Performance Running Shoe (e.g., Nike Pegasus ) Primary Purpose Lifestyle, fashion, casual wear Running performance, training, racing Cushioning Technology Encapsulated Air unit (firm, stable) Responsive foams (React, ZoomX) & Air units Upper Material Leather, suede, heavy synthetics Engineered mesh, knit (light & breathable) Weight 14-16 oz (Heavy) 8-10 oz (Lightweight) Flexibility Stiff, rigid sole Flexible forefoot for natural toe-off Heel-to-Toe Drop 10-14 mm (High) 8-10 mm (Moderate, balanced) Outsole Design Flat, durable rubber for walking Grippy patterns for traction on pavement This table clarifies that every element of a performance running shoe is optimized for running, something an Air Max is not designed to handle. Top Alternatives for Every Runner Here are some top tier recommendations that deliver the features Air Maxes lack. For the Daily Trainer Seeker (Men & Women): Brooks Ghost : A "workhorse" running shoe, the Ghost balances soft cushioning and durability. It’s a neutral shoe offering a smooth ride, ideal for daily miles. Nike Pegasus : A legend in running, the Pegasus is known for its responsive feel and reliable fit, pairing React foam with Zoom Air units for a springy ride. For the Cushioning Enthusiast (Men & Women): Hoka Clifton : A max cushioned option that delivers an incredibly plush yet lightweight ride. It's perfect for long, slow runs or recovery days. Nike ZoomX Invincible Run : Built for maximum cushioning and bounce, this shoe uses Nike's premier ZoomX foam for exceptional energy return and impact protection. Choosing the right running shoe is about matching technology to your personal gait and goals. The difference in performance and comfort between an Air Max and a dedicated running shoe like the Brooks Ghost is felt on the very first step. Even Nike's own performance Air technology has evolved far beyond the classic Air Max. Advanced prototypes with modern Air tech were on the feet of elite runners at the 2023 Chicago Marathon for record setting performances, proving how specialized the technology has become (World Athletics, 2023). For more guidance, check our guide on finding your best running shoe for comfort and performance . The Final Verdict on the Air Max Legacy So, are Air Maxes good running shoes? The answer is a clear no . The Nike Air Max has gracefully transitioned from a running pioneer into a cultural icon. Its legacy is now in fashion and everyday comfort, not on the racetrack. The shoe is a champion of style and versatile fitness, perfect for long walks and gym sessions, just not for a serious runner’s rotation. Using the Right Tool for the Job The core message is simple: celebrate the Air Max for what it is, an outstanding lifestyle sneaker, and grab a dedicated performance shoe for your runs. Using the right footwear for an activity isn’t just about performance; it’s about avoiding discomfort and potential injury. By picking a shoe engineered for running, you're honoring the legacy of the Air Max and your commitment to a healthy journey. It ensures every step, whether on the street or the track, is supported correctly. Ultimately, the Air Max is a testament to a timeless design that has found a new, powerful role. Let it anchor your style, and let a true running shoe power your miles. Customer Recommended Steel Water Bottle Your Top Air Max Questions Answered Let's tackle some common questions to clear up any final doubts about running in Air Maxes. So, Can I Run a 5K in Them? You could physically complete a 5K in Air Maxes, but it's not recommended. For a one-off, casual jog, the cushioning might feel okay. However, their heavy, stiff design will likely make your legs feel fatigued much faster than a real running shoe would. A proper running shoe provides energy return and supports natural foot motion, enhancing comfort and reducing injury risk. Are Some Air Max Models Better for Running Than Others? No. None of the modern Air Max models, be it the 90 , 95 , 97 , or 270 , are built for performance running. They all share the same drawbacks for a runner: they're too heavy, not flexible enough, and lack the responsive technology found in Nike’s dedicated running lines like the Pegasus or Invincible Run. The technology separating a lifestyle sneaker from a true running shoe comes down to purpose. Air Max is a large, soft cushion for low-impact shock absorption, while performance tech like Zoom Air is a responsive system designed to propel you forward. What's the Real Difference Between Air Max and Zoom Air? This is a great question. Think of the Air Max unit like a big, plush pillow designed to absorb shock for all day comfort. In contrast, Zoom Air is a performance system using pressurized air and tightly stretched fibers that snap back on impact. This creates a spring like feeling that provides energy return, pushing you into your next stride, perfect for running. References World Athletics. (2023, October 8). Kiptum smashes world marathon record with 2:00:35, Hassan runs second-fastest woman’s time in Chicago . Retrieved from https://worldathletics.org/competitions/world-athletics-label-road-races/news/kelvin-kiptum-sifan-hassan-chicago-marathon-2023 At Flourish-Everyday , we believe the right gear empowers your journey toward a healthier, happier you. Explore our expert guides to find the perfect shoes for every workout at https://www.flourish-everyday.com .
- Better Recovery: What To Eat After A Workout For Optimal Gains
I have written several articles on this subject. I want to emphasize the importance of what you eat right after a workout. Many people visit their favorite coffee shop or food stall, but after you’ve completed a workout, the single most important thing is to eat a mix of high quality protein and easily digestible carbohydrates. This powerhouse combination works to repair your muscle tissue and replenish the energy stores you just burned through, which speeds up recovery and helps you get the most out of your hard work. Index Why Your Post Workout Meal Is So Important When to Eat After Your Workout Tailoring Your Plate for Your Specific Workout Hydration and Supplements for Enhanced Recovery Your Post Workout Nutrition Questions Answered Putting It All Together for Long Term Success Adapting a Long term Mindset References Why Your Post Workout Meal Is So Important Think of your body after a workout like a construction site. Your muscle fibers have tiny tears, and your fuel tanks, glycogen , are running low. That post workout meal is the supply truck rolling in with materials to repair, rebuild, and refuel. This isn't just about feeling less sore; it's about making your effort count. When you provide the right nutrients, you initiate two critical recovery processes: Muscle Protein Synthesis (MPS): This is where your body uses protein to repair those tiny muscle tears, rebuilding them stronger than before. Without enough protein, this repair job is inefficient. Glycogen Replenishment: Carbohydrates are your body's preferred energy source, stored as glycogen. During your workout, you burn this fuel. Eating carbs afterward refills the tank, ensuring you're ready for your next session. Maximizing Your Efforts The global sports nutrition market, valued at USD 49.60 billion in 2024 , is projected to reach USD 94.30 billion by 2033 for a reason (1). Post workout products are popular because they play a vital role in recovery and performance. Skipping your post workout meal is like building a house without a foundation. You're leaving strength gains, faster recovery, and better long term performance on the table. By refueling strategically, you're not just eating. You're signaling to your body that it's time to adapt, get stronger, and prepare for the next challenge. Your Quick Guide to Post Workout Recovery Nutrients Here is a summary of the essential macronutrients and fluids your body needs after exercise and the role each plays in recovery. Nutrient Primary Role in Recovery Why It's Critical for Results Protein Muscle Repair & Growth Provides amino acids to rebuild damaged muscle fibers stronger. Carbohydrates Energy Replenishment Refills depleted muscle glycogen stores for your next workout. Fluids (Water) Rehydration & Nutrient Transport Replaces fluids lost through sweat and helps shuttle nutrients to cells. Getting these three components right is the bedrock of a solid recovery plan. Your post workout meal reduces muscle soreness, supports muscle growth, and readies your body for the next session, making it a nonnegotiable part of any fitness plan. Protein: The Master Repair Crew Exercise creates microscopic tears in muscle fibers, a necessary part of getting stronger. Protein, with its building blocks called amino acids , steps in to patch up the damage. It rebuilds the fibers slightly thicker and tougher, which is how you build lean muscle and increase strength. For your post workout meal, target 20-40 grams of high quality protein. This provides ample material for the repair crew and kickstarts muscle protein synthesis. For a deeper dive, check out this guide on increasing lean muscle mass . Carbohydrates: The Essential Fuel Source Carbohydrates are the refueling team. Their job is to replenish your body's glycogen stores, the primary energy source for muscles during exercise. After a tough session, these stores are low. Eating easily digestible carbs replenishes them quickly so you're ready for your next workout. The combination is key. Pairing protein with carbs creates a powerful synergistic effect. Carbs cause a small insulin spike, which helps shuttle amino acids from protein into your muscle cells more efficiently, accelerating recovery. Optimizing Your Intake for Results Studies recommend a daily protein intake of 1.4–2.0 grams per kilogram of body weight for active individuals to enhance training adaptations (2). For a 70kg (154lb) person, that’s 100-140 grams of protein spread throughout the day. To capitalize on your workout, eating 20-40 grams of protein with carbohydrates within the post workout "anabolic window", roughly 30 minutes to two hours after exercise, can maximize muscle repair and refill glycogen stores up to 150% faster (3). For convenience, especially if weight loss is a goal, healthy snack bars for weight loss high in fiber and protein can be a great choice. When to Eat After Your Workout You’ve likely heard of the “anabolic window,” a supposed 30-minute period post workout to refuel or lose all your gains. The good news? Modern research shows this window is much larger than we once thought. Think of it less as a closing window and more as a wide open door that stays open for several hours. You don't need to slam a protein shake the second you finish your last rep. Debunking the 30-Minute Myth The 30-minute window concept originated from studies on elite athletes training multiple times a day. For them, rapid refueling is crucial. But for most of us working out once a day, the body is more forgiving. The main goals, restocking glycogen and kickstarting muscle repair, happen perfectly fine even a few hours later. Your muscles remain sensitive to nutrients well beyond that initial half hour. The real takeaway isn't about a ticking clock. It's about ensuring your body gets the building blocks it needs within a reasonable timeframe to recover and adapt. Practical Timing Guidelines for Your Lifestyle When is the best time to eat? Ideally, within a couple of hours. This approach removes stress and makes post workout nutrition a sustainable habit. If you trained on an empty stomach: It's a good idea to eat sooner, preferably within an hour. Your body needs protein and carbs quickly to stop muscle breakdown and start recovery. If you had a pre workout meal: If you ate 1-3 hours before training, your body still has nutrients circulating. You can comfortably wait 1 to 2 hours after your workout to eat. When Immediate Fueling Is a Good Idea While the window is wide for most, there are situations where eating sooner, within 30 to 60 minutes , is smart: You're a two-a-day athlete: If another session is less than eight hours away, quick carb intake is critical. You are a competitive endurance athlete: After a long event like a marathon, immediate refueling speeds up the massive recovery process. Your goal is maximum muscle growth (hypertrophy): Some evidence suggests getting protein in sooner might provide a slight edge in optimizing muscle protein synthesis. Don't let perfect timing become the enemy of good nutrition. The most important thing is consistently eating a quality meal with protein and carbs after you train. Tailoring Your Plate for Your Specific Workout Just as training plans differ, your post workout meal should match your activity's demands. To maximize recovery, you must tailor your plate to replenish what you've used and repair what you've broken down. The more intense and glycogen depleting the workout, the more carbs you need. The more you focus on breaking down muscle, the greater the emphasis on protein. The key takeaway is that a balanced meal within a couple of hours is effective for most people's recovery. Fueling for Endurance Athletes For runners, cyclists, or swimmers, the top recovery goal is glycogen replenishment . Your post workout meal should be carbohydrate heavy, to refill energy tanks. Protein is still important, but your main focus is easily digestible carbs. Aim for a carb to protein ratio of about 3:1 or 4:1 . Recovering from Strength and Gym Workouts For those lifting weights to build muscle, the priority shifts. Carbs are needed to restore energy, but protein takes center stage . Your goal is providing amino acids to repair muscle micro tears, which triggers growth. After a heavy lifting session, a meal with at least 25-40 grams of high quality protein is non-negotiable to kickstart muscle protein synthesis. Refueling After CrossFit and Cross-Training CrossFit and other high intensity workouts demand both endurance and power, draining glycogen and causing significant muscle breakdown. Your recovery meal needs a solid helping of both carbohydrates and protein . Quick options like whey protein shakes (often 25 grams per serving) are effective. It's no surprise that many athletes add BCAAs and electrolytes to help reduce soreness. To help you put this all together, here’s a quick guide. Post Workout Meal Ideas by Activity A comparison of ideal post-workout meal components for different types of workouts. Activity Type Primary Recovery Goal Example Meal Idea Example Snack Idea Endurance (Running, Cycling) Glycogen Replenishment A large bowl of a healthy grain with milk, banana, berries, and a spoon of almond butter. A fruit smoothie made with Greek yogurt and a little honey. Strength Training (Lifting) Muscle Repair & Growth Grilled chicken breast or salmon with a roasted sweet potato and a side of broccoli. A cup of cottage cheese or Greek yogurt with a handful of nuts. CrossFit/Cross-Training Glycogen & Muscle Repair A quinoa bowl with black beans, corn, avocado, and shredded chicken or tofu. Chocolate milk for its ideal carb-to-protein ratio. By aligning your meal with your workout, you ensure your body gets what it needs to recover strong. For more tips, check out our guide to pre and post workout nutrition for maximum results . Hydration and Supplements for Enhanced Recovery While protein and carbs are cornerstones of post workout nutrition, hydration and smart supplementation are also crucial. Food is only part of the puzzle; fluids and key supplements can boost recovery. Think of hydration as the delivery driver for nutrients, shuttling them to your exhausted muscles. Rehydrating for Optimal Recovery Even slight dehydration can slow muscle repair. A good rule is to drink 20 to 24 ounces of water for every pound of body weight lost during your workout (4). You can learn more with these hydration tips for athletes . For most workouts, water is perfect. After long or very sweaty sessions, a drink with electrolytes can replenish minerals like sodium and potassium. Navigating the World of Supplements The supplement aisle can be overwhelming, but a few key players have proven benefits. The post workout supplement market is enormous, projected to reach USD 138.48 billion globally by 2033 , with protein products making up over 50% of the share (5). Let’s focus on two effective options: Protein Powders ( Whey , Casein , Plant-Based ): These offer a convenient way to get a quick, high quality dose of protein. A shake is easy to digest and perfect when you can't get to a full meal right away. Creatine Monohydrate : One of the most studied supplements, creatine helps muscles replenish their immediate energy supply, improving performance and supporting strength gains over time. A key insight to remember is that supplements are meant to supplement a healthy diet, not replace it. Prioritize whole foods first and use supplements as a tool to fill gaps or for convenience. Supplements aren't required for great results, but they can offer a helpful boost when used correctly. Your Post Workout Nutrition Questions Answered Let’s tackle some real world questions about post workout eating. Life is busy, and things aren't always perfect. Here are straightforward answers to help you fuel your body right. Do I Need a Big Meal After Yoga or a Light Walk? No. Recovery needs are tied to workout intensity. For lower intensity activities like gentle yoga or a brisk walk, your body isn't tearing down muscle or burning massive amounts of glycogen. After light exercise, focus on hydration . Drink some water and eat your next planned meal. There's no need for a special post workout snack if you aren’t hungry. Can a Protein Shake Replace a Real Meal? Protein shakes are convenient but shouldn't regularly replace whole food meals. Think of a shake as a tool for when you're in a rush. It provides a quick shot of protein to start the repair process. However, a real meal offers more: Micronutrients: Foods like chicken and broccoli are packed with vitamins, minerals, and fiber not found in most shakes. Satiety: A proper meal keeps you feeling full longer than a liquid shake. Energy: Whole foods provide a complex mix of carbs and fats for sustained energy. The supplement industry is massive for a reason; you can learn more about these post workout supplement market trends yourself. But remember, these products support a good diet, not replace it. Think of shakes as a convenient bridge to your next meal, not the final destination. A solid, well rounded diet is always the foundation. What Should I Eat After a Late-Night Workout? For late night workouts, you need to refuel without disrupting sleep. Go for something light, easy on the stomach, and focused on recovery nutrients. Avoid big, fatty, or carb heavy meals. A smaller snack with protein and some carbohydrates is ideal. Smart Late Night Post Workout Snack Ideas: A small bowl of Greek yogurt with a few berries. A glass of low fat chocolate milk. A scoop of casein protein mixed with water or milk (casein digests slowly, ideal for overnight recovery). A piece of fruit with a handful of almonds. This approach gives your muscles protein for overnight repair without weighing you down. Customer Recommended Steel Water Bottles Putting It All Together for Long Term Success Proper post workout nutrition works best as part of a bigger picture that includes consistent training and quality rest. Your workout is the spark, nutrition provides the materials for repair, and rest is when growth happens. Neglecting any of these will lead to a plateau. The Core Principles of Smart Recovery Let's recap the most important takeaways: Prioritize Protein and Carbs: This is the nonnegotiable cornerstone of recovery. Time It for Your Lifestyle: A solid meal within a couple of hours after a workout is perfect for most people. Always Stay Hydrated: Water is critical for nutrient transport and waste removal. When you view food as a fundamental part of your fitness journey, you can recover faster and achieve the results you're working for. The goal isn't perfection; it's consistency. Your best post workout meal is the one you can stick with day after day. This steady effort builds momentum and delivers lasting change. Adopting a Long Term Mindset Ultimately, knowing what to eat after a workout is about empowering yourself. It’s about understanding what your body needs and making choices that support your goals. When you see food as an essential tool for recovery and performance, everything changes. This mindset shift helps you stay motivated, listen to your body, and move closer to your fitness goals. You will, after time, know what foods your body prefers and improves on and which foods slow you down. Try different types of carbs and proteins to find your optimal foods. Be well. At Flourish-Everyday , we believe a healthy lifestyle is built on smart choices, from the shoes on your feet to the food on your plate. We provide the information and recommendations you need to support every aspect of your fitness journey. Explore our resources to empower a healthier, happier you at https://www.flourish-everyday.com . References Research and Markets. (2024). Sports Nutrition Market - Global Industry Analysis, Size, Share, Growth, Trends, and Forecast 2024-2033 . Jäger, R., Kerksick, C. M., Campbell, B. I., et al. (2017). International Society of Sports Nutrition Position Stand: protein and exercise. Journal of the International Society of Sports Nutrition, 14 , 20. Aragon, A. A., & Schoenfeld, B. J. (2013). Nutrient timing revisited: is there a post-exercise anabolic window?. Journal of the International Society of Sports Nutrition, 10 (1), 5. American College of Sports Medicine. (2007). ACSM Position Stand: Exercise and Fluid Replacement. Medicine & Science in Sports & Exercise, 39 (2), 377-390. Data Insights Market. (2024). Post-Workout Supplements Market Report .